


When you head to the Fog Tower on the map in Gothic 1 Remake as part of The Stranger quest, you will get a strange book, putting you on a route to grab all the books under its name.
The books share the same name, but the location for each one is different, and some require the completion of certain quests to access the area of these special books. As you make your way through the locations for the Chromanin books, you will come across skeletons, golems, and, most difficult of them all, maze-like routes to the secret place.
Here, I have put up the map location details for each of the 6 Chromanin books, and what to expect on your way to these collectibles.
All Six Chromanin Books in Gothic 1 Remake
The Stranger quest is part of the main storyline and begins once we take the first Chromanin Book in the game. The first one is the most difficult one to obtain compared to the rest.
About Chromanin Book Spawns
The remake of Gothic carries the same game structure as the original when it comes to Chromanin book spawns. In short, when you do come across a book, make sure to read each one before moving to the next one.
Note: If you don’t read Chromanin book number #1, Chromanin book number #2 will not spawn in the game. Just open the book for a few seconds before closing it.
The books don’t have a specific name tied to them; they are just Chromanin books. The content inside each book will differ, unlike the cover and description.
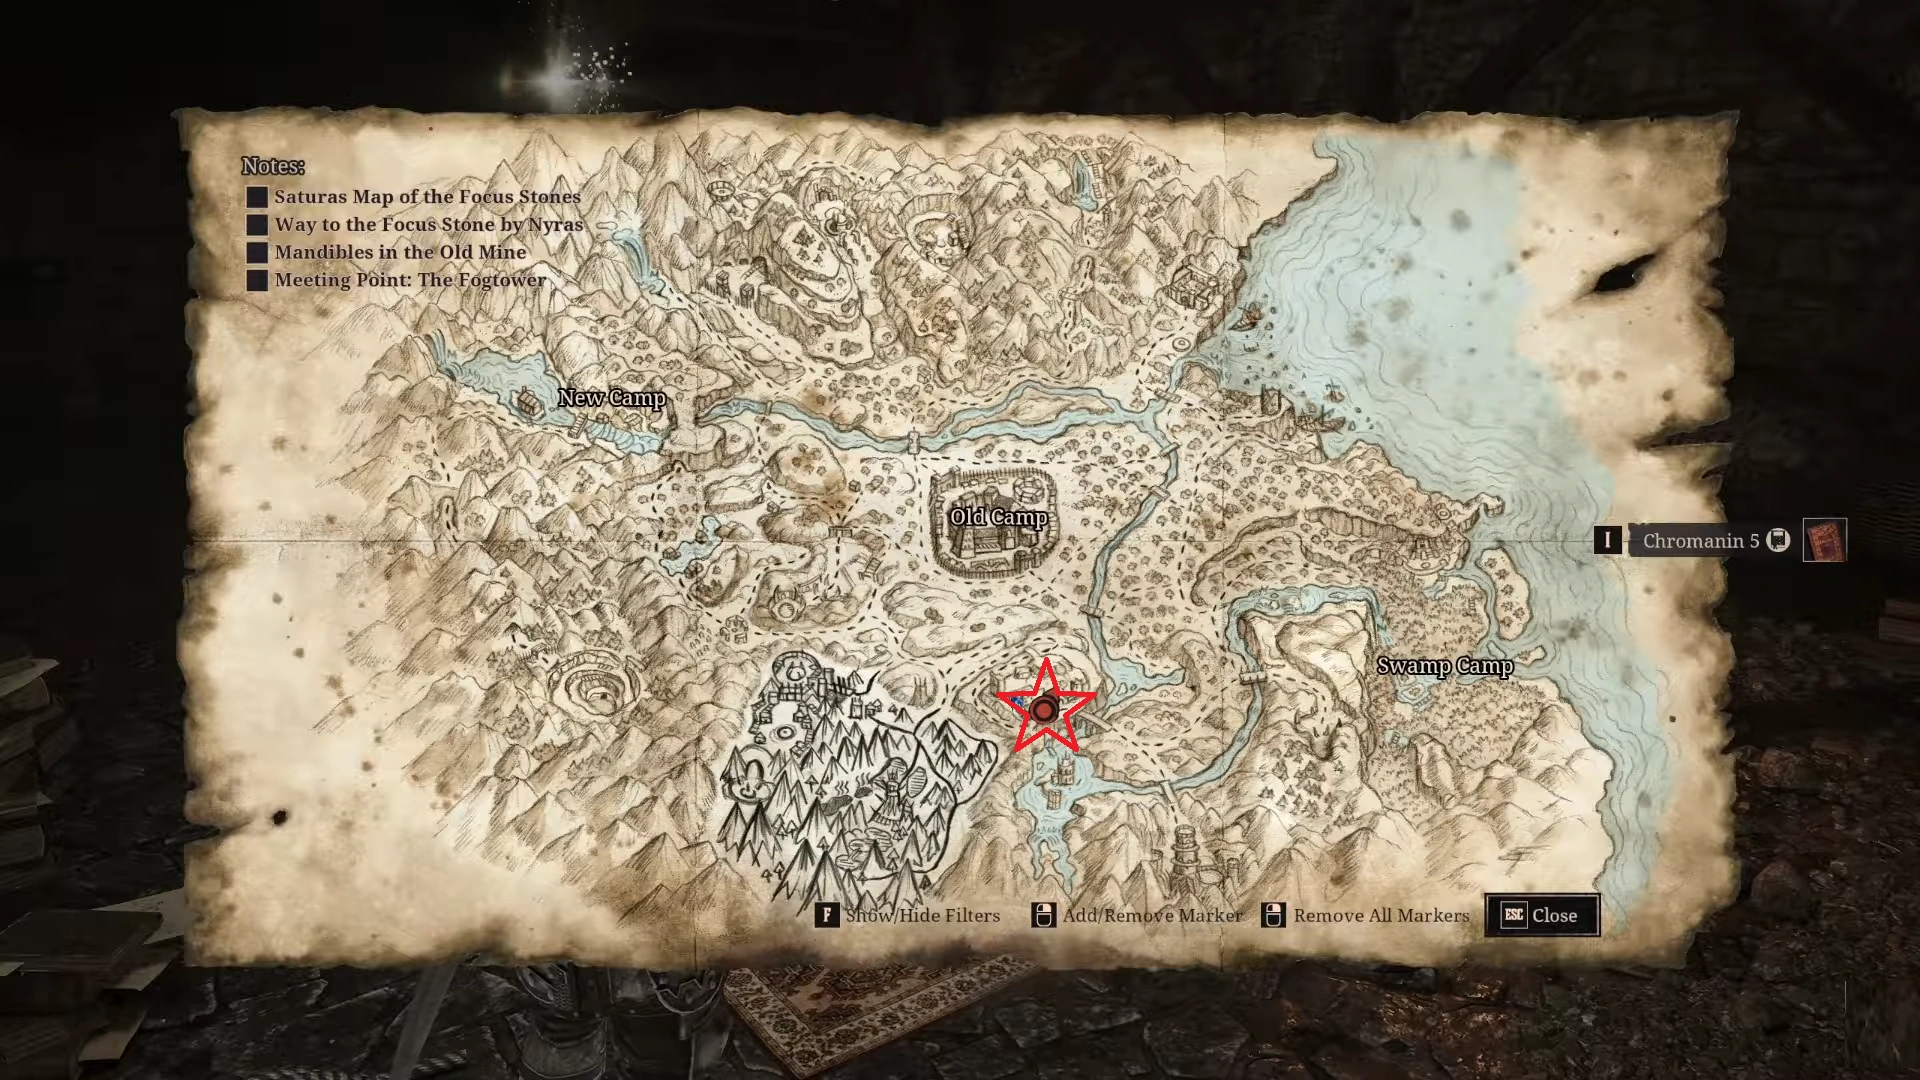
Chromanin Book #1 | Fog Tower
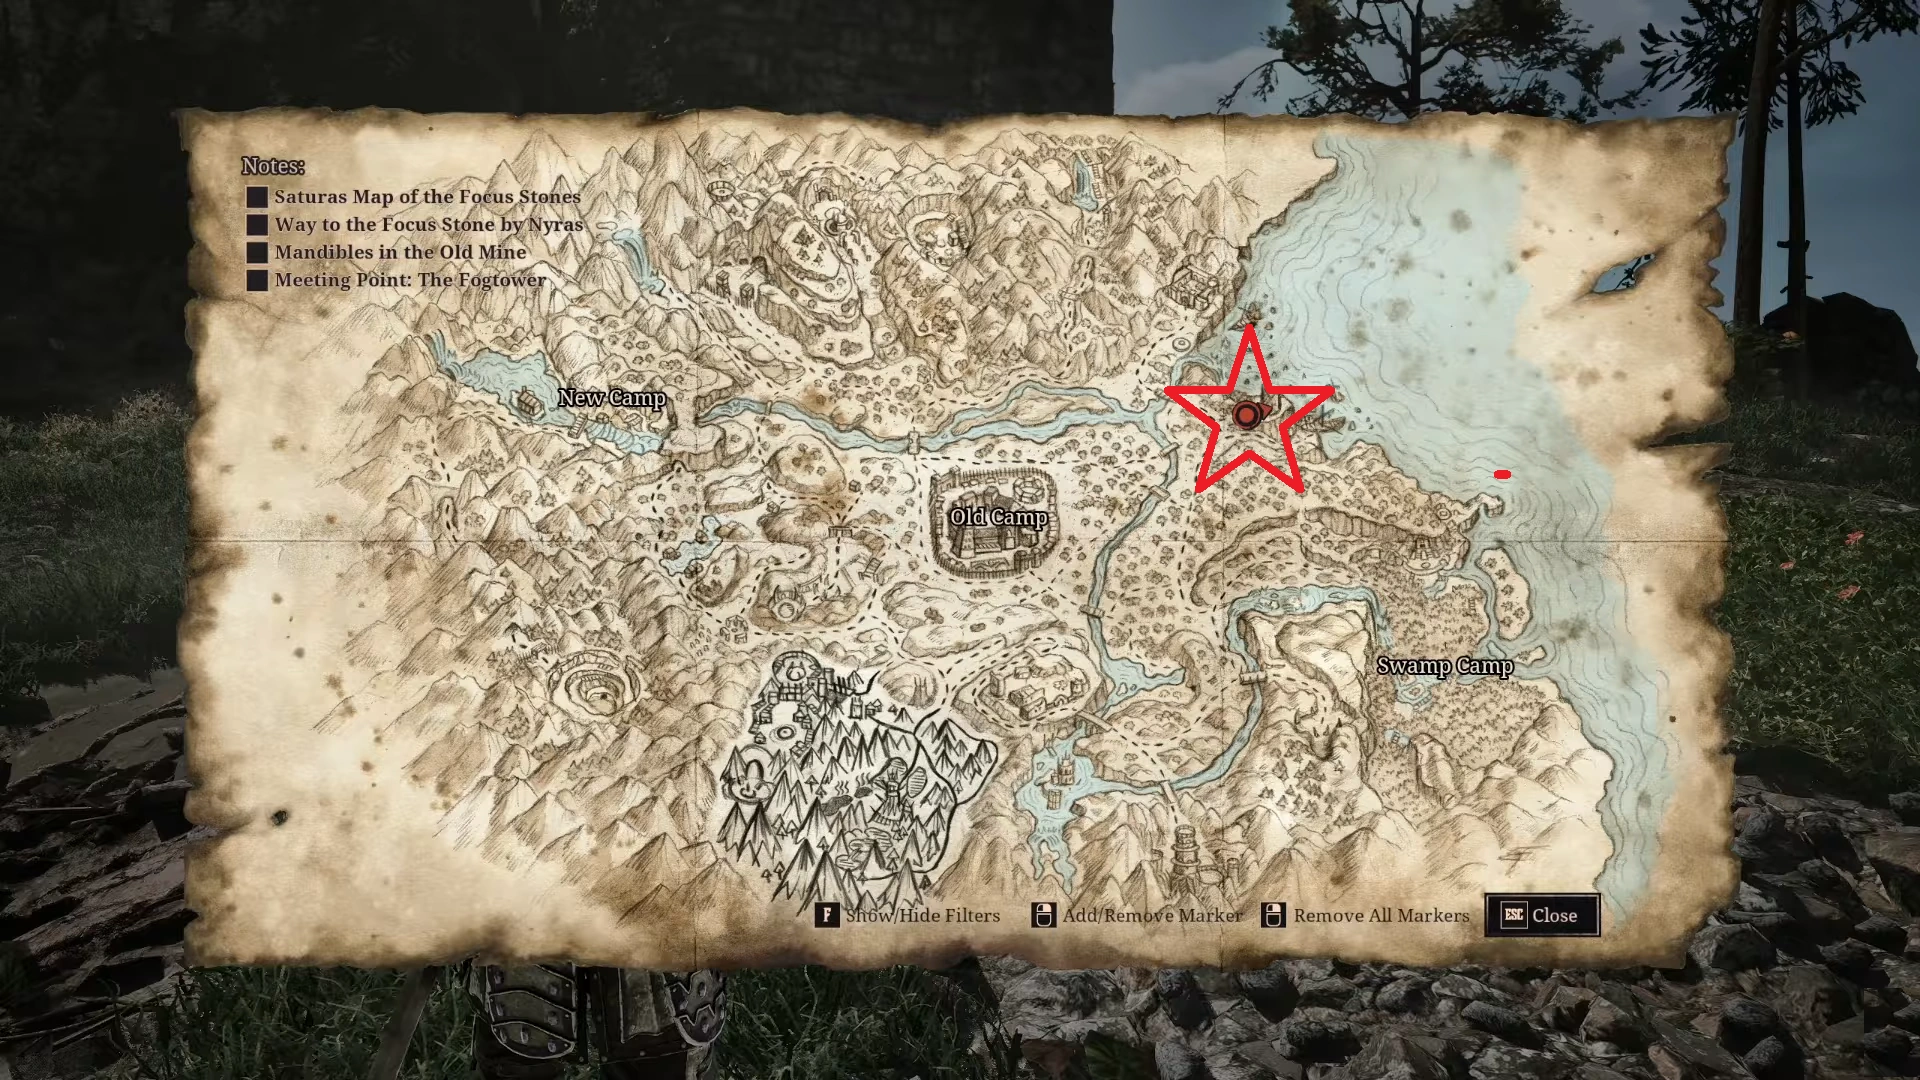
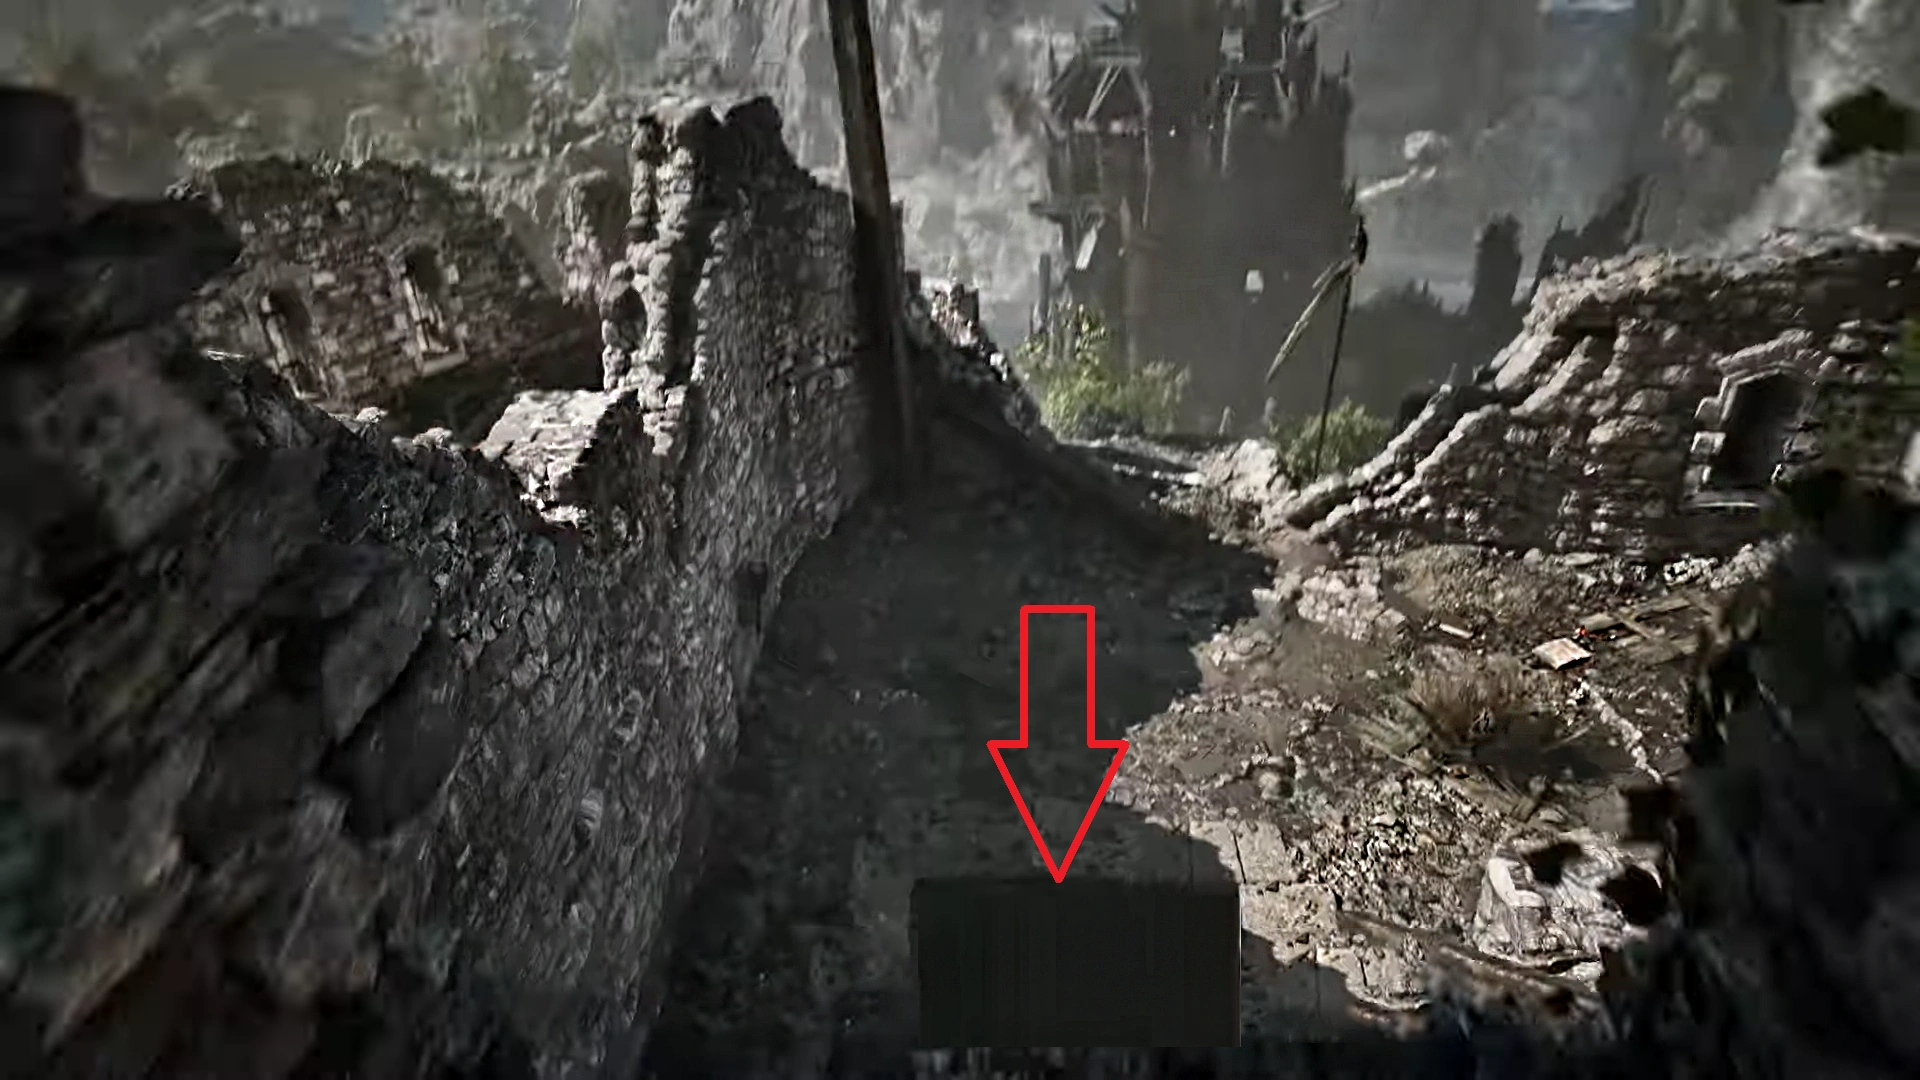
The first Chromanin book is found in the corpse of Skeleton Mage inside the crypt in the Fog Tower. Compared to the others on the list, this one will be the most complicated because of the crypt’s layout. Since we are heading into a crypt, it’s better to carry some torches with you at all times.
Head northeast of Old Camp to get to the Fog Tower. Once you are in the tower, open the entrance door to get inside. Now, take the spiral stairs to get to the basement. You will find a ladder in the middle of the room, drop down to enter the crypt. The crypt is packed with skeletons – lure them out, and defeat them before moving deeper.
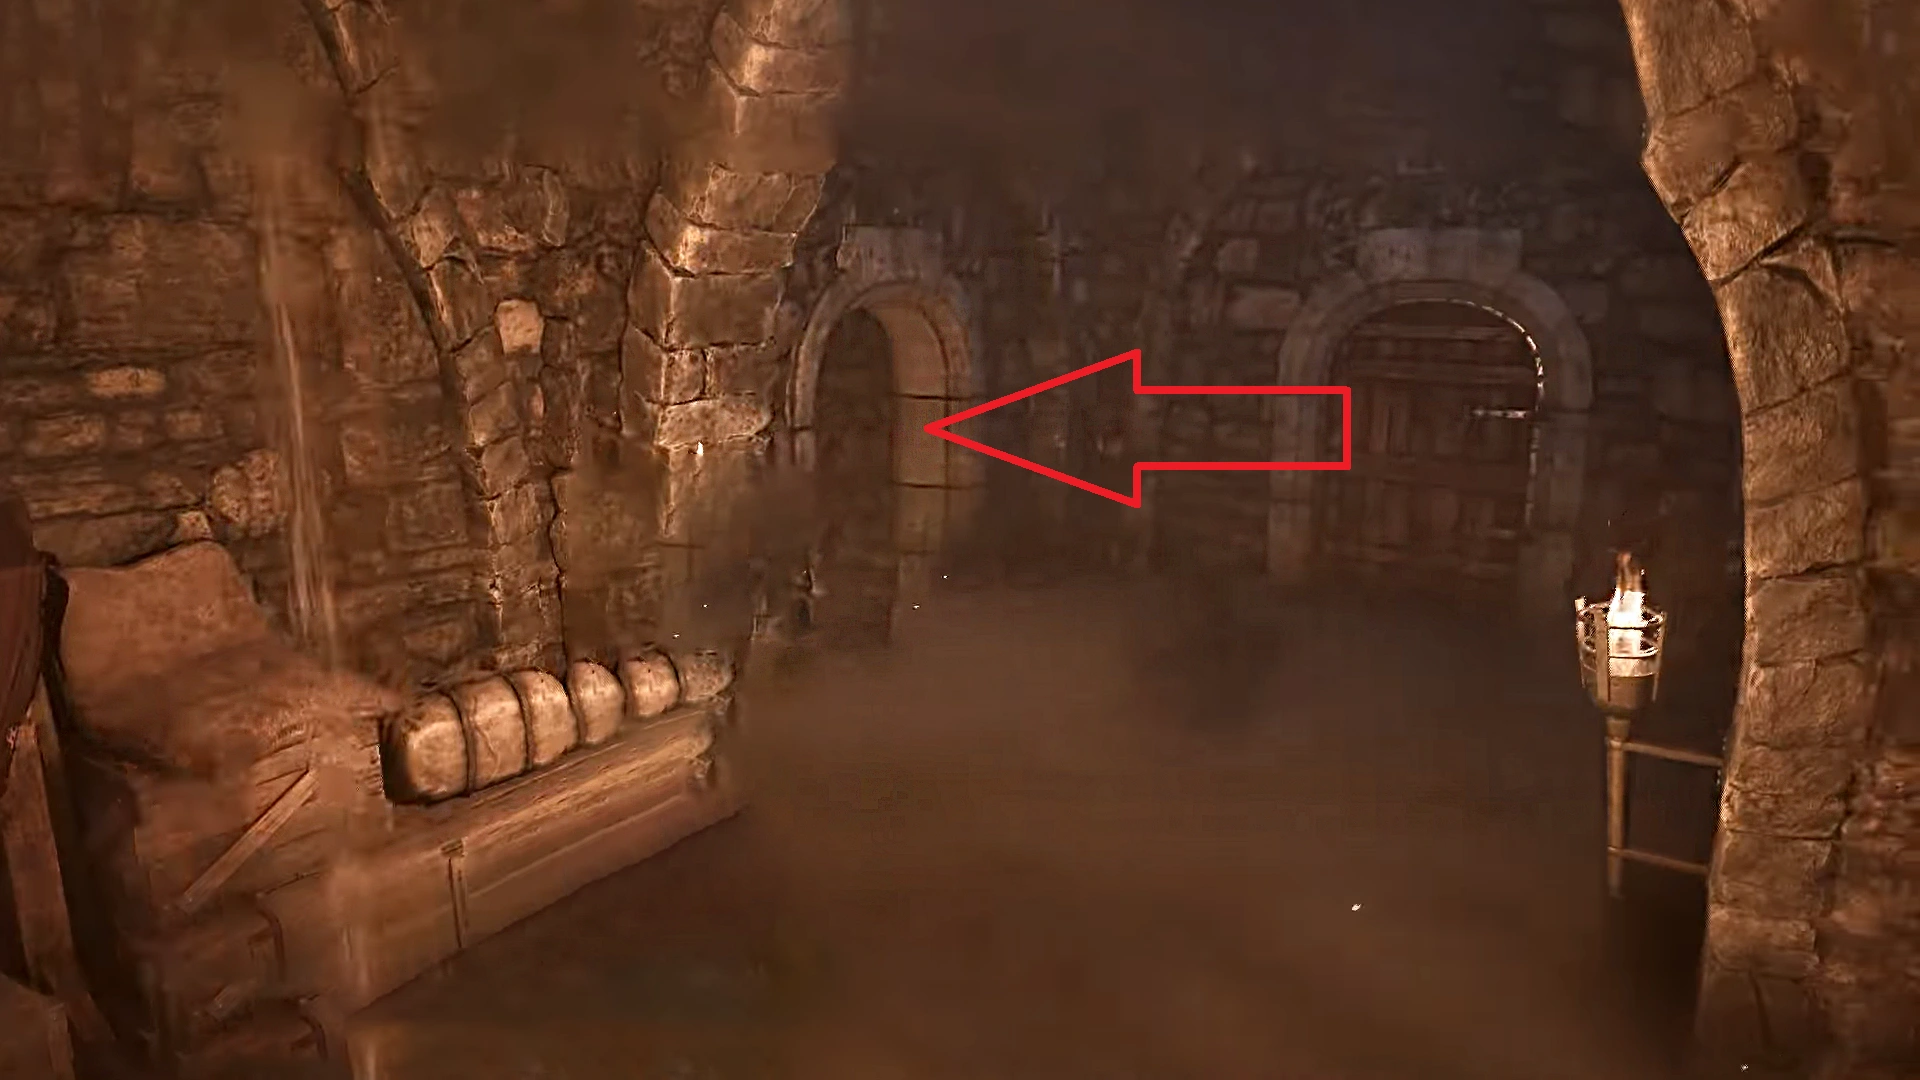
- Once you drop down the ladder, head straight forward until you arrive at the prison cell area. Take the path on the right and follow the linear route until you arrive at a fork in the road. Here you will find an open doorway on the left and a closed door straight ahead. Skip the door straight ahead, take the open doorway on your left.
- Now you will enter the crypt filled with nothing but skeletons. Move forward, and you will come across the first point of divergence. where one path leads to the left and another to the right. Take the path on the left.
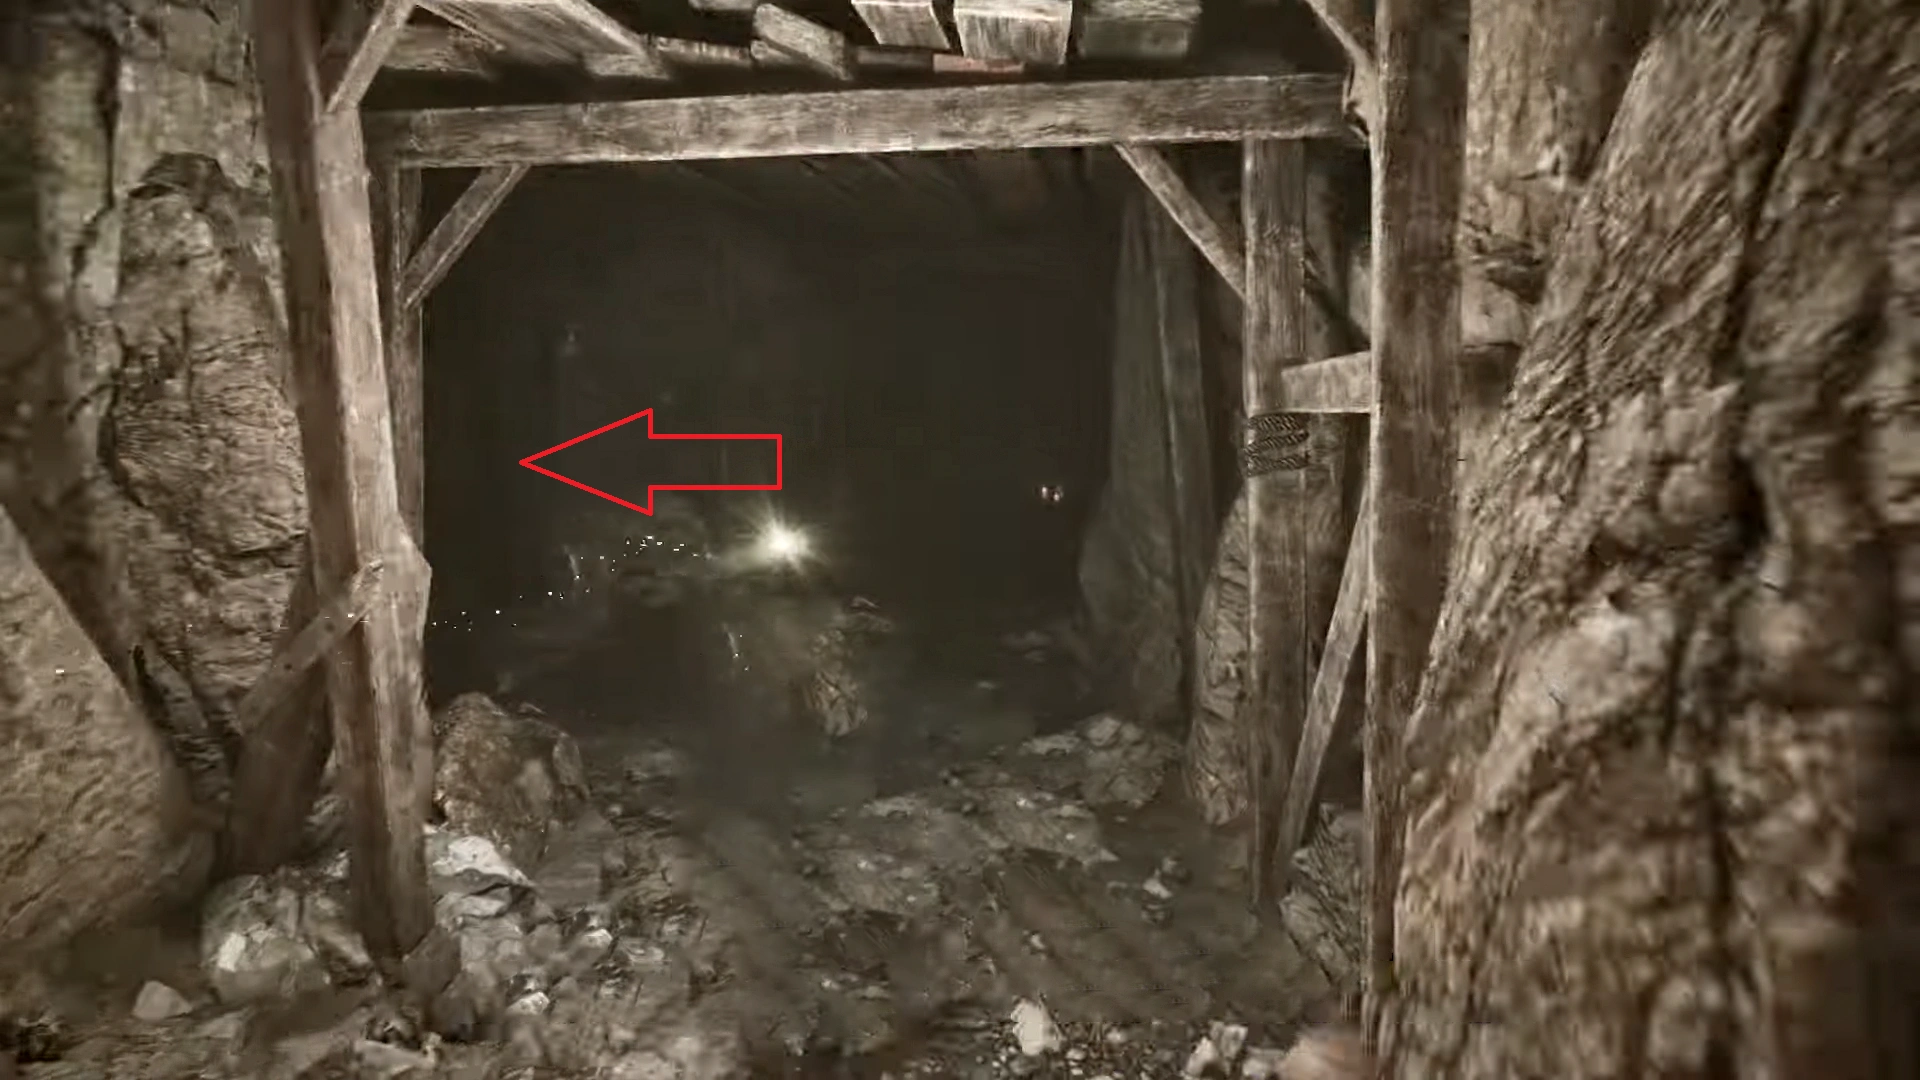
- After taking just a few steps, you will come across another two routes situation, here take the path on the right.
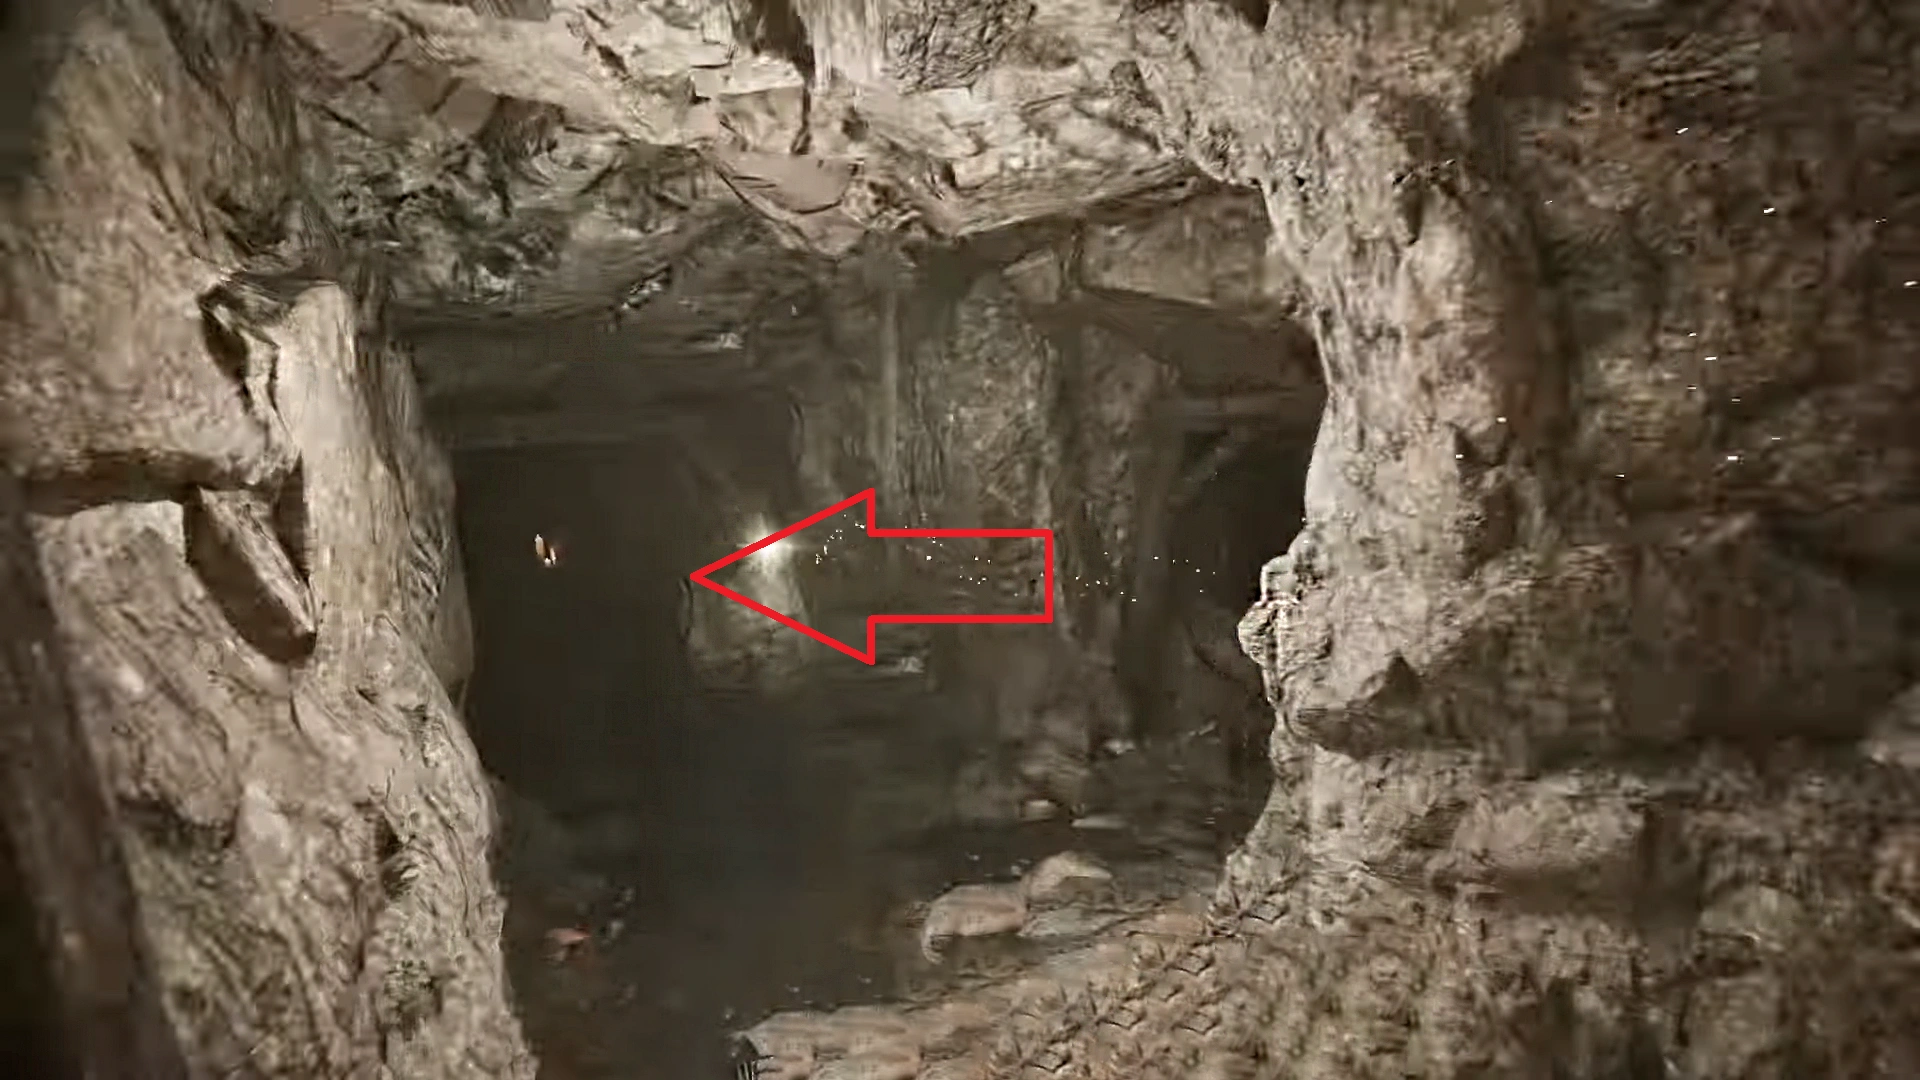
- Now you will have to make another similar decision; here, take the path on the left.
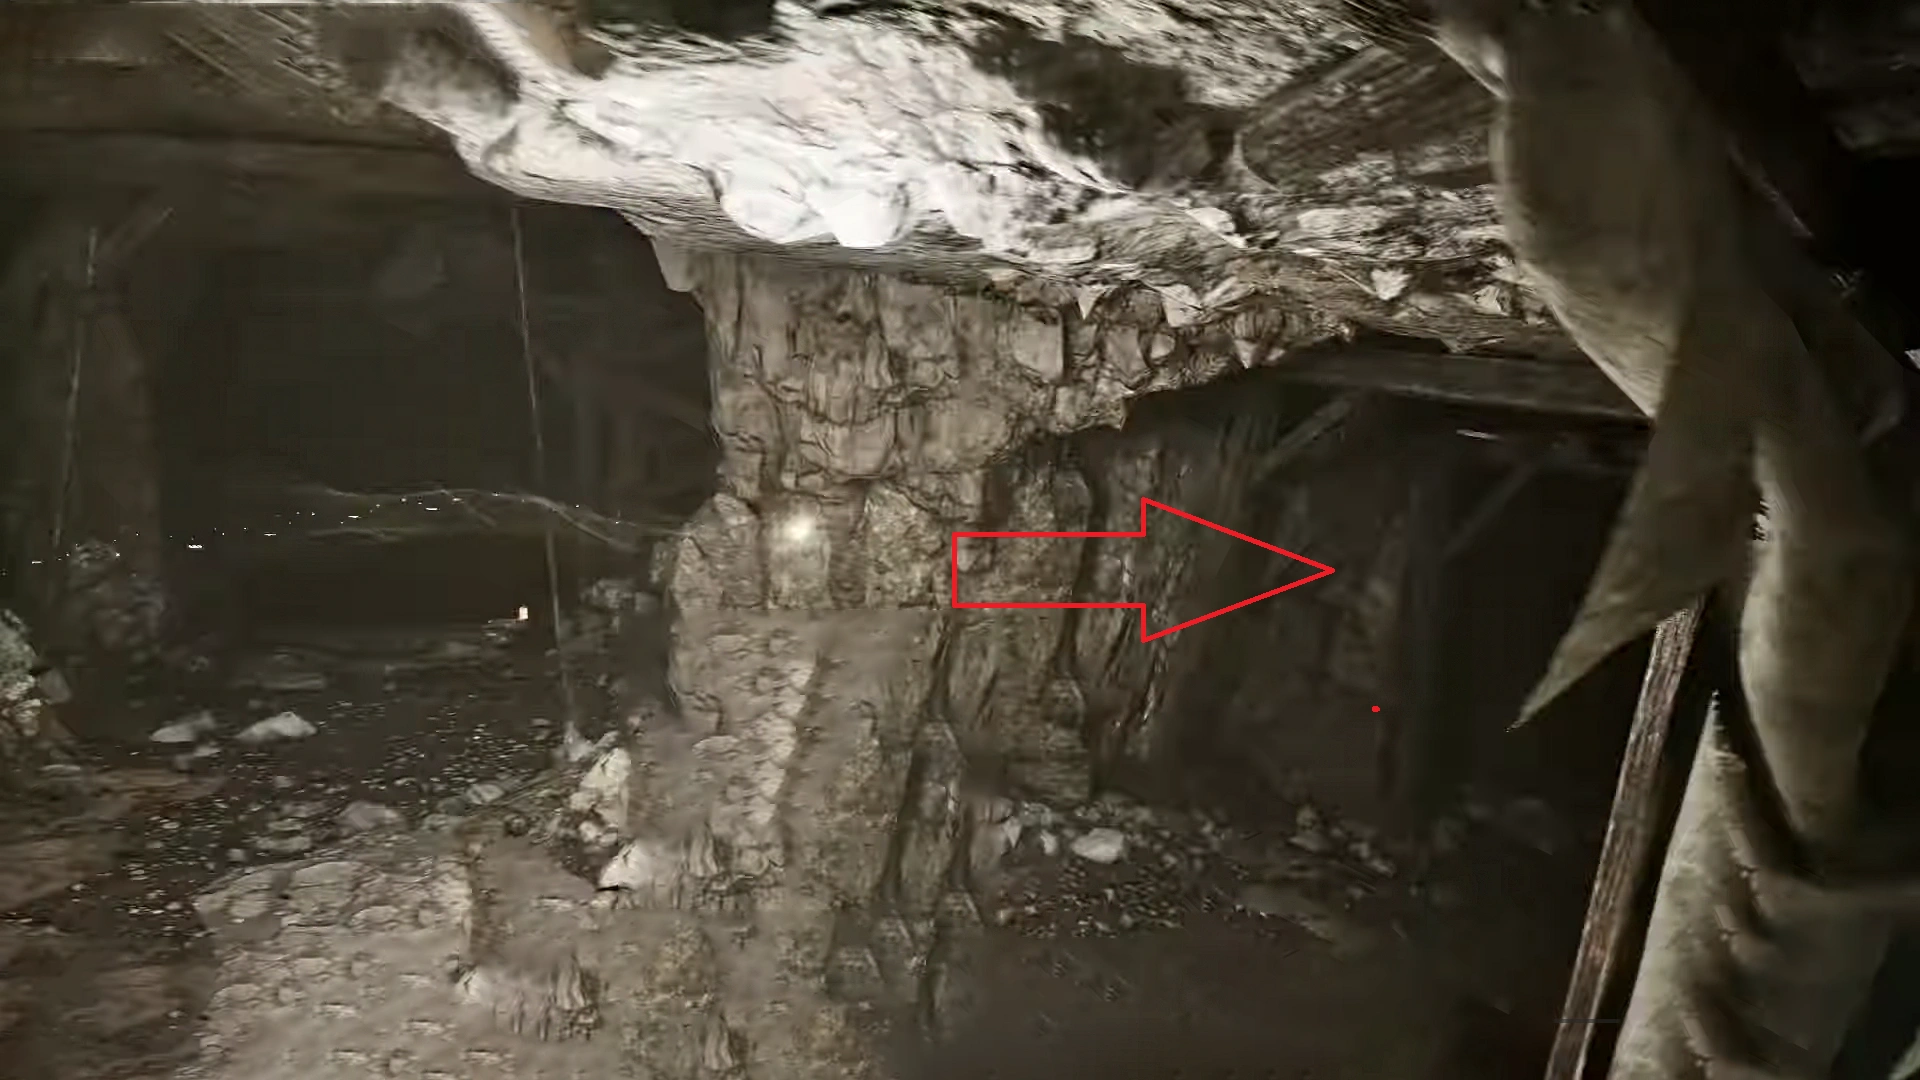
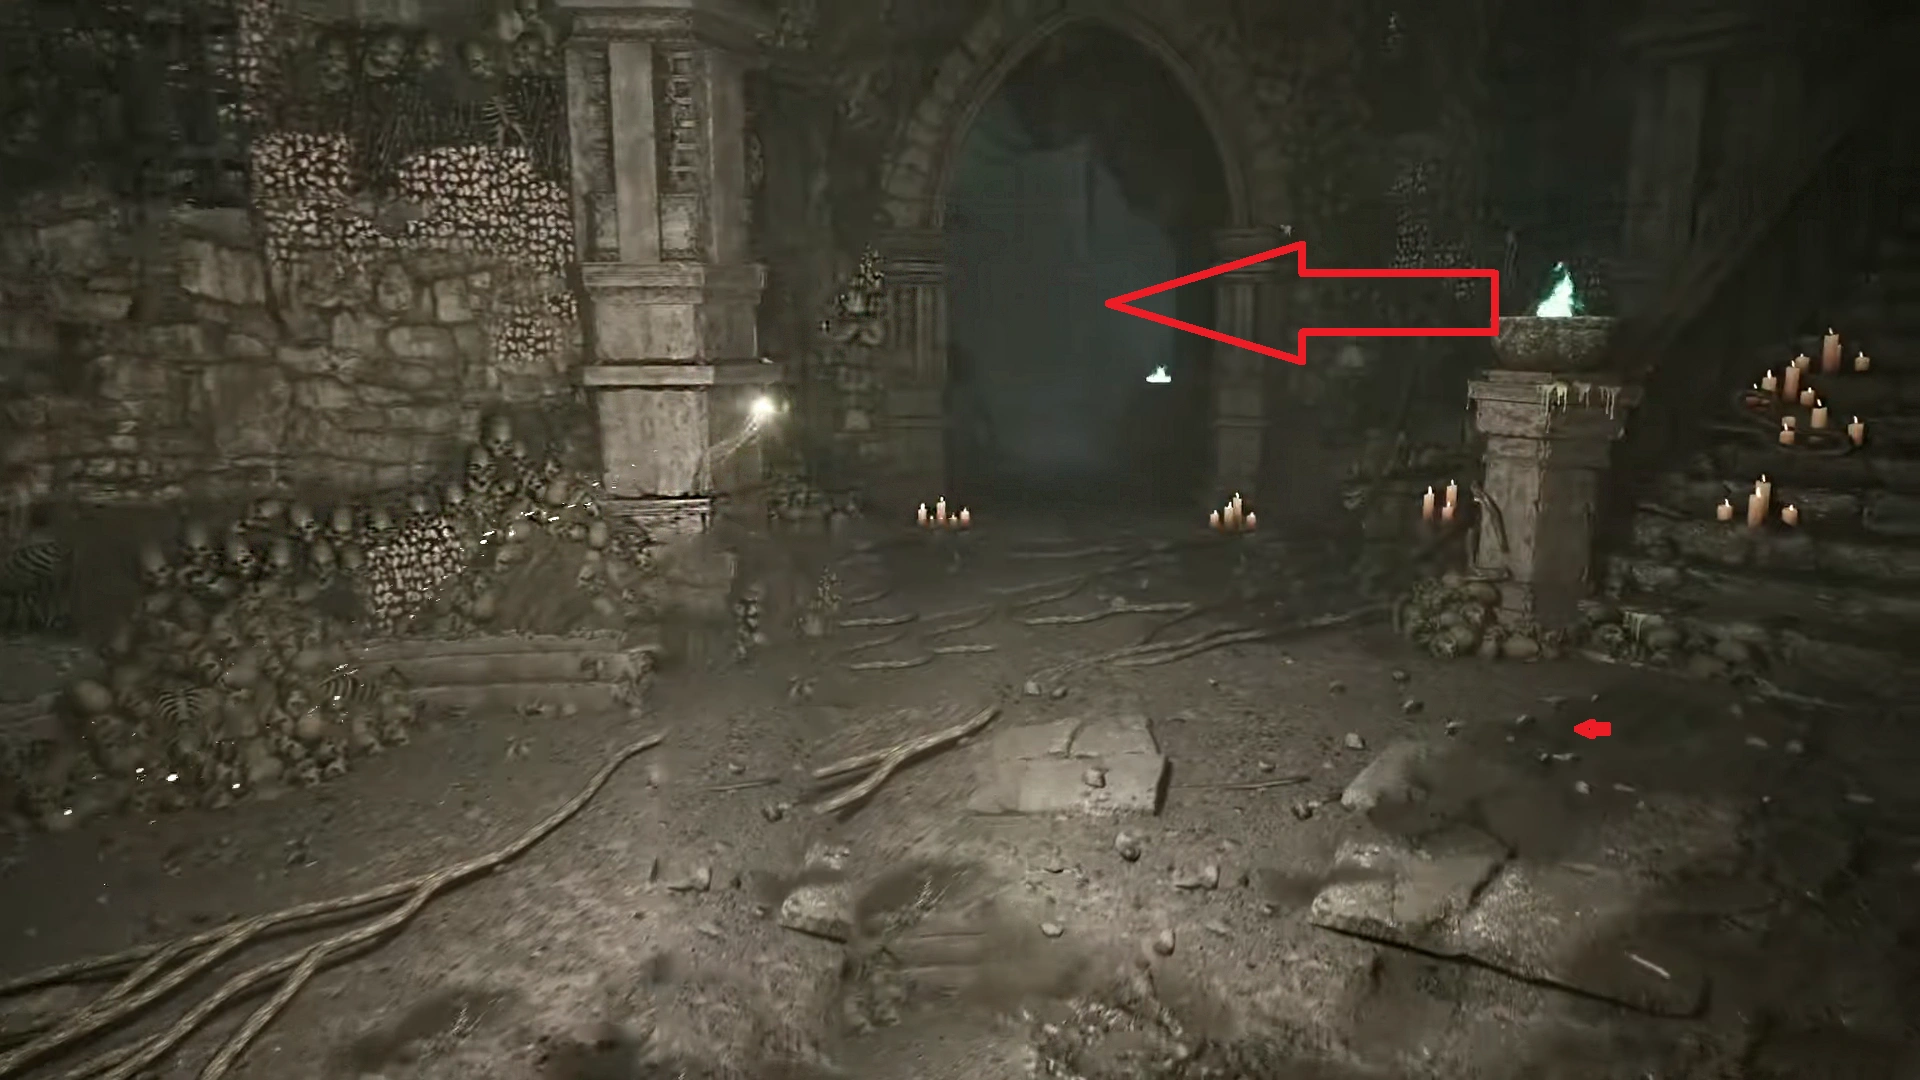
- Finally, well, we are not there yet, another final route decision-making; here you need to take the path on the right. Go through the narrow route, drop down the ledge on the right, and you will arrive at the boss arena.
You will spot a large arena with a menacing-looking flying skeleton in the middle. That’s our boss of the crypt, the Skeleton Mage. If you have a bow, it’s time to shoot it. Don’t worry when the mage comes close, get back up the ladder and start spamming the arrow at the mage to take him down.
If you prefer to deal with swords, just head inside and kill the mage. Once you take the Skeleton Mage down, you will get Chromanin #1 from its corpse.
Chromanin Book #2 | Ruined Fisher Village
This one is found on the table in Ruined Fisher Village, near the entrance to the new camp.
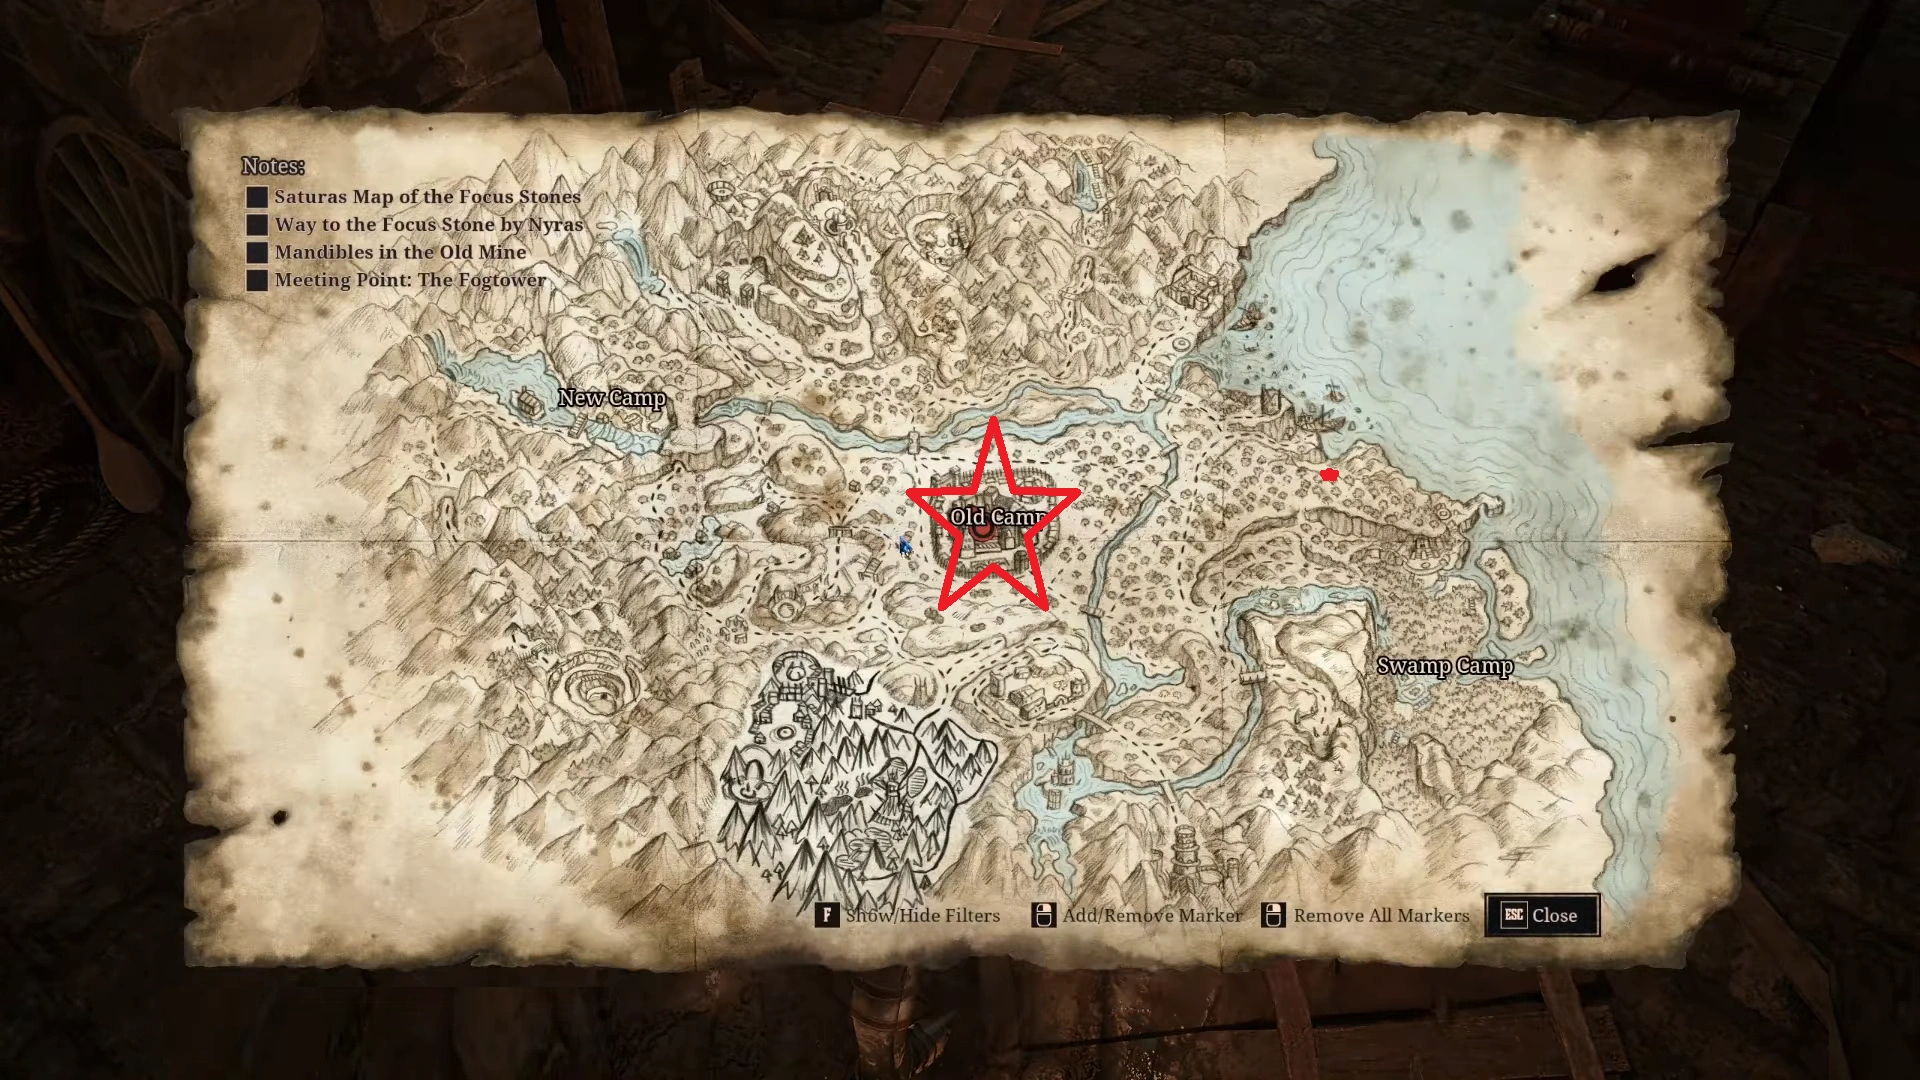
Compared to the first book hunting, where we had to take down a skeleton mage, the second Chromanin book is just sitting on the table in Ruined Fisher Village, located west of Old Camp and straight south of New Camp on the map.
Once you are in the village, take the stairs to the only wooden hut in the area, and you will find the book on the table in the corner of the room.
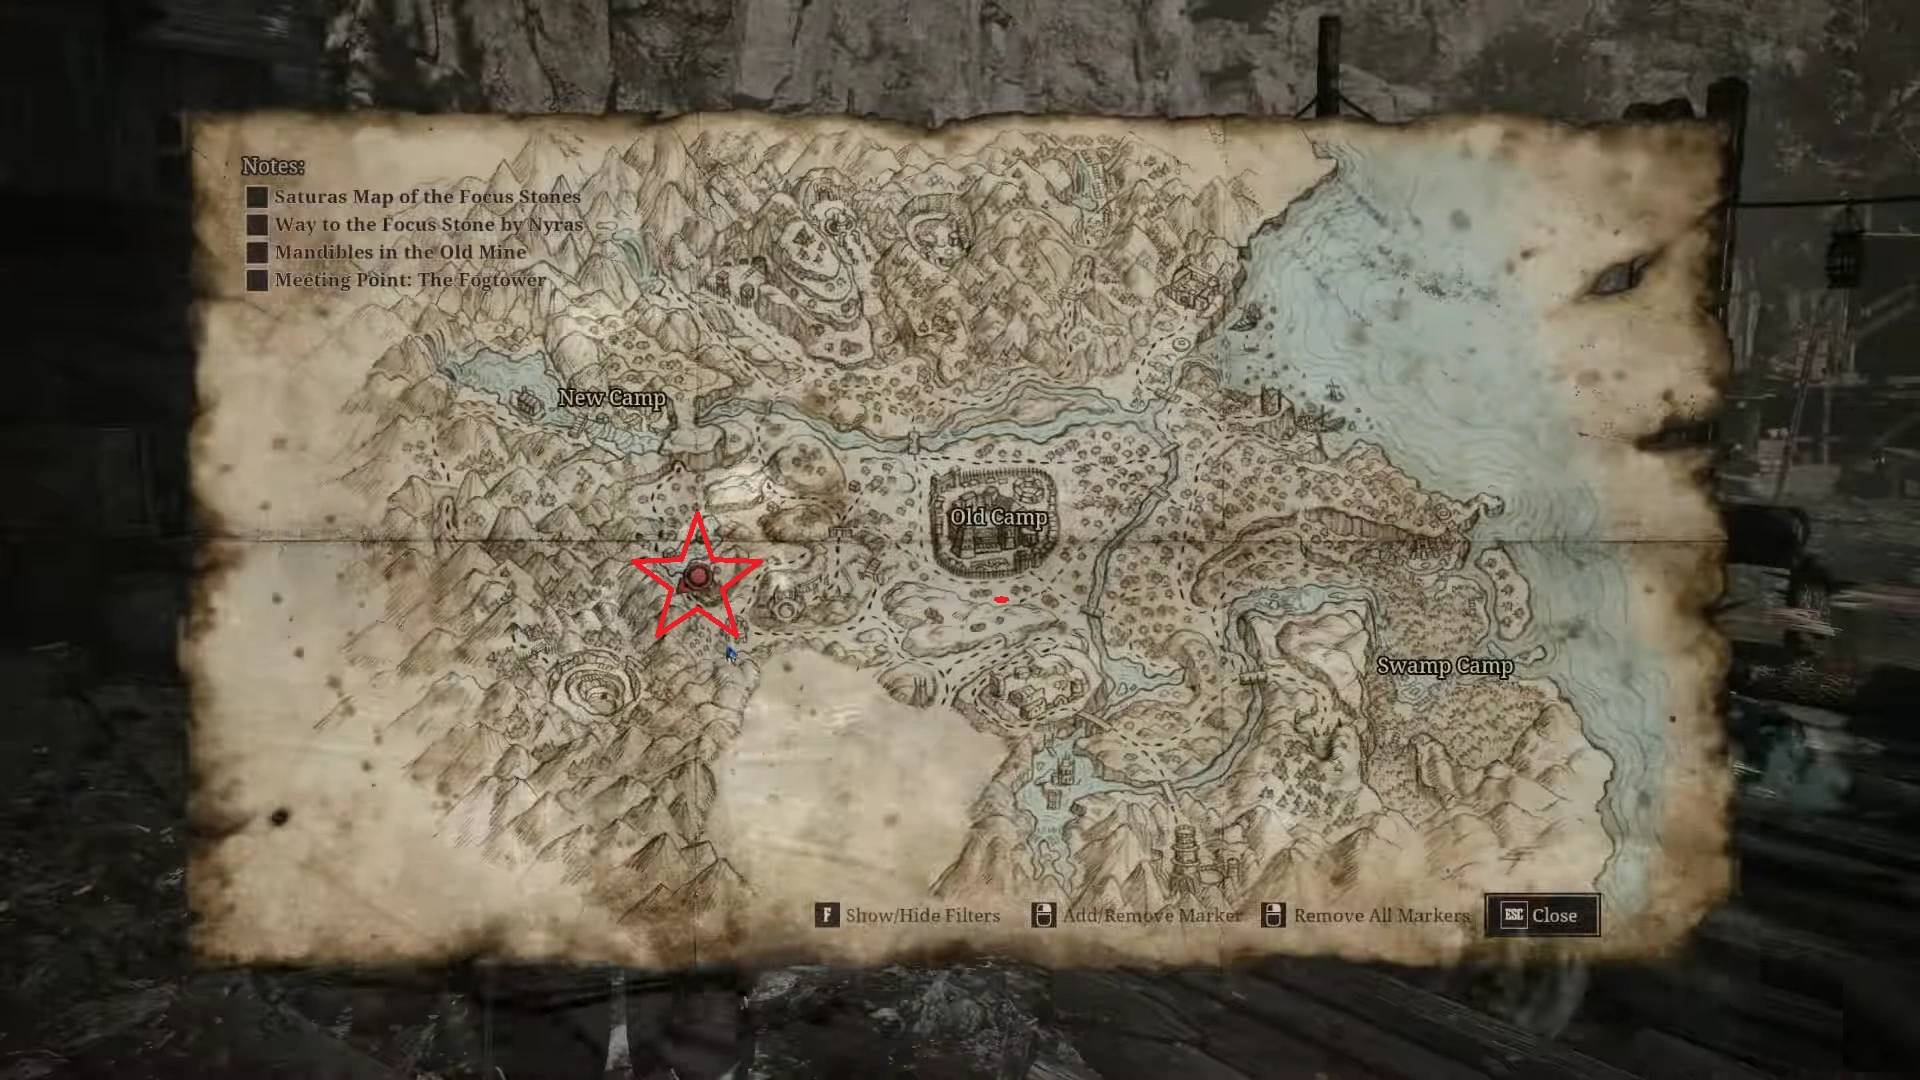
Chromanin Book #3 | Old Mountain Fortress
The book is located where you found the royal night armor in the Old Mountain Fortress, south of the Old Camp, as part of the Focus Stone Quest storyline in Chapter 2.
- Enter the fortress, take the spiral staircase leading to the upper floor on your right. The route is linear; get your screenshot key ready, as you will see some wonderful vistas on your right.
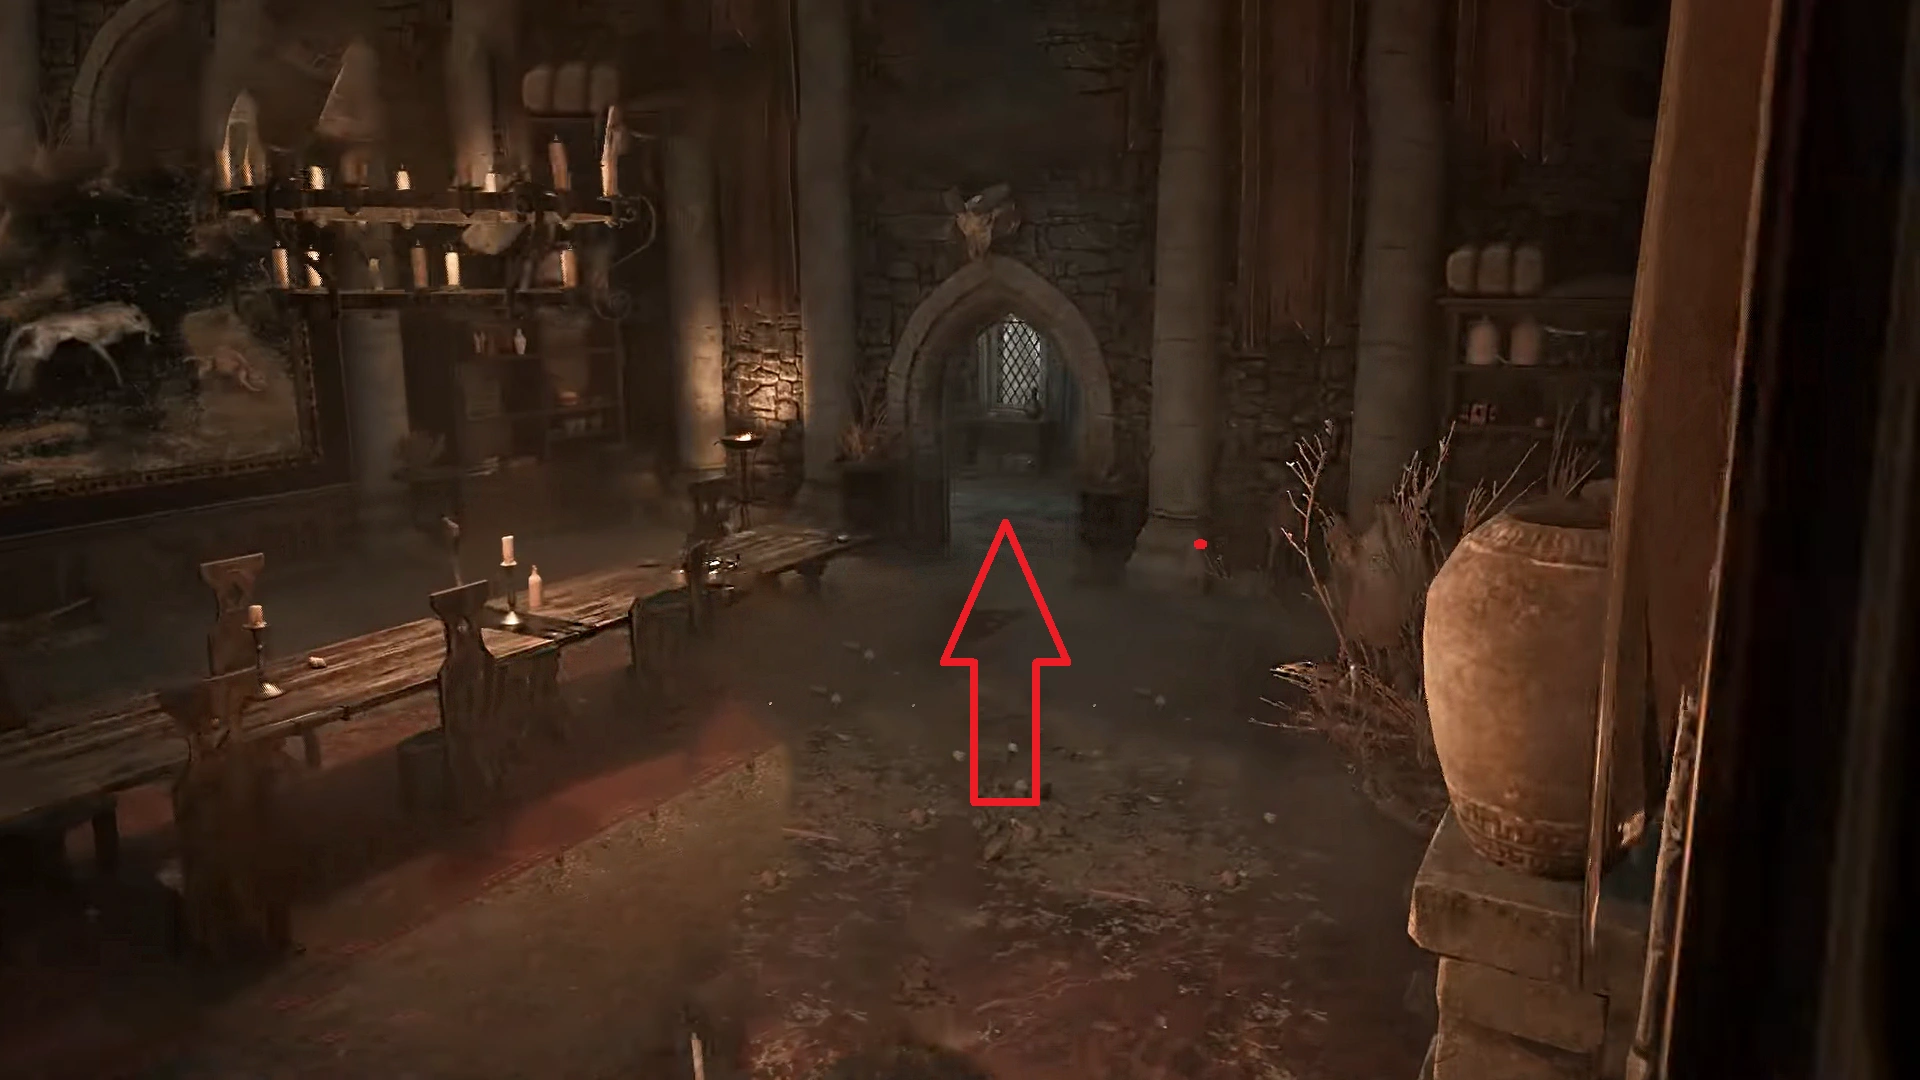
- Follow the route, and a few staircases later, you will arrive at the top of the fortress, in a room filled with bookshelves and paintings. Head to the next room to get to the dining area.
- Take the doorway on the right of the dining room, and then turn left.
This will put you in a room with bookshelves all around. But only one side will have a fireplace next to the bookshelves. Squeeze through the gap in the fireplace, next to the bookshelves, to enter the hidden room in the fortress.
Note: If you are having problems solving the bookshelf puzzle, the answer is Worm – Wolf – Mole Rat (In this order).
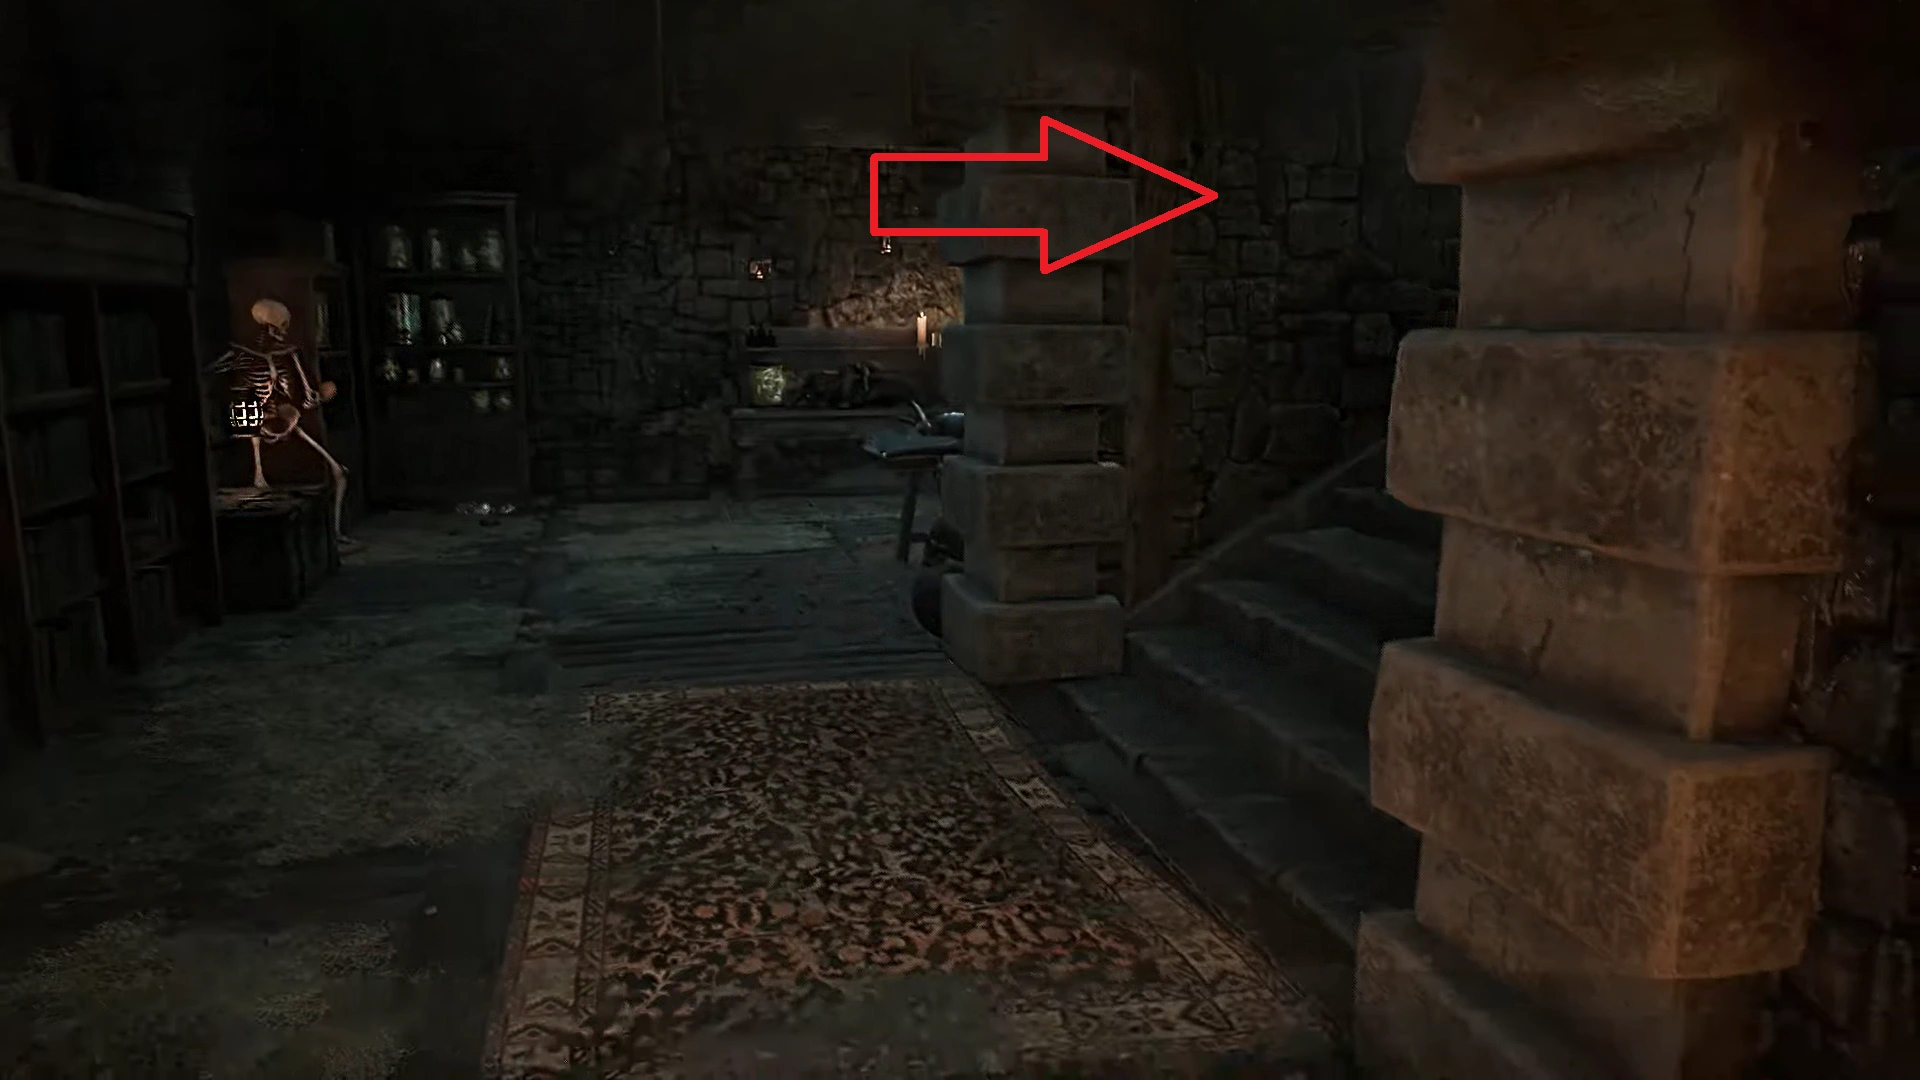
- While you can explore the hidden room, you can come back to do your loot later. Here, take the stairs on your right at the entrance. Follow the linear route, and at the end, take the ladder to the upper floor.
Now drop off the ledge on your left, turn around, enter the room, and it will lead you to the section with the chest on your left and our Chromanin book number 3.
Chromanin Book #4 | Old Camp
The fourth Chromanin book is located inside the prison section in the Old Camp, in the northern area.
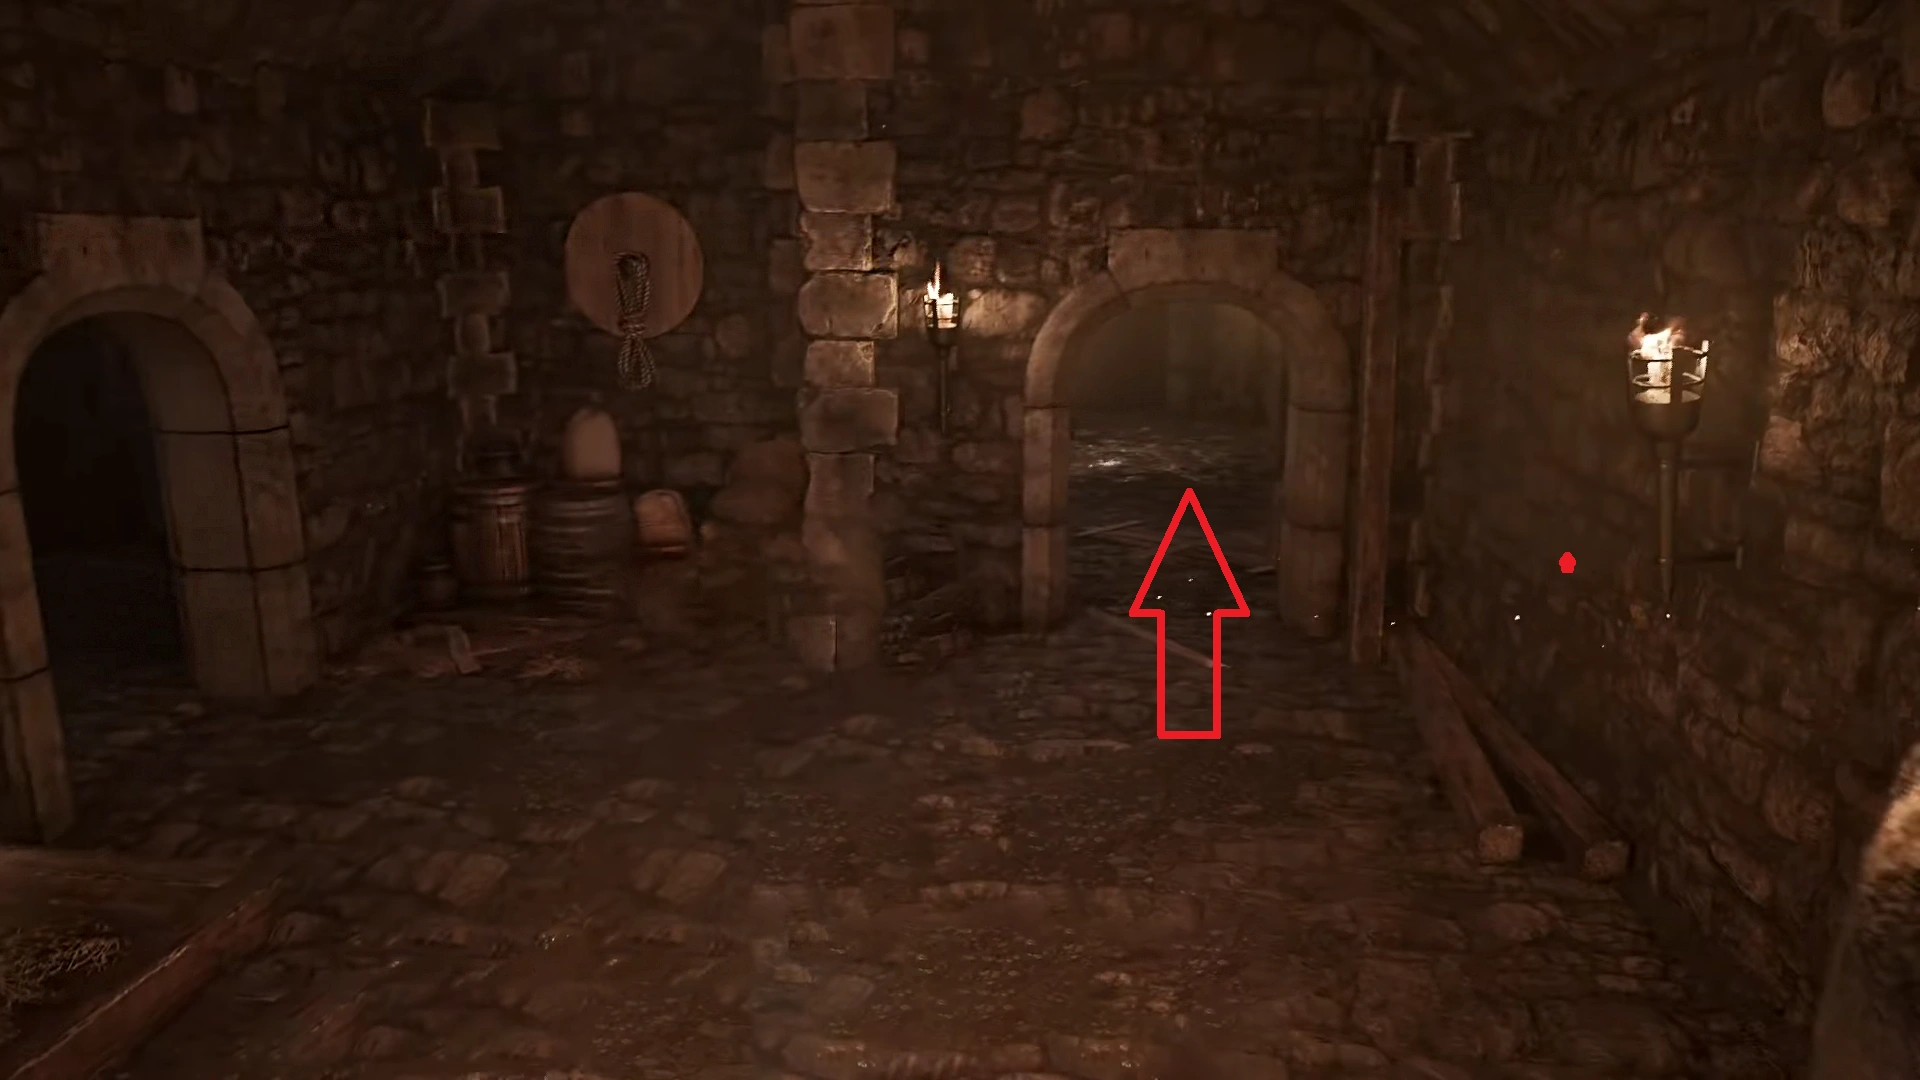
- Get inside the prison and take the stairs on the right to get to the bottom floor. And just like the crypt we encountered in the first Chromanin book, you will find a fork on the road, with an open doorway on your left and another one on the right.
- Take the open doorway on the right, head straight, and go down the flight of stairs to reach the bottom floor. Now, skip the route on the left, just keep heading straight.
And you will soon find another flight of stairs, leading to the lower floor of the cell. It’s closed by a door. Don’t worry, you don’t have to hunt down a key or lockpick to open the door; just interact with the door, and it will open.
Now you will enter the torture room with various torture-related machinery all around the room. Fortunately, the book we seek is right on the table, on the left of the entrance.
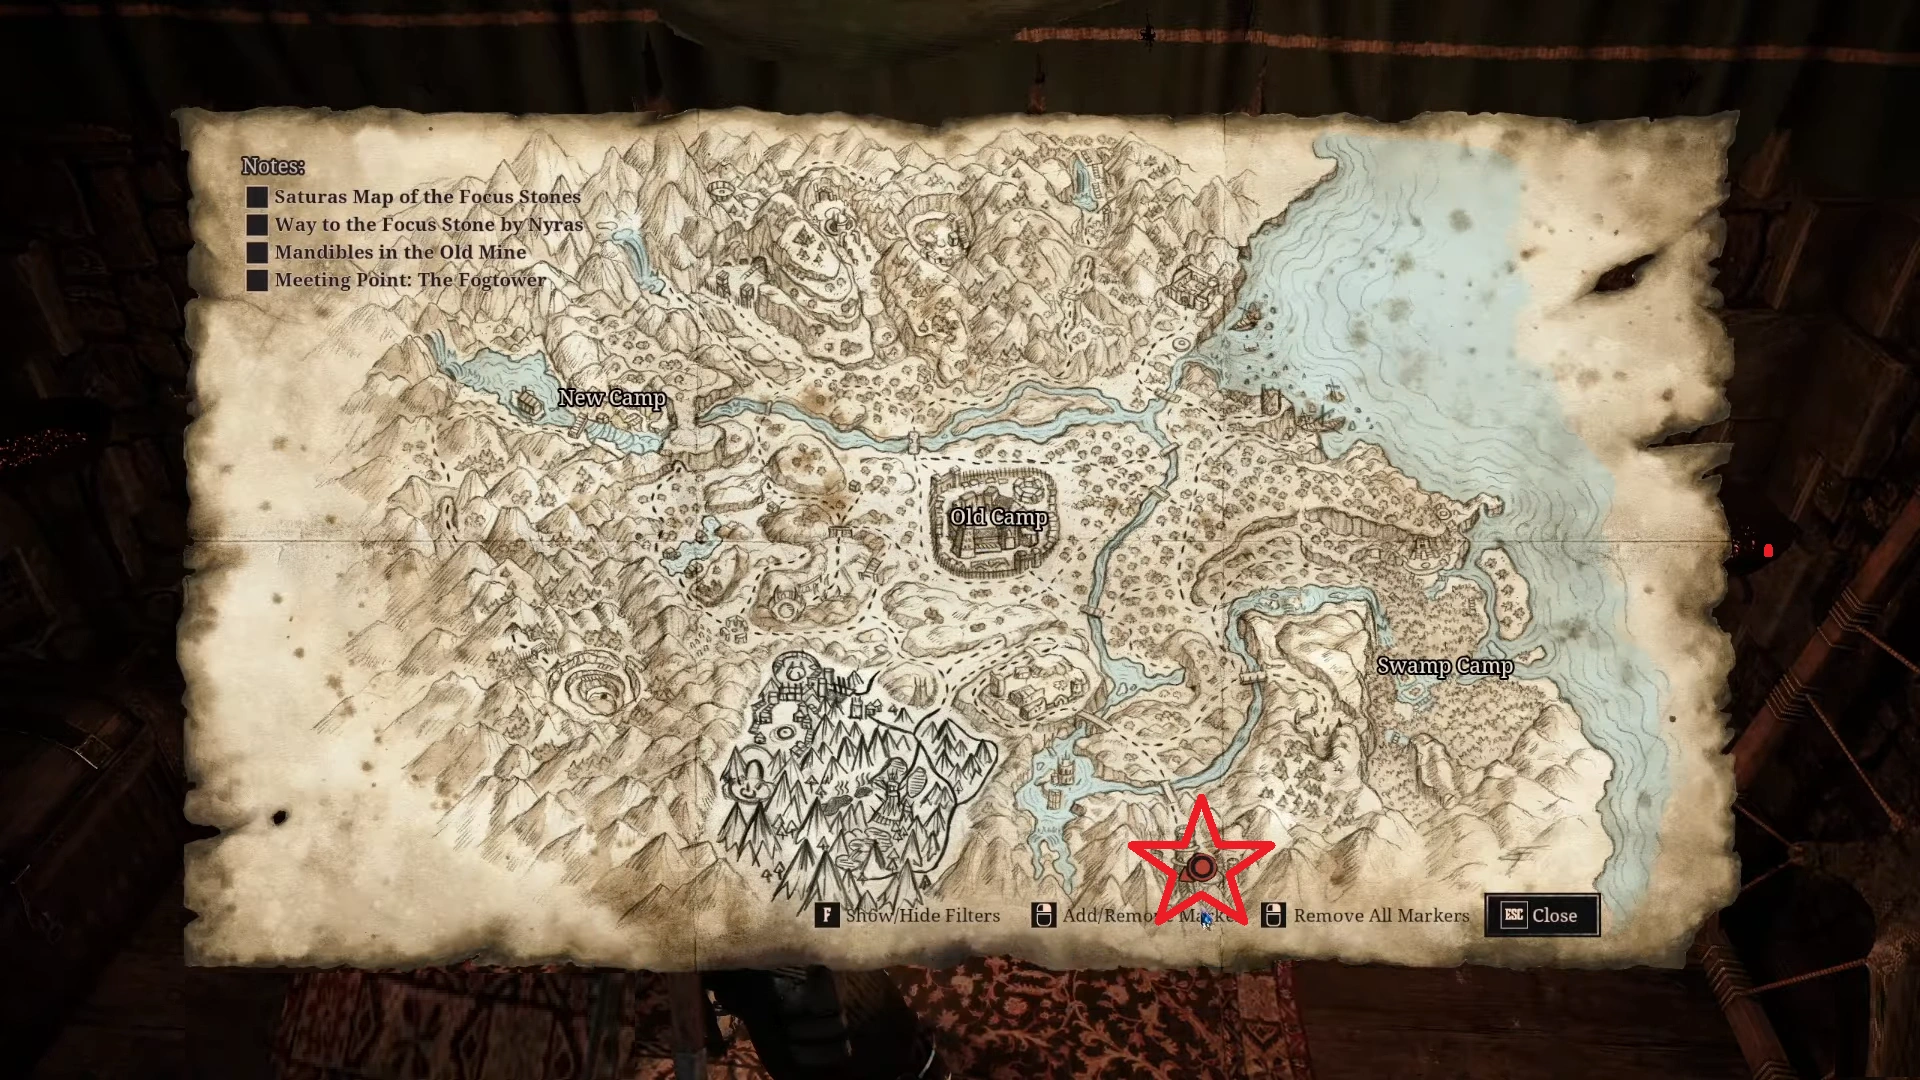
Chromanin Book #5 | The Ruined Fortress
It’s located near the Stone Golem boss arena, hidden in the Ruined Fortress, south of Old Camp.
The Stone Golem boss arena is hidden at the bottom of the Ruined Fortress. You will come across a point on the ground barricaded by woods, you can’t slam or stand on the wooden gate on the floor to break it. We will need something solid to break down the wooden gate on the floor to get inside.
Head up to the rooftops, next to the wooden gates, and push the golden bell at the top. The bell will then fall from the top and will go through the gates to the bottom floor.
When the gate breaks apart, it will open the route to the lower floor. Drop down from the bell spot, and get inside the new route. It’s a linear path, and it will end with a fight with the Stone Golem.
Note: You don’t have to defeat Stone Golem to get the book.
Near the entrance to the golem room, you will find the Chromanin book number 5 on the small table to your left. So if you want to skip the boss, you can certainly do it, just grab the collectible and run.
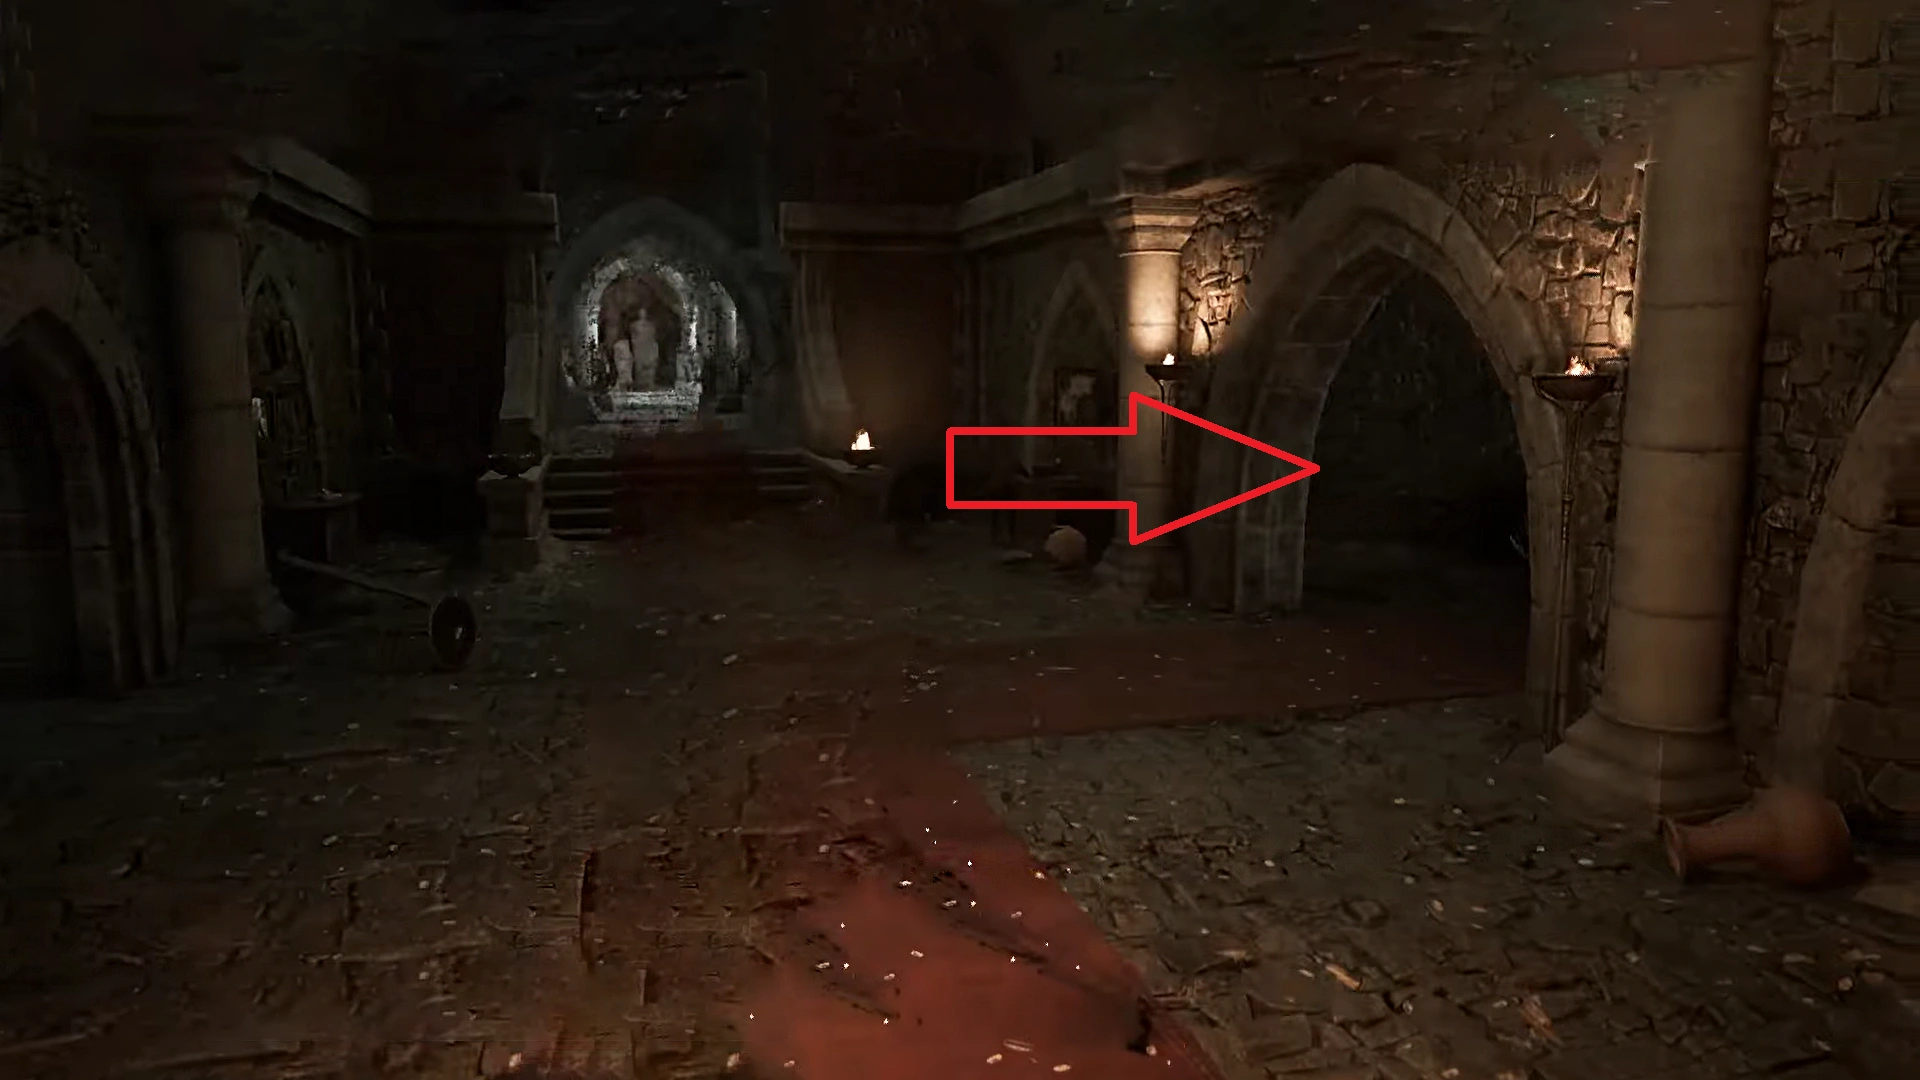
Chromanin Book #6 | Fog Tower
Now we are going back to the Fog Tower to grab the last collectible. It only spawns after you get all five Chromanin books.
The final Chromanin book is located in the same room where we dealt with the Skeleton Mage in the Fog Tower. Follow the same pathway through the crypt to head to the Skeleton Mage boss arena. Now head to the alcove on the right, and you will find the last Chromanin book on the lectern.
That’s it, now you have collected all 6/6 Chromanin books in Gothic 1 Remake. You will get a notification in-game about the completion of The Stranger, and you will also earn an achievement or trophy titled The Stranger, the same title as the quest.
Looking for more guides on Gothic? Check out some of these:
Best Strength Build | Bully for Bullit Quest | The Dam Lurker Quest | Up to His Neck Quest | The Minecrawler Nest Quest | Baloro’s Weapon Quest | How to Open the Broken Tower Door Quest | Which Camp Should You Join? | Where to find Fisk | Where is Torrez | Gothic Ending Explained | How to Open Scatty’s Chest | Gothic Difficulty Settings | Put Away the Torch | How to get into the Castle | Gothic How to Get a Map | Should you pay for protection in Gothic? | How to get rid of Mud | Games Inspired by Gothic | How To Get Your Own Bed And House