


Seattle isn’t exactly the safest city for vampires in Vampire: The Masquerade – Bloodlines 2. The militant I.A.O. faction is tightening its grip across the streets, keeping a close eye on everything through their surveillance cameras.
When Silky, the Brujah Primogen and owner of The Dutchman, learns about this network of cameras, he asks Phyre to take them all down. Completing this task not only earns his approval but also gets you one step closer to the Cutting the Feed achievement.
Vampire: The Masquerade – Bloodlines 2: All Surveillance Camera Locations

There are a total of 30 I.A.O. cameras scattered throughout Seattle in Vampire: The Masquerade – Bloodlines 2. Most of them are placed high up on rooftops, while others are tucked away in narrow alleys or near familiar landmarks.
You’ll need to climb, explore, and rely on your crosshair indicator to spot these devices more easily. You can use your crosshair indicator efficiently to find the cameras because it expands when you’re close to a collectible.
The side quest to destroy the cameras becomes available after starting the main quest “We Don’t Do Ghost Stories.” Once you meet Silky at The Dutchman, he’ll ask you to take care of the I.A.O.’s spying equipment. Here is a breakdown of every camera location, for each individual district.
Atrium District

The Atrium area has several cameras placed high above ground level. You’ll need to climb onto rooftops and look closely around the surrounding buildings.
- Behind the Atrium scaffolding: Climb the metal scaffolding structure behind the Atrium. The camera is placed along the upper beams near the middle level. Use nearby pipes or ledges to reach it.
- Above the neon pentagram rooftop bar: Head to the rooftop bar with the large neon pentagram sign. The camera is directly above the glowing symbol, fixed to the roof’s edge.
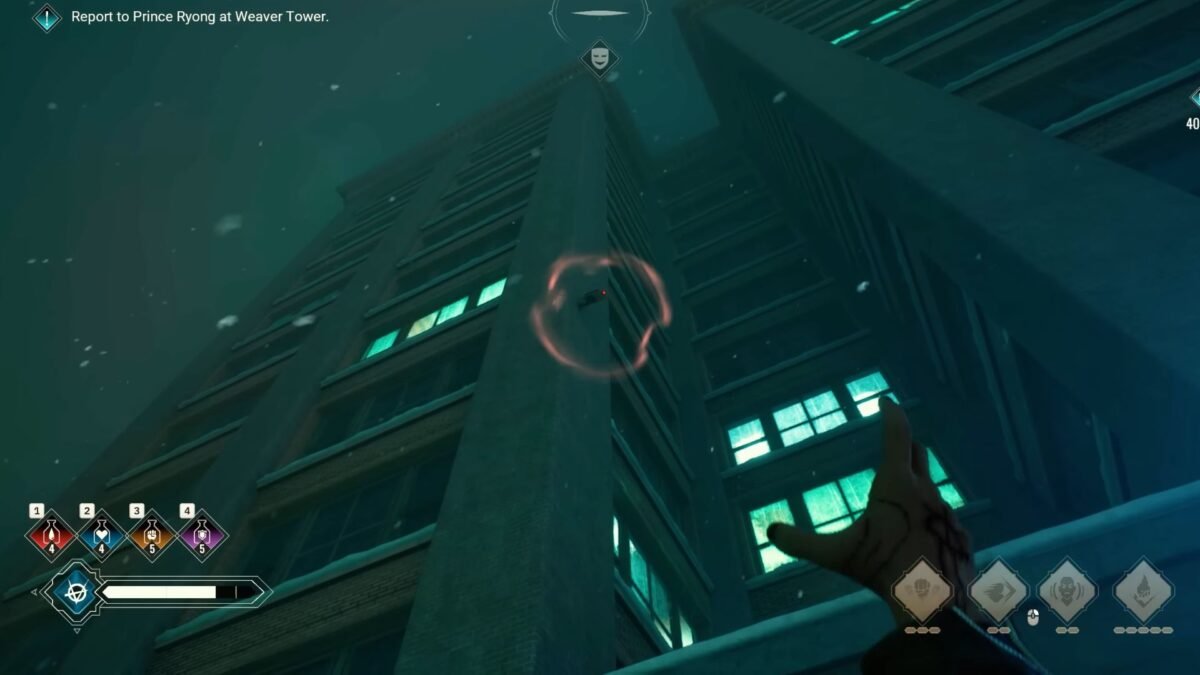
- Opposite Weaver Tower: Look across from Weaver Tower toward the high-rises nearby. The camera is attached to one of the taller buildings facing the tower. You’ll need to climb a fire escape to reach it.
- Across from Atrium, near a small water tower: From the Atrium, look across the street for a rooftop with a small water tower. The camera is just below it, facing the main road.
- Eastern side, above the red “Flour” sign: Climb the buildings on the eastern side of the block and look down toward the sign that says “Flour.” The camera is just above that sign.
- East of the Glacier Hotel: From the Glacier Hotel, head east and climb onto the corner rooftop hangout area. The camera is mounted along the wall, just above a few lounge chairs.
Keep an eye out for construction zones and ledges, most of these require you to scale walls to reach the right vantage point.
Makom Bar Area

This area has a few cameras placed between bar rooftops and nearby alleys. Some are hidden behind signs, so it’s easy to miss them if you’re not looking up.
- Northwest of Makom Bar: Head northwest from Makom Bar and climb the nearby buildings. Once you reach the top, look south to spot the camera near the edge of the rooftop.
- East of the pink “Paranoia” billboard: Locate the tall pink “Paranoia” sign. The camera is on a nearby rooftop to the east, facing the billboard. You can reach it by climbing the adjacent fire escape.
- Directly across from the auto repair, visible from the door: Head to the auto repair shop and face its main door from across the street. The camera is fixed high up on the opposite building, clearly visible once you step back from the entrance. Climb the fire escape or nearby scaffolding to reach and destroy it.
- Above the Hole in the Wall bar: Stand near the Hole in the Wall and look up under the concrete overhang. The camera is tucked just beneath it. Use the side stairwell or parked crates to get high enough to destroy it.
- On a rooftop gazebo with paper lanterns: Look for a small rooftop gazebo decorated with hanging lanterns. The camera is on the corner beam of the structure.
- Across from the Yinuo Beer sign: Find the Yinuo Beer sign in the street below. Look directly across from it to see the camera mounted high on a wall.
- Near the Brew-House rooftop: Head to the rooftop across from the Brew-House. From there, look south to spot the camera fixed near a ventilation unit.
Most of these are visible from the streets below, but you’ll need to climb to reach them.
Aurora and Nearby Blocks
This section of the city has a mix of rooftop and street-level cameras, so check corners and alleyways carefully.
- Near the yellow building and red Tacoma structures: Head west toward the yellow building near the red Tacoma frameworks. The camera is mounted on the wall facing the street.
- In the alley southwest of Aurora Pawn: Go behind Aurora Pawn and enter the narrow alleyway. Face south and look up. The camera sits on the rooftop corner.
- South of the construction zone: From the construction site, look south toward the blue hotel sign. The camera is on the building wall, just beneath that sign.
- Behind Wake the Dead café: Stand in front of the Wake the Dead coffee shop and look across the street at the wall with flower graffiti. The camera is fixed high above that area.
- On the U-shaped apartment building: Head toward the tall apartment complex shaped like a “U.” The camera is placed on one of the upper corners overlooking the courtyard.
Players who notice a narrow field of view while searching here might feel at a disadvantage, especially since Bloodlines 2 currently cannot change FOV, making some rooftop cameras harder to notice without climbing up. Many of these are located above narrow alleys, so look up often while navigating.
St. Stephens to Weaver Tower

Several cameras are hidden around St. Stephens Church and the Weaver Tower area. Expect to climb fire escapes and explore narrow paths.
- In an alley near fire escapes: From the main street, find the narrow alley lined with fire escapes. The camera is halfway up the wall, pointing toward the road.
- Behind St. Stephens: Move behind St. Stephens Church and follow the back alley. The camera is on the wall near some graffiti.
- Across from Weaver Tower’s north wing: Stand across the street from the north wing of Weaver Tower. Look into the nook with yellow graffiti; the camera is fixed just above it.
- Under the bridge in the garden area: Travel to the garden area west of the church. The camera is attached beneath the bridge, so look up from ground level.
- Southeast of Haven: Move southeast from your Haven until you reach the main street. The camera is angled down toward the blue hotel sign nearby.
- Behind Haven’s fire exit: Climb up to the fire exit located at the back of your Haven. The camera is just behind the doorway, aimed at the exit itself.
- On the northern rooftop above a blue exit door: From the north side of the block, look for a building with a blue exit door. The camera is mounted above it, visible from the nearby rooftops.
Inside St. Stephens, you’ll also spot a stone relief resembling the Cross of Saint James, which is a subtle nod to Seattle’s layered history and the religious motifs often intertwined with Kindred lore. This area can be tricky because of the varying building heights, so make sure to scan rooftops from multiple angles.
The Dutchman’s Territory

The last few cameras are scattered around The Dutchman and nearby construction zones. These are easier to reach compared to the earlier ones.
- Near the umbrella dining patio: Go to the outdoor dining area with umbrellas behind The Dutchman. The camera is fixed on a nearby streetlight pole.
- Outside the northwest corner of the police station: Walk around the police station and look up at the northwest corner wall to find the camera.
- In the alley opposite the scaffolding: Face the construction scaffolding east of The Dutchman. The camera is between the tall buildings, about halfway up.
- Inside the construction site across from The Dutchman: Enter the fenced construction area and look above the red cargo crate. The camera is mounted high up on the metal beams.
- Behind The Dutchman’s back door: Exit through the back door of The Dutchman and look above the trash pile. The camera is fixed just over it.
After destroying the last camera, return to Silky to finish the task.
Alternative Locations For Some of the Cameras

In addition to the areas above, you may also spot a few cameras in these locations during different quest phases:
- Police station parking lot: Along the left side where police cars are parked.
- Southwest construction wall: On the right side of the wall near the Police Station.
- Back fence behind The Dutchman: Fixed above the fence near the rear alley.
- Plastic Factory block: Mounted high up on a wall in the southwest corner of the map.
- Beneath the water tower west of Atrium: Found under the platform supporting the tower.
- Between Glacier Hotel and Makom Bar: Look up at the connected rooftops for a high-mounted camera.
These may vary slightly depending on your progression, so double-check areas if you’re missing a few cameras.
Once all 30 surveillance cameras have been destroyed, return to Silky at The Dutchman to report your success. He’ll thank Phyre for the help and reveal more about his work in Schmitz Park.
Completing this objective also boosts your relationship with Silky, unlocks extra codex entries about the I.A.O., and rewards you with the “Cutting the Feed” achievement. You’ll also earn experience points that can help you upgrade your vampiric abilities and strengthen your character further.
If you’re aiming for full completion in Vampire: The Masquerade – Bloodlines 2, clearing these 30 I.A.O. cameras is an important milestone that ties neatly into Seattle’s darker storylines and earns you some favor with the Brujah Primogen along the way.
Set TheGameSlayer as your Preferred Source on Google to find us more easily when searching for game guides and news!