

In Hollow Knight: Silksong, you need all the help you can get to make it out alive from the bug-infested places. The game will get tougher as you progress into later areas. Having one more Mask can make all the difference between life and death, and that is where Mask Shards come into play. Collecting four Mask Shards will grant you one additional Mask for your health bar. Here we have put up all details for the 20 Mask Shards that you can find in Hollow Knight: Silksong.
Mask Shard #1 | Wormways
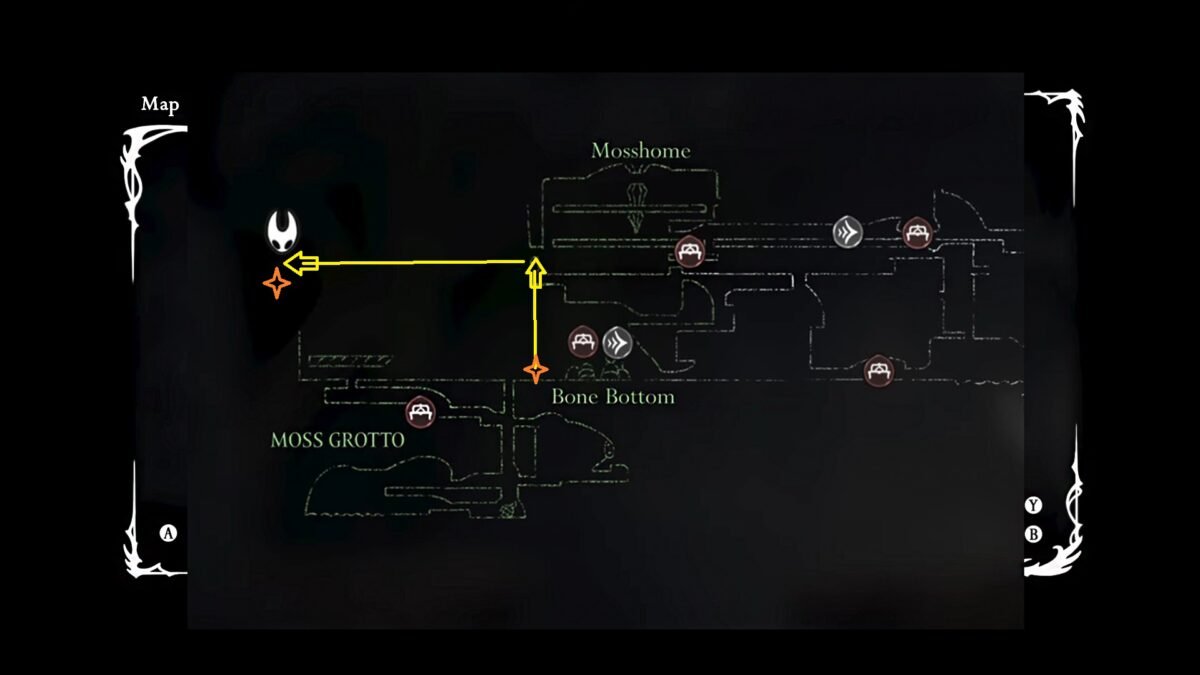
From the Bone Bottom area, take the elevator all the way to the top. Get off the elevator and head up until you are at the peak. Here, you need to get on the hanging steel cell on the left. And the only way to do it is by hitting the fly downwards in the air to launch yourself to the top of the steel cell.
Now jump to the other cell on the left, and you will arrive at the small hole on the left that will take you to the boss arena. You don’t have to defeat the boss; just use the platform as a cover from its projectile attacks. Once you get across the other side of the arena, get inside the door, and then make your way to the ground until you are on the water. Here, break the hidden wall on the right to access the second Mask Shard.
Mask Shard #2 | Bone Bottom
After defeating the Bell Beast, travel to Bone Bottom. Head to the village and then talk to Pebb. In the shop menu, you will find a Mask Shard described as: “Just a piece of something greater, but finely crafted. You should take it with you, traveller, for luck.”. It will cost you 300 Rosaries to get it.
Mask Shard #3 | Deep Docks
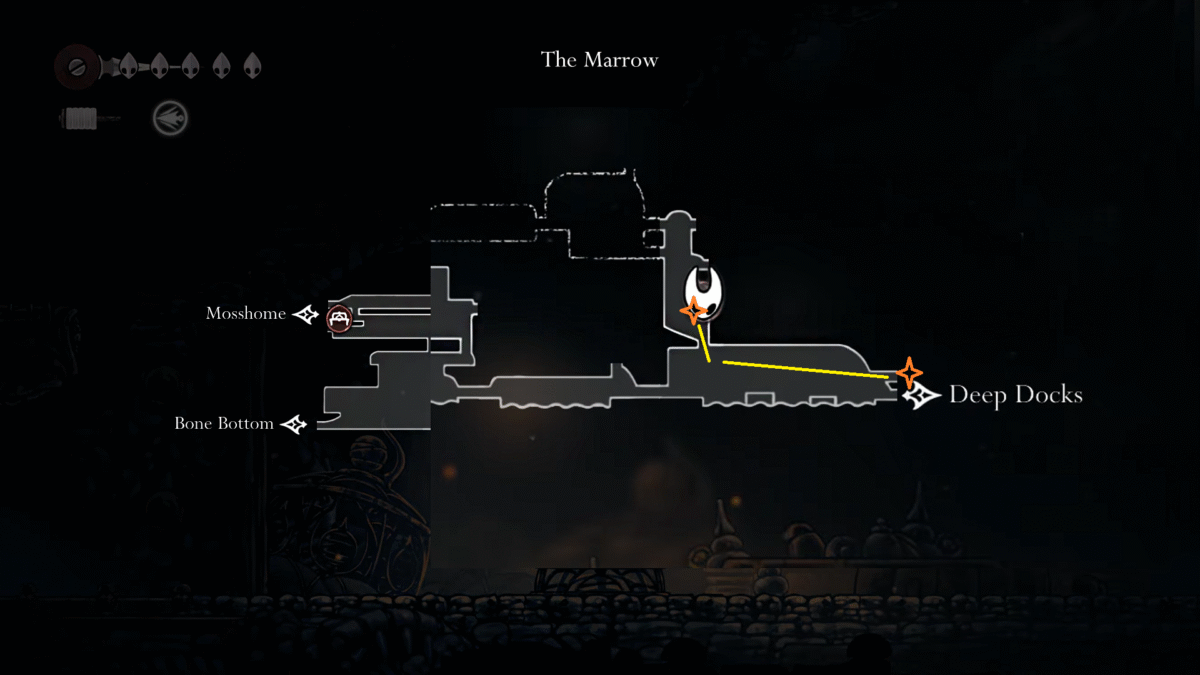
Requirement: You will need the Double Jump ability to get this one.
Get to the Bench located at the Marrow, northwest of the Deep Docks. Now make your way down and start moving to the right until you arrive at the Deep Docks area. Here, you must jump through plenty of hanging platforms, defeating enemies on the way to get to the arena and access the Mask Shard on the right.
Mask Shard #4 | Far Fields
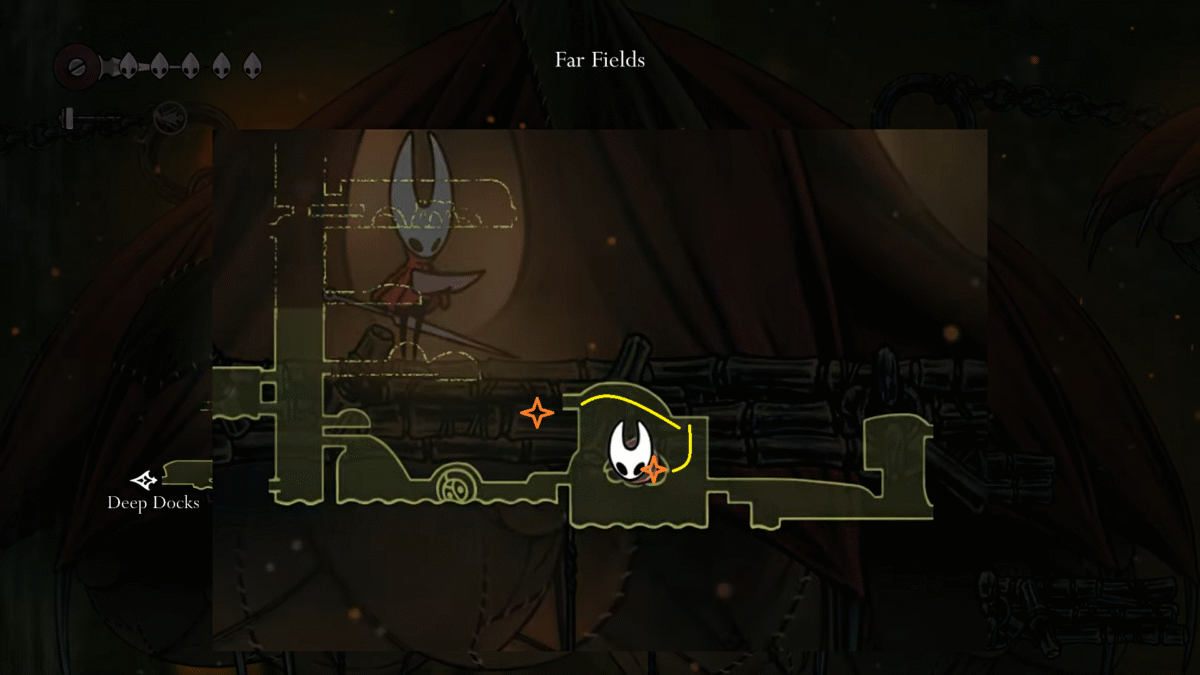
Requirement: You will need Drifter’s Cloak, allowing you to glide in the air.
Leaving the Deep Docks area will take you to the Far Fields. Here, you have to do plenty of aerial platforming using the gushing wind from the ground or updraft to navigate to the platform on the left.
The first couple of updrafts will be wide open, as you will see wind blowing out of them, which you can use to launch upwards. After a while, you will come across some of the updrafts blocked with lava shells. Just break the shell to let the air out, which can then be used to propel yourself in a different direction. Just move towards the left of the area, and you will find yourself in a different room with a giant glowing bomb attached to the ceiling.
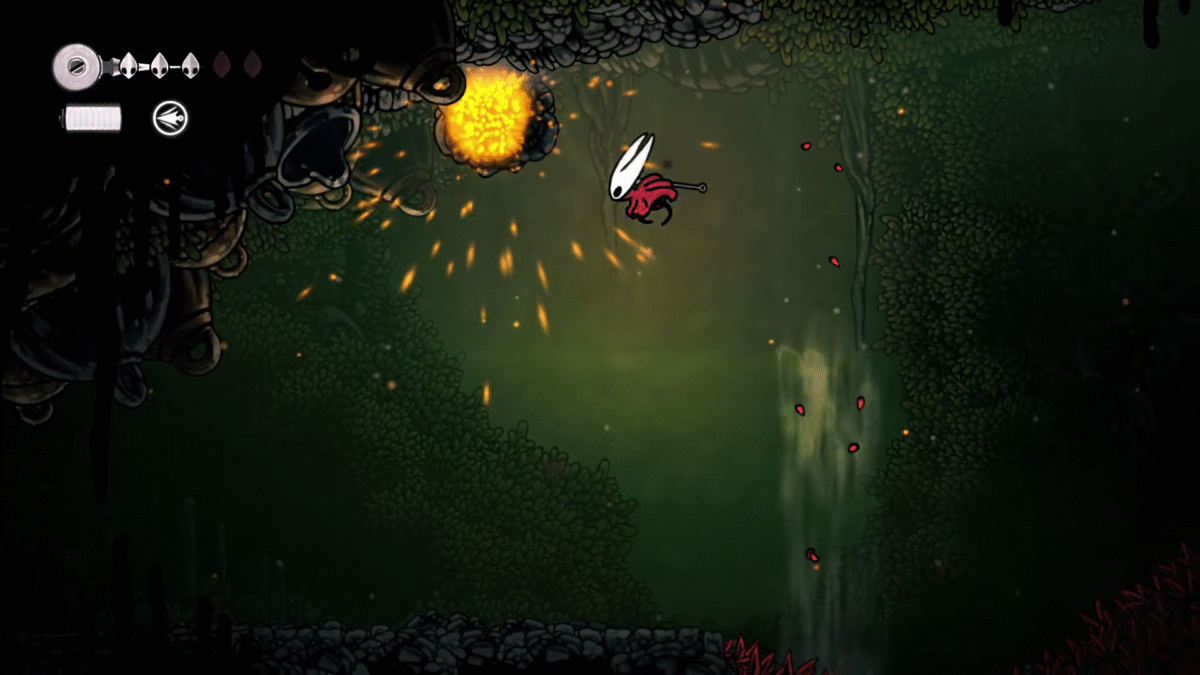
Hit the bomb with a couple of attacks by using updrafts to launch upwards, and it will drop and reveal a Mask Shard.
Mask Shard #5 | Shellwood
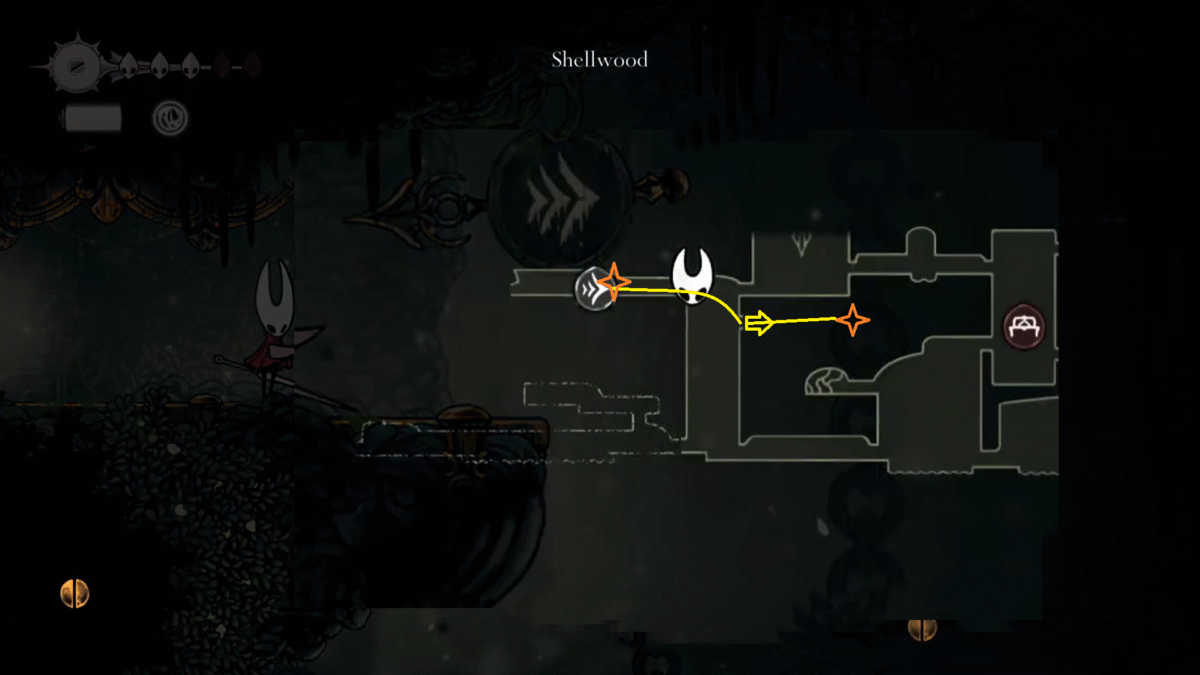
From the Travel point of Shellwood, keep moving towards the right. It will take you to a new area, jump down on the platform, and go through the small hole on the right. This new area is filled with platforming challenges; all you have to do is use the downward pierce move on white flowers to jump and move to the right. Once you make it to the end, you will be awarded a Mask Shard.
Mask Shard #6 | Cogwork Core
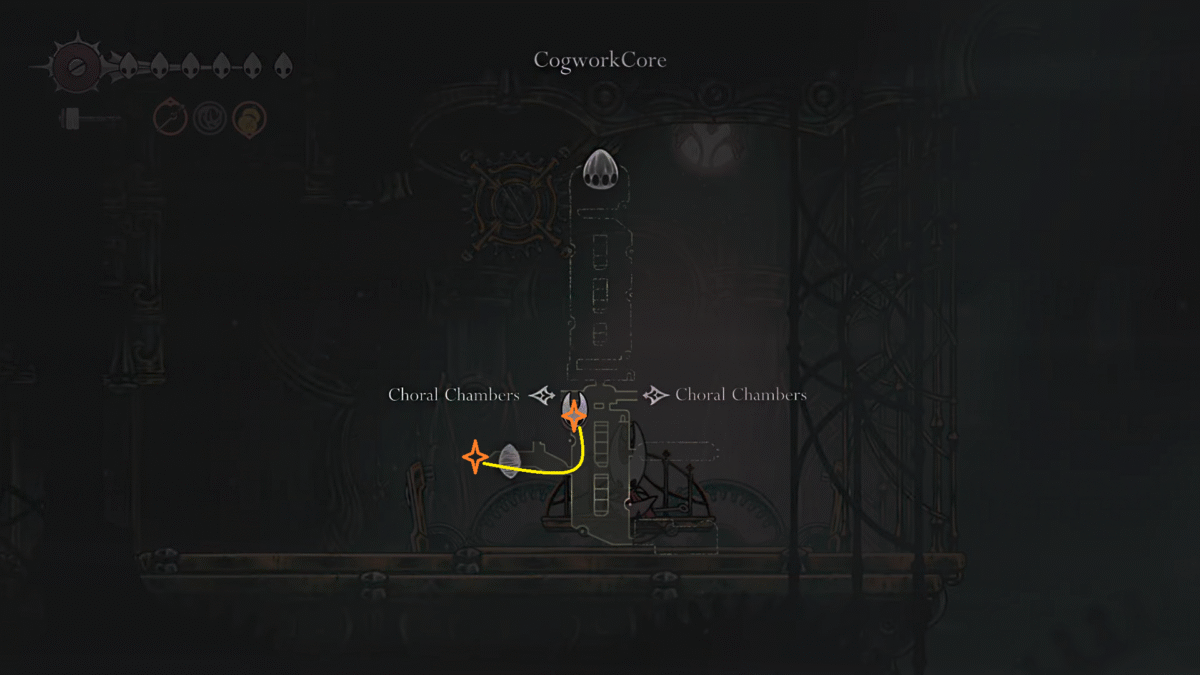
From the Bench located at Cogwork Core, move left and head down until you come across a path on the left. Take the first path on the left, and it will take you to the battle arena. Defeat all the enemies, and you will unlock a room on the left. Get inside the room, and you will find a Mask Shard.
Mask Shard #7 | Weavenest Atla
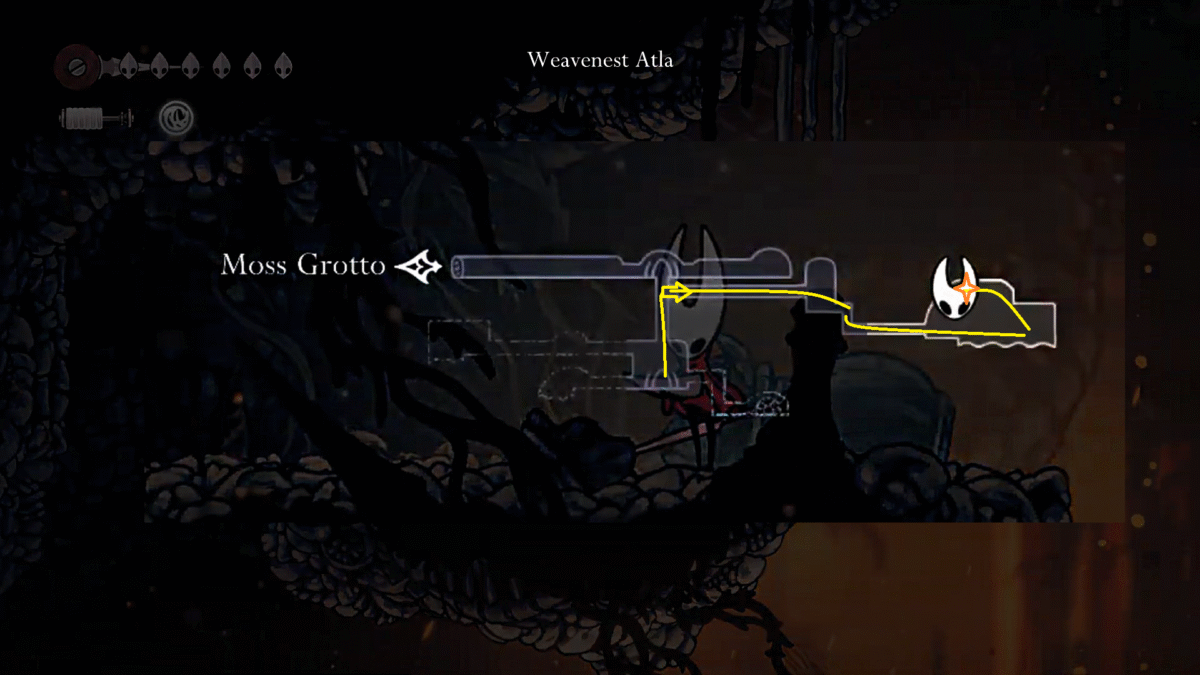
Requirement: Swift Step, Cling Grip, and Drifter’s Cloak
Make your way to the Weavenest Atla from the Bench at Moss Grotto. Once you enter the Weavenest Atla, move right until you are on the teleportation spot that teleports you to the upper area of Weavenest Atla. Now climb on the walls to the upper region, stick to the wall on the right until you find an opening (As seen in the image above).
Don’t go all the way up; move right, follow the linear route until you arrive at the lava room east of the map. Here, you must complete a platforming challenge by jumping on the broken platforms, flying enemies, and orange fruit-shaped objects on the tree to propel yourself upward. Watch out for the lava pouring out of the ceiling. Time your jump until you arrive on the platform on the left. Here you will find a Mask Shard.
Mask Shard #8 | Whispering Vaults
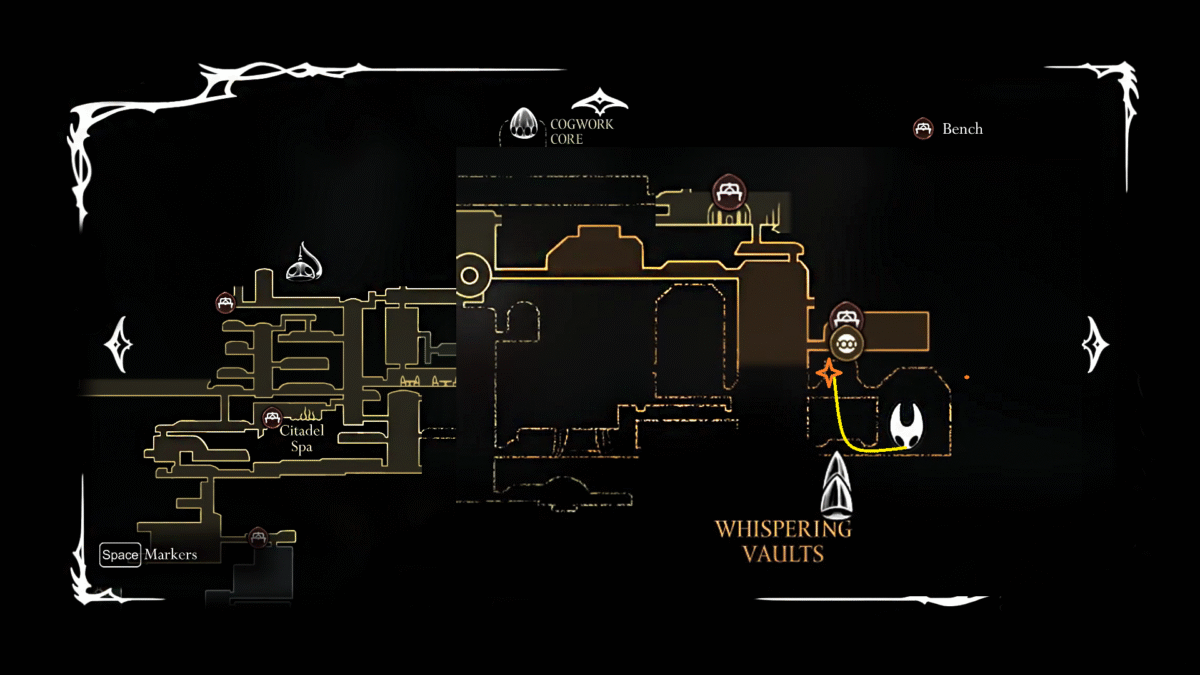
Make your way to the southeast section of the Whispering Vault. Here, take the path on the left until you arrive in the hall. The entire hallway is filled with darkness. Here, you must hit the ceiling to open up a hidden hatch. The hatch location is secret, so you have to hit the ceiling at multiple spots, especially in the middle, to make it open. Climb up on the walls to get to the floor above. Here you will arrive in another dark room. Again, hit the ceiling to activate the hatch and climb to the top, and then one final climb to reach all the way to the peak. Here you will see the Mask Shard being locked away inside a glass cell.
Mask Shard #9 | Bilewater
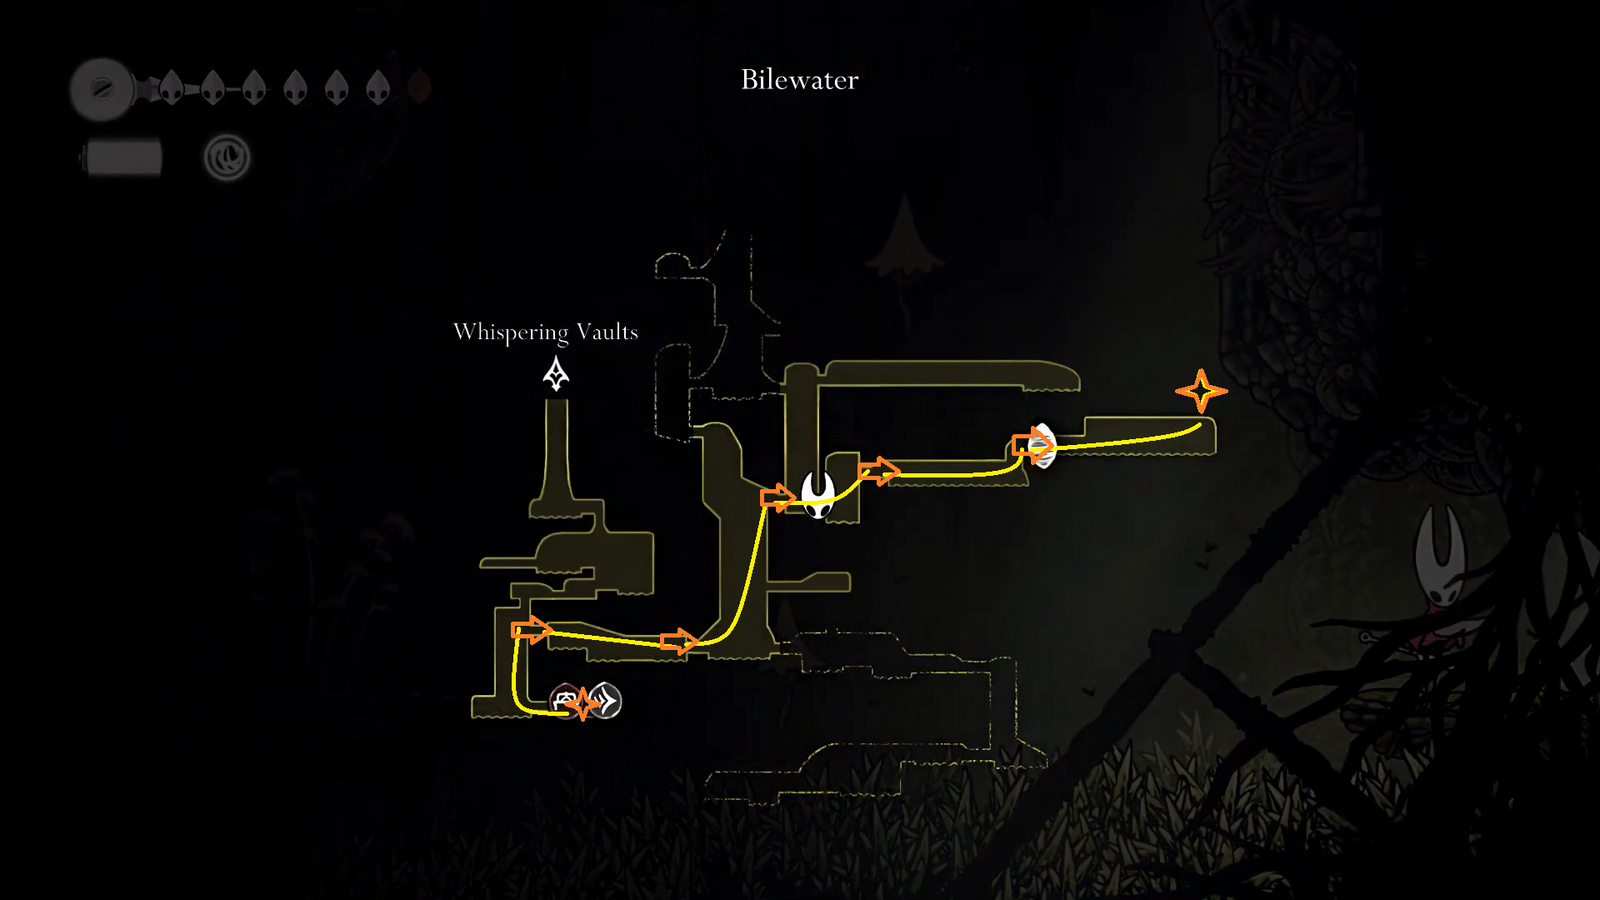
From Whispering Vaults, make your way down to the Bilewater section of the map. The area is filled with swamps and creatures that will jump out of the water to hit you. The Mask Shard is located at the end of the eastern route in the Bilewater. From the Bench at the bottom of the Bilewater, make your way to the northeastern section of the area. We have provided an image that you can use as a reference to get to the place. Having the Clawline ability and the Dash move will help you out a lot while navigating the platform floating in the swamp.
Mask Shard #10 | The Slab
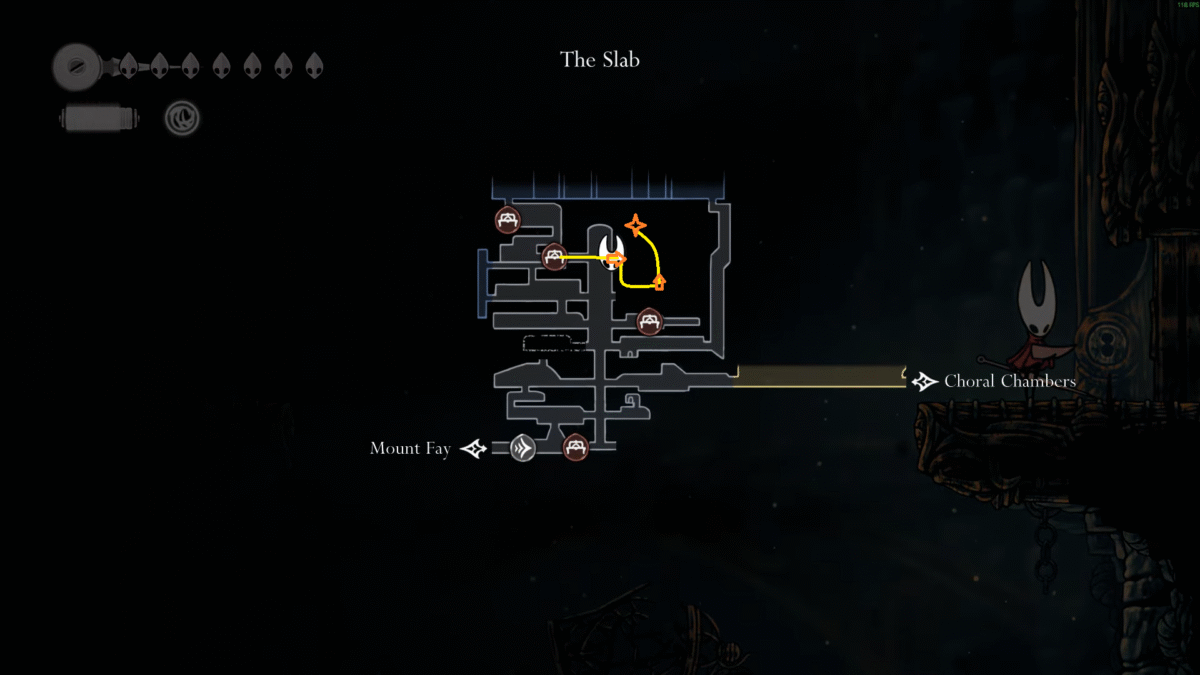
Head to the Bench north of the Slab, now make your way to the right, and you will come across a locked door that requires the Key of Apostate. Unlock the door with the key and then start moving to the right. You will land on a platform that will trigger the trap in the room. Over your head, you will see spinning blades moving on the railing. Use the Needle and Clawline ability to properly jump on the spinning blades to climb to the top. Once you make it to the top, you will find the Mask Shard locked inside a cell. Break it to grab the shard.
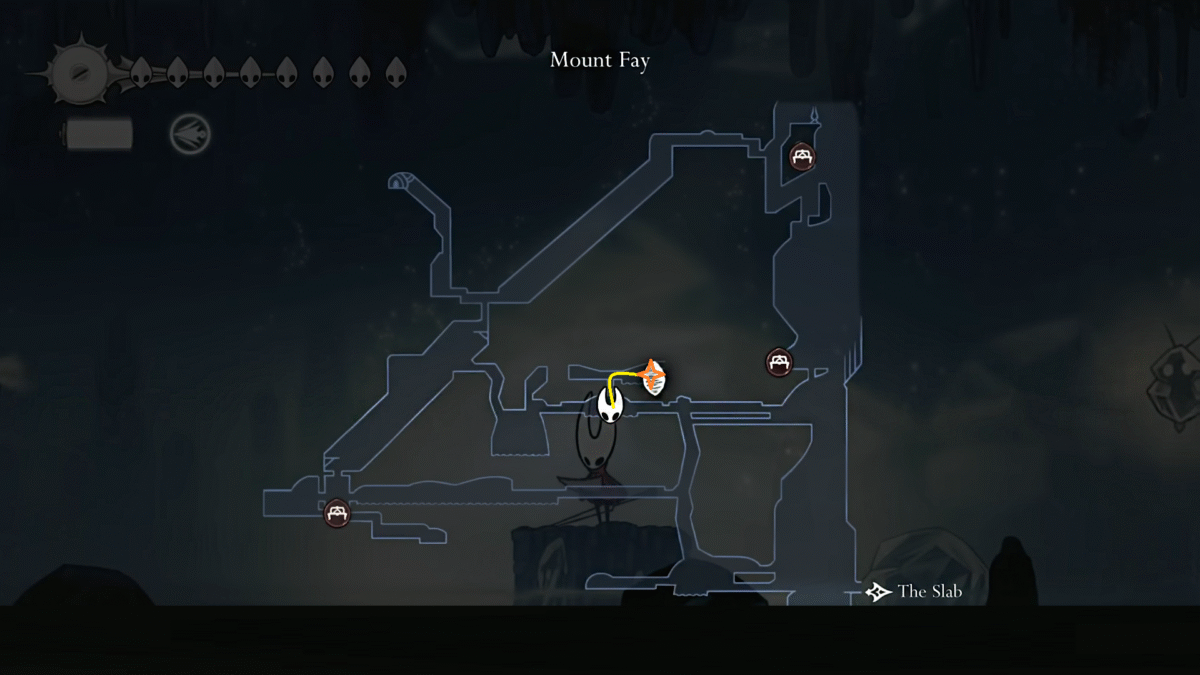
Mask Shard #11| Mount Fay
This one will take us all the way to Mouth Fay, by far the easiest one. Just get to the Bench located west of Mount Fay; you will need to pay 90 Rosaries to unlock the Bench. After unlocking it, jump to the platform on the left to exit the area. Now keep moving left, and after a few steps, you will see a broken tunnel over your head. Jump and climb on the walls inside the tunnel to move upwards and grab the Mask Shard at the end.
Mask Shard #12 | Blasted Steps
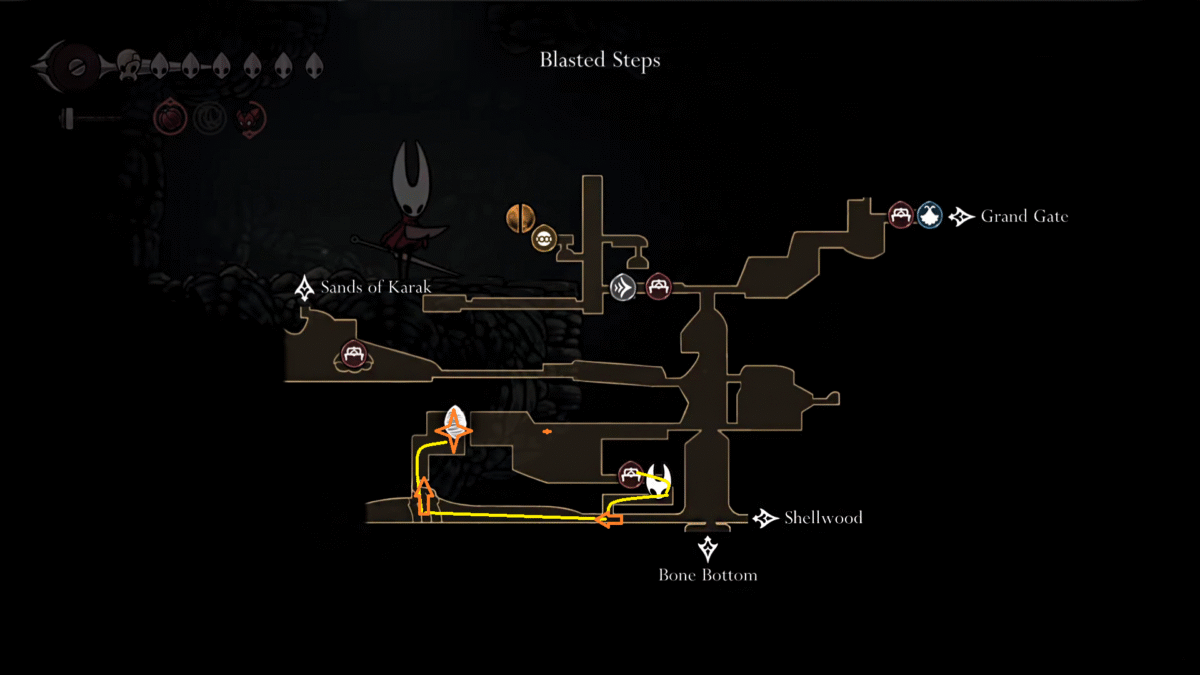
Requirement: You must be in Act III
Get to Blasted Step, now make your way to the Bench located south of the map, right next to the route that leads to Bone Bottom. From the Bench, go right and jump down the hole. Now make your way to the ground and take the left route. After passing the altar, make your way down. Keep heading towards the left. Here, make your way to the floating platform above. It can be quite difficult to make the jump; you must use the Clawline ability to get on the platform. After jumping on a few platforms, you will make it to the top, where you will break the cocoon, and on its left, you will find the Mask Shard at the corner.
Mask Shard #13 | Choral Chambers
Requirement: Requires the completion of The Wandering Merchant and The Lost Merchant Wish in Act III.
At the Bench northeast of Choral Chambers, you will find Jubilana, and you can buy a Mask Shard from her for 750 Rosaries. You can find both Wishes on the Wishboard in Songclave.
Mask Shard #14 | Far Fields
From the Hot Air Balloon south of Far Fields, move towards the right, and you will soon be in the lava area. Here, use the Clawline ability to go up the spot, and you will find a Skull room on the right. Head inside to start the Lava challenge.
Note: Once you enter the Skull, the path will be blocked, and you will not be able to go back. So make sure you are ready before tackling the challenge.
Mask Shard #15 | Bellhart
Requirement: You must be in Act III
Accept the Dark Hearts Wish at the Wishwall in Bellhart. You must be in Act 3 of the game to start it. The quest has you destroy 12 Void Mass in the game. These are simply dark blob creatures clinging to the walls. They can simply be destroyed by common hits, but watch out for their projectiles. Once you have completed the Dark Hearts quest, you will gain a Mask Shard as a reward.
Mask Shard #16 | Bellhart
Requirement: You must defeat the Savage Beastfly two times
Defeating the Savage Beastfly Grand Hunt and turning the wish in the Bellhart will help you get another piece of Mask Shard in the game. Before beating the Savage Beastfly Grant Hunt in Far Fields, you must defeat the Savage Beastfly in Hunter’s March. Only then can you get to Bellhart and accept the Savage Beastfly Grand Hunt Wish.
Mask Shard #17 | Far Fields
Requirement: You must be in Act III
Head to Bench, in the northeast of the Far Fields, and you will find Sprintmaster Swift. Talk to him to start the Fastest in Pharloom Wish. Here, you have to win the race, and you will get a Mask Shard at the end.
Mask Shard #18 | Mount Fay
Requirement: You must be in Act III
Get to the middle of Mount Fay, now make your way to the cocoon spot to find the Mask Shard. Prepare to break a lot of ice and have climbing ability to get to the top. Once you get to the cocoon spot, march your way up by climbing on the enemies and using the Clawline ability.
Mask Shard #19 | Bellhart
Requirement: Complete the Hidden Hunter Grand Hunt wish in Act III
Here, you need to take down Gurr the Outcast in Far Fields. Turning the wish in the Bellhart will reward you with a Mask Shard.
Mask Shard #20| Wisp Thicket
From the Bench southeast of Wisp Thicket, go right and climb up, and then take the exit on the right. In the next area, all you have to do is move right while dodging all the fire bugs. Slow your pace, move carefully; these fireballs can feel relentless. The last thing you want to do is rush to the end of the area. Once you reach the end of the route, climb up, and you will find the Mask Shard on the left.
Congratulations, now you have collected all 20 Mask Shards in Hollow Knight: Silksong.