


Shattered Veil brings in a new set of collectible items scattered throughout the map. Most of them are hidden in plain sight, and some of them will require a bit of work to figure out the location. Here in this guide, we have a piece of detailed information on every intel found in Shattered Veil in Call of Duty Black Ops 6.
All Intel Locations in Shattered Veil
The Intel in Shattered Veil comes in three different types. Each of them will be distinct, as they will be placed in various locations, and you must interact with all of them to count as obtained.
- All Audio Log Intel in Shattered Veil
- All Documents in Shattered Veil
- All Artifact Locations in Shattered Veil
The game does provide hints for all the intel types found in Shattered Veil. While most of them can be found right away without much hassle, some of them will require you to progress through the main questline. We have added a detail under every intel to keep you easily track them.
All Audio Log Intel In Shattered Veil
This section covers all the Audio Logs available to grab in Shattered Veil, along with detailed information on their precise Locations, Hints, and area names.
#1 Shadow Benefactor | Garden Pond
Hint: Water Under the Bridge
Where to Find: Head to Garden Pond, and you will find it underneath the bridge. It will be lying next to the broken wall under the arch.
#2 Obstacles | Conservatory

Hint: Computer Deck-Top
Where to Find: Head to the Conservatory, the same place the Quick Revive Machine is located. Head up the stairs on the right, and you will find the audio log next to the computer on the desk near the entrance of the Conservatory Room.
#3 A Way In | Shem’s Henge

Hint: Bench Press
Where to Find: Go over to Shem’s Henge, and you will find the audio log on a bench next to the Speed Cola machine.
#4 Crackling Eggheads | Motor Court
Hint: Car Wreck
Where to Find: Go to the Motor Court area, it’s the spot outside the Mansion. Walk over to the flipped-over burning vehicle next to the broken wall. You will find the audio log next to the barbed wire.
#5 Within Reach | Overlook

Hint: Dino Might
Where to Find: Get inside the mansion, pass the T-Rex bones, and take the stairs on the right. Here you will find the audio log on a couple of carboxes next to the fire extinguisher and a fallen lamp.
#6 Bodily Harm | Nursery
Hint: Minor Chord
Where to Find: Make your way to the Nursery in the mansion. You will find the audio log on the piano chair directly across the Phd Flopper machine.
#7 Thesis Statement | West Balcony
Hint: Terrace Trees
Where to Find: Get to the West Balcony northwest of the mansion. Grab the audio log on the back of the second tree in the region. You will come across two trees, just check the back of the tree to spot the intel file.
#8 Specter | Kitchen

Hint: The Most Important Meal of the Day
Where to Find: Get to the Kitchen from the Rear Patio, and you will find the audio log on the countertop at the corner of the room.
#9 Shem’s Folly | Library
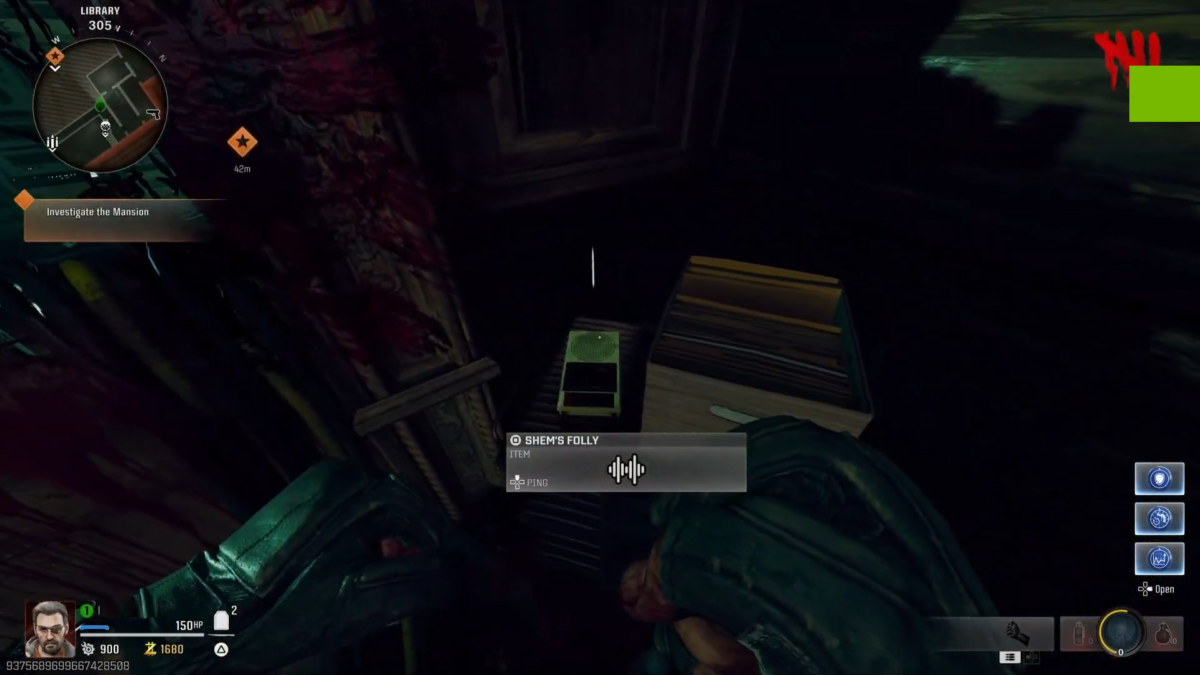
Hint: Shhhhh
Where to Find: Make your way to the Library, take the stairs to the floor above, and you will find the audio log on a desk in the corner next to the broken door.
#10 Prime Time | Overlook
Hint: An Overlook in Security
Where to Find: Head to Security Overlook, where we unlocked the Pack-A-Punch machine, and you will find the audio log on the desk directly across the machine.
#11 Particulars | Service Tunnel

Hint: Tunnel Vision
Where to Find: Head over to the Service Tunnel, now make your way to the Ammo Cache in the room, and you will find the audio log on the blue barrels in the corner next to the Ammo Crate.
#12 Serpent Mound | Armory
Hint: Helmet Head
Where to Find: The last one will be locked up in the Armory. You can access the Armory section in the Supply Depot next to the Teleporter. Once inside the Armory, you will find the audio log on the bench
All Document Locations in Shattered Veil
Shattered Veil only contains three documents in the area. The game gives out clues for the player to track it down. Here is the location of all three document locations in the Shattered Veil map.
#1 Regretfully Yours | Library

Hint: Top Shelf Material
Where to Find: Head to the Study Area after passing through the Library in the mansion. Here you will find the document next to the computer on the table. It can get difficult to detect, since the table doesn’t have any light source highlighting it.
#2: My Warheads | Garden Pond

Hint: Woodsman
Requirement: Tomahawk (You can find it next to the axe on the chopping block in the Garden Pond)
Where to Find: Go to the spawn area in the Garden Pond, and here use your Tomahawk to destroy the log on the ground next to the chopping block. Destroying the log will reveal the document hidden underneath.
#3 A Monstrous Proposal | Study

Hint: Sleepwalking
Where to Find: Follow the steps below to get the document:
- Make it to Round 11, leave one zombie out.
- Now, get to the Study area by passing through the Library section of the mansion. In the Study room, you will come across a Grandfather Clock in the corner of the room.
- Interact with the clock to make the hands spin. Only leave once the hand is spun.
- Now, get to the Director’s Quarters and lie down on the bed in the room. You will soon see the last remaining zombie coming into the room, shoot him from the bed. Stay on the bed, don’t step outside the bed.
- Eventually, you will fall asleep, indicated by the fade to black screen. When you wake up from sleep, you will see glowing footprints from your bed leading outside.
- Follow the footsteps silently without making any noise.
Note: When you are following the footsteps, make sure to crouch. Don’t run, or walk, or shoot the zombies on your way. If you make any noise, they will wake up from their sleep and ruin your chance.
- The footsteps will lead you to a locked chest (in the Study room), where our job is to find the key. Which we can only loot from zombies. To find the zombie with the key, you need to observe the “Zzz” colors on their head.
- All the zombies will have Z letters coming out of their heads, indicating their sleep state. Most zombies will have the letter Z in the color white. But only one zombie will have a Z letter in gold. That’s our zombie that holds the key to the lock.
- You can now kill the zombie that holds the key or anyone who comes for your throat. Since we already know the location of the chest, you are free to kill any zombie in the area.
Once you have taken down the zombie with the key, grab the key off the corpse and put it in the chest in the room. You will receive the final document intel in Shattered Veil.
All Artifact Intel Locations In Shattered Veil
The last section will feature all the artifacts found in the Shattered Veil location. We have added the details of hints and precise locations to help you track each of them down easily.
#1. Rental | Director’s Quarters

Hint: Bed Head
Where to Find: Get to the Director’s Quarters in the mansion. Here, get on the bed and you will find the Rental artifact placed between two pillows.
#2. Family Portrait | Nursery

Hint: Playtime
Where to Find: Get to the Nursery, where we found the Phd flopper machine. Interact with the table in the middle, by standing on the carpet side. And you will soon have a Family Portrait artifact coming out of the table, landing on the floor.
Note: This one is hidden; you need to approach the table in the middle from the carpet side for a successful interaction.
#3. Unwelcome Guests | Service Tunnel

Requirement: 2x Semtex Grenade
Hint: What The Truck?
Where to Find: Find the truck stuck between two giant doors in the Service Tunnel section of the map. Now, equip the Semtex and toss it at the truck’s backside. After throwing 2x Semtex, the artifact Unwelcome Guest will come out of the back of the truck and land on the floor.
Note: Make sure to wait for a while before throwing the next Semtex grenade. Throw the grenade after witnessing the explosion from the first Semtex grenade.
#4. Deed of Sale | Nursery

Requirement: Thermax Weapon/ Jumpscare Quest
Hint: Pain In the Glass
Where to Find: You will need a weapon with a Thermal Scope equipped. Once you have the weapon, go outside the mansion at the Motor Court.
- Make it to Round 13. You must equip the weapon with a Thermal Scope.
- Now look at the Mansion’s windows. You will see red eyes staring at you through the glass.
- When you see one, quickly equip the weapon with a Thermal Scope, and use the scope to stare at the eyes. Through the Thermal Scope, you will see a full body attached to the eyes, but you don’t need to shoot. Just watch the body for a couple of seconds until it disappears.
- Carry on this process five times. The front of the Mansion will cover three spots, and then you need to go to the back of the Mansion to cover the rest of the Eyes.
Note: The figures are only visible to the outside. You must stay outside of the Mansion, whether front or back, to catch the figures with your Thermal Scope.
Once you catch five ghosts through the window, make your way to the Nursery room in the Mansion. Interact with the mirror at the corner to grab your artifact.
#4 Ray Gun MK2 | Armory
Requirements: Unlocking a sealed door in the Armory
Where to Find: Get to the Service Tunnel, make your way to the Armory. Here, use the hand on the Keypad and unlock the door to Ray Gun MK2. Follow the steps to get the Ray Gun MK 2 quickly in Shattered Veil.
- First, get to the Service Tunnel and then survive to Round 13.
- Once you make it to the round, a Lab Technician zombie will spawn. When you kill this specific zombie, it will drop a Floppy Disk.
- Now, get to Easy Foyer in the mansion, in the room, and interact with the computer in the corner.
- After a few seconds, the printer next to the computer will print out a paper with the code. The code will be capitalized in the print; remember that four-letter codeword.
- Now head down to the Nursery room, here you will find a blackboard with letters written all over the board.
- On the blackboard, you will find letters in a group, some groups will have one letter, while other groups will have 7 or 8. Here you need to look for the codeword letters in the group that shares the code word letter.
Ex- Let’s assume that the code word is FIZZ.
- If group A has 4 letters (F, G, H, J), and the codeword has F in the first letter, then you could F = 4 (number of letters in the group). If another group has 3 letters (I, Y, Z) and the codeword I in the second letter of FIZZ, then you should count I = 3.
- Once you have the code, head over to the Service Tunnel and put the code in the keypad in the room to open the large door. Be prepared, once the door opens, you will encounter a Red Doppelghast.
Killing the Red Doppelghast will drop an arm on the floor. Take the arm to the Armory to open the sealed locker to gain access to the Ray Gun MK2 inside.
#5 Z-Rex Tooth | Main Boss
Requirement: Defeat the Z-Rex Boss Fight
You need to progress to the end of the story to go toe-to-toe against the giant Z-Rex. Defeating the dinosaur will help you obtain the Z-Rex Tooth Artifact.
#6 Hip Flask
Requirement: Progress in the Main Questline
Near the beginning of the main quest, you will be tasked to brain rot a zombie to ring the bell. Here, the zombie will drop the Hip Flask on the table.
#7 Nuclear Plant Inspection
Requirement: Progress in the Main Questline
At one point in the main mission, you will be searching for an Audio Log, a Nuclear Plant ID Badge, and a Ledger. After getting all the items, you will interact with the bookshelf found in the Library. Here, solving a puzzle will unlock a brand new room that holds the artifact Nuclear Plant Inspection Report, which will be lying on the table.
#8 Antler Carving
Requirement: Progress in the Main Questline
During the mission where you collect 3 chalices and activate them on the map. Eventually, you will find a codeword that unlocks a safe in the Western Hallway. Unlocking the safe will award you the Antler Carving Artifact.
The new map comes with its very own easter eggs, and if you are looking to get these, check our guides on all Mr Peeks parts in Shattered Veil, and on all 3 headphone locations in Shattered Veil.