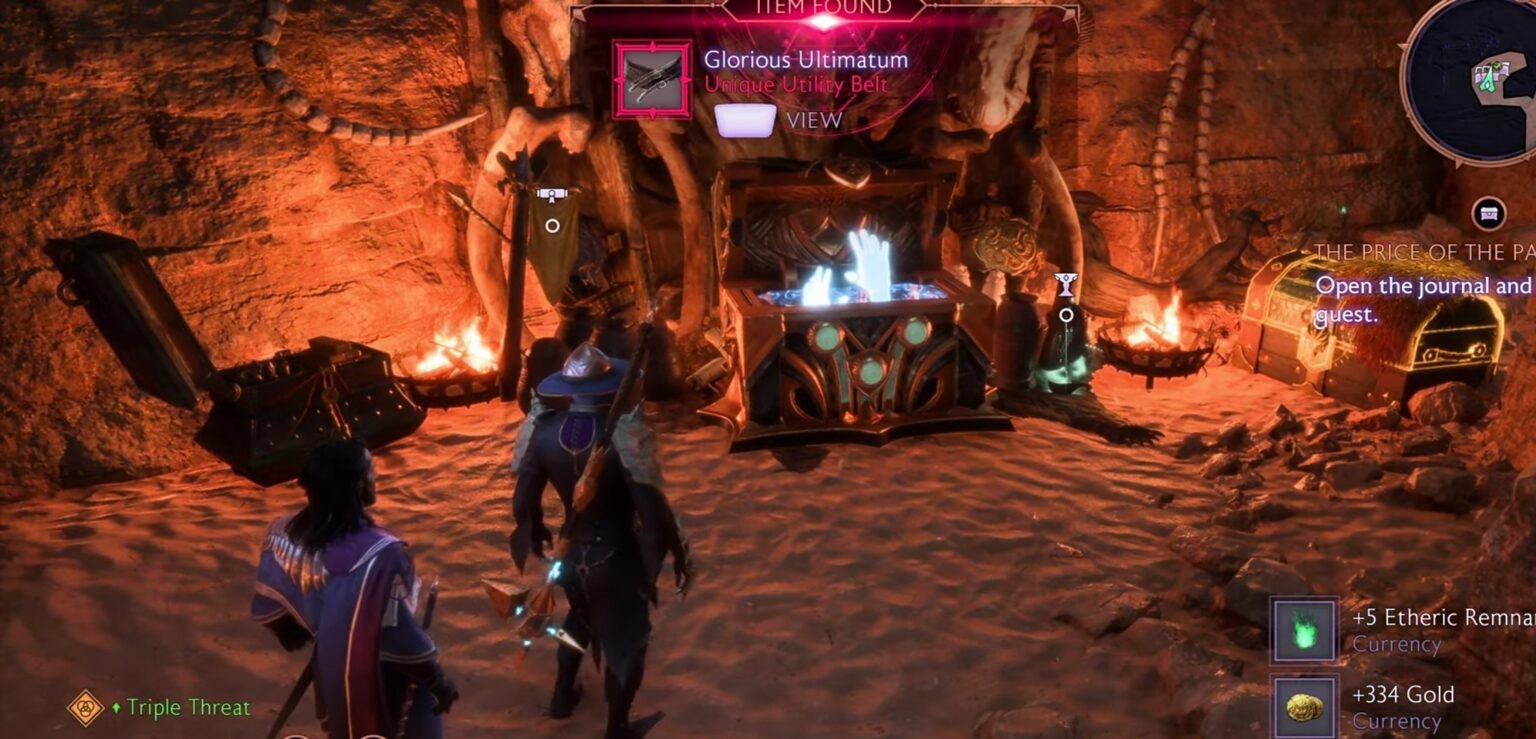
Hossberg Wetlands carries hidden secrets and sweet rewards inside many chests scattered throughout its map. It can be difficult to pinpoint each one of them, as some are locked behind puzzles and ability requirements. You must progress through the main quest to unlock areas and a companion personal quest to unlock the abilities required to resolve some of the obstacles for the chest. Here in the guide, we have put up details on all 20 chests in Hossberg Wetland in Dragon Age: The Veilguard.
Locations Of All 20 Chests In Hossberg Wetlands In Dragon Age: The Veilguard
Out of the 20 treasure chests, there are 2 Unique Weapon chests. While most of the locations are easy to figure out, some of the chests here do require you to go through some rough platforming or solve a puzzle to get to them. Also, a few areas containing these treasure quests unlock only later into the story, so you may want to wait till you progress enough before tackling all the Hossberg Wetlands treasure chests.
Chest Locations #1 & #2
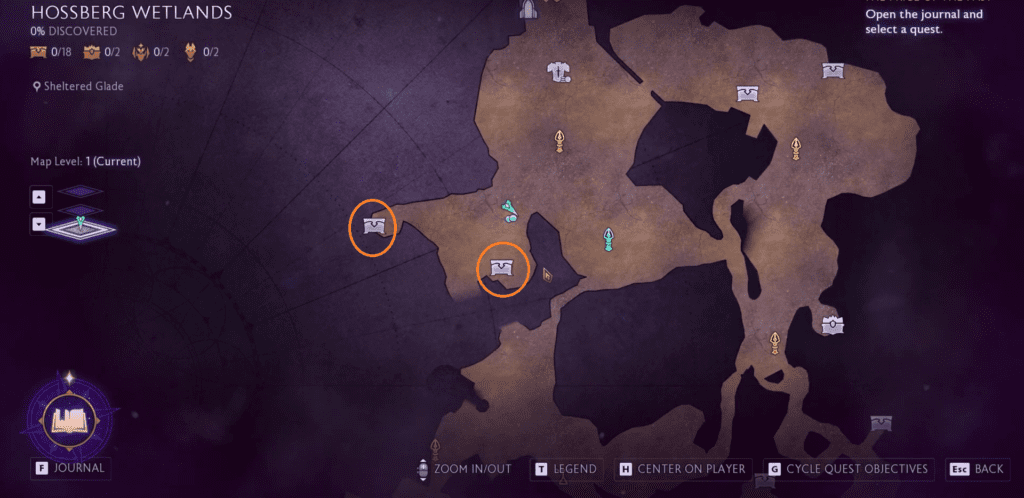
Location: Sheltered Glade, Hossberg Wetlands
Rewards: Monster Leathers, Frontline Plated mail
Ability Required: Blight Hunter
Puzzle: Rotate the Statues
Chest #1
Make your way north of the Sheltered Glade, and head southwest of the beacon. Here you will see a chest locked behind the door. To unlock the door we will need to move the statues on the roof in the proper direction. Another layer of the puzzle is that to get to the rooftops you will need to use a companion ability Blight Hunter. First, we focus on freeing the statue and then we get to solving the puzzle of this section.
Free the Statues:
Destroy two blobs next to a Blight Abscess to free the ladder to the ledge.
- Use the Blight Hunter ability on the Blight Abscess hanging on the scaffolding next to the tower. Once you have destroyed the orange blob, this will light up the string of destructible pipes connecting to it. The next step is to use a range weapon to destroy the blob left of the Blight Abscess.
- On the second step again use the Blight Hunter ability on the Blight Abscess on the scaffolding, but this time use the range weapon on the blob behind the Blight Abscess. Get to the right of the Blight Abscess to see the blob.
Once the blob is destroyed, it will free up the ladder. Climb the ladder, we have a puzzle to solve.
Solve the Statue Puzzle:
Here you have three statues with activators, two of them will be directly in front of the ladder opening, and one on the right. On the left of the two statues, you will see a brazier. We have to light up the brazier by aligning the statues in the right order.
- Interact with the first statue 3 times to make it point to to the wall on the left.
- The second statue, which is directly across the first one, interacts with the activator twice to make it point to its right.
- The third statue, which is at the right of the second one, interacts with it once, it will point towards the area.
Once you have correctly arranged all of them, the light will pop up in the brazier signaling the door for the chest is now open. From the third statue, jump across the platform ahead, go through the door and you will find the chest at the edge.
Chest #2
Compared to the hassle of the first chest, the second chest in the Sheltered Glade is much easier. Just get to the west of the Sheltered Glade, and you will find the second chest next to a tree in the corner of the area.
Chest Locations #3 & #4
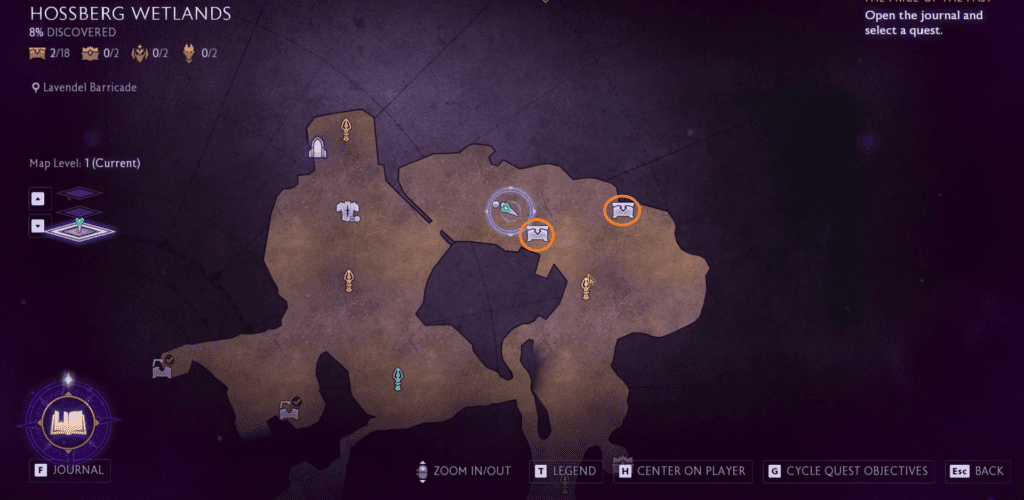
Location: Lavendel Barricade, Hossberg Wetlands
Rewards: Recurit’s Simple Tunic, Pursuant’s Implements
Ability Required: Unbind Wards
Travel to the beacon north of Lavendel Barricade, and head towards the village area on the east.
Chest #3
Start moving towards the chest area on the left of the map, enter the destroyed house, and you will find the third chest in the corner of the room.
Chest #4
From the house, get out, turn right and another right, take the stairs on the left, and go through the doorway right across the stairs. Once inside the building, walk across the beam on the right to get to the section with the fourth chest. To open the chest, you will need to use “Unbind Wards” to open it.
Chest Locations #5
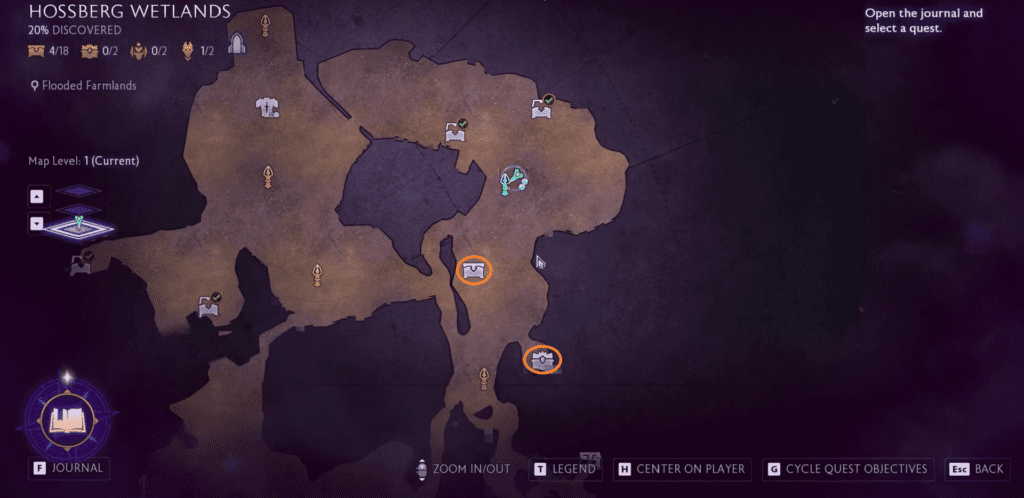
Location: Flooded Farmlands, Hossberg Wetlands
Rewards: Etched Raider’s Axe,
Travel to the beacon at Flooded Farmlands, directly below the Lavendel Barricade (last location).
- From the beacon, turn left, take the stairs, and get inside the house. Here take the ladder to the top, you will need to climb on the ledges to get to the top.
- Once you are on the top, you will find the chest to your left. Open it to get the reward.
Chest Location #6
Location: Old Crossroad, Hossberg Wetlands
Reward: Emberborn Shard
Travel to the beacon at Old Cross, directly below the Flooded Farmlands.
- Take the stairs right of the beacon, and keep heading straight, until you come across two branching paths, one directly ahead of you and the other to your left. Take the path on the left, and then turn right.
- Keep heading straight, take the stairs to the upper floor, turn right, and climb another flight of stairs. Pass the green pot, cross the wooden bridge and you will find the sixth chest in Hossberg Wetlands.
Chest Locations #7, #8, #9 & #10
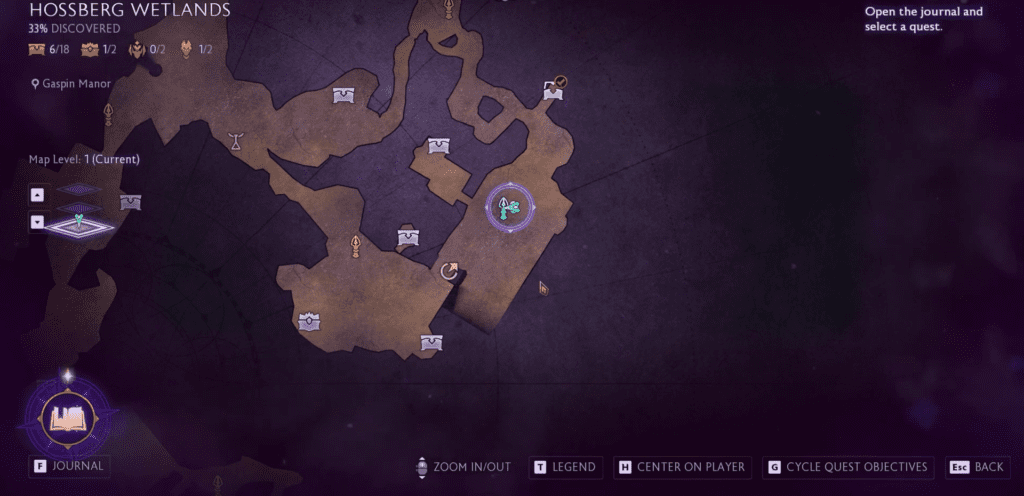
Location: Gaspin Manor, Hossberg Wetlands
Reward: Griffon’s Talon, Battlehorn, The Griffon’s Tail, Weisshaupt’s Wall
Puzzle: Align three Statues
Travel to Gaspin Manor east of the map. Here we are going to start our journey to grab 4 treasure chests in the same location.
Chest #7
Go through the archway behind the beacon, and take the doorway straight next to the barrels and crates. Keep heading straight, go through another doorway, and you will find the chest to your right.
Chest #8
From the beacon, turn around take the stairs on the right, and climb another flight of stairs to the floor above. Turn left and climb the stairs to reach the upper floor, go through the rocky doorway. Jump across the platform, and you will find the chest to your left.
Chest #9
From the beacon, go through the archway, and take the stairs on the left. Here use your ranged weapon to break the wooden barrier right of the steel door to open a new room. Head inside the room and you will find the treasure chest.
Chest #10
Statue Puzzle: We must align three statues in a proper direction to light the green brazier.
Solve the Statue Puzzle
Head back to the beacon area, now here we have statues around the arena that we must interact with to turn them in the right direction.
- Interact with the statue left of the stairs, just move it only once.
- Now head right of the beacon, and interact with the statue twice.
- We will find the third statue right across the first one, or right from the second one. Here interact with the statue only once to activate the brazier.
Now climb the stairs next to the first statue, turn left, and go through the doorway on the left. In the room, you will find a light bulb.
Carry the bulb to the steel door we came across where we found our ninth chest. Just go through the beacon archway, and then turn left and you will arrive at the steel door. The light orb will soon come off your character and will interact with the lever on the other side of the steel barricade.
Once the steel barricade is lifted up, you can head inside and take the stairs on the left. make your way down to the ground. Here you will find the tenth chest on the right inside of a cave.
Chest Location #11
Location Solitude’s Edge, Hossberg Wetlands
Rewards: Winged Wall
Here must destroy the blight-infested rot to free the area to open the chest. Head to the beacon at Solitude’s Edge, and move southeast of the beacon, you will eventually come across a broken house, get inside the house, and get out of the back door exit to find the chest
Chest Location #12
Location: Blighted Grove, Hossberg Wetlands
Reward: Tevinter Longcloak
Required Abilities; Blight Hunter, Dragon Fire
The chest is located directly north of the beacon point.
- Head towards the north direction from the beacon, and make your way to the Blighted Grove. Now get to the treasure chest area, it’s going to be placed on a ledge above the ground.
- Go to the right of the chest, and climb the ledges. Here use the Blight Hunter on the Blight Abscess to destroy it, then use the range weapon to free red veins off the rock. The last orb to be on the right of the ledge.
- Once the blob on the wall is destroyed, you can go through it, here you will have to use Dragon Fire on the Blistering Drakestone.
Here look up, and you will find another Blight Abcess, use your ranged weapon, and then destroy all the red veins in the area to unlock the route to the treasure chest.
Chest Location #13
Location: Swamp Road, Hossberg Wetlands
Rewards: Recruit’s Simple Tunic
Travel to the beacon to the Swamp Road, and make your way left of the beacon to reach the Lost Village area. Stick to the left route, then turn left from the busted wall on the left, and take the wooden walkway along the wall. To reach the platform to find the #13 treasure.
Note: This chest releases poison gas, so watch out after opening it.
Chest Location #14
Location: Lost Village, Hossberg Wetlands
Reward: Pursuant’s Implements
Ability Requirement: Plcate Mischief
Head to the chest location in the Lost Village, the chest will be located on the upper floor. To get to the upper floor, we will need to use a ladder.
- First, find the light orb near the chest area, it will be located next to the busted artillery machine. Here use Placate Mischief to Free the light orb. Now take the light orb to the chest location. The floor under the chest will have the activator, use the light orb to activate the mechanism.
- After a few seconds, a ladder will drop in from the floor. Climb the ladder and open the chest to get the reward.
Chest Location #15
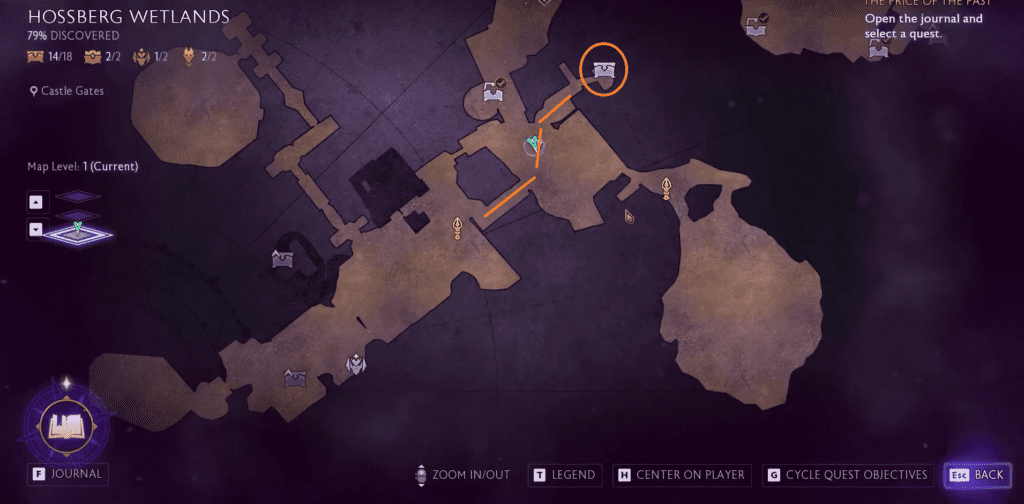
Location: Castle Gates, Hossberg Wetlands
Reward: Warden’s Shell
Travel to Castle Gates beacon in Hossberg Wetlands, and make your way to the chest located northeast of the map.
- From the beacon, move towards the east. Once you are in the open area, take the stairs on the left and go through the doorway to reach the area near the water.
- Here walk across a beam to reach the platform with the chest on it.
Chest Location #16
Location: Blighted Shallows, Hossberg Wetlands
Reward: Ensign’s Helm
Ability Requirements: Eternal Hymn
Travel to the beacon at Blighted Shallows, from the beacon, take the route on the left. Then take another left and keep moving forward. Take one last left to reach an area blocked by the blobs.
Here use the Eternal Hymn on the wall ahead of you to reveal the blob underneath. Destroy the blob and then activate the wall with Eternal Hymn again to get to the upper floor room.
Break the wooden barricade in the room, and you will find the chest on the right near the edge.
Chest Locations #17 & #18
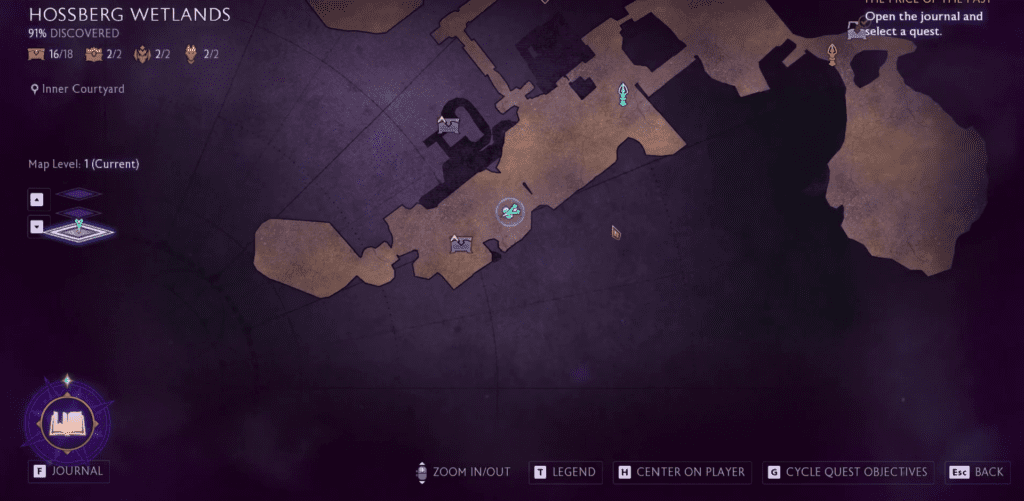
Location: Inner Courtyard, Hossberg Wetlands
Reward: Recruit’s War Hat, Etched Raider’s Axe
Ability Requirements: Soothe Torment
Chest #17
Travel to the Inner Courtyard, and then proceed to move towards the west of the beacon. Here you will eventually arrive at the first chest location, which is above the ground. Go through the archway right of the tower, take the stairs, and then jump to the platform on the left to find the chest.
Chest #18
From the last chest, take the path on the right, and then jump across the gap. Here start moving toward the right. Here you will come face to face with two branching paths, take the path on the left with rotating stairs.
- Climb the rotating stairs, you will find an activator, we will need a light orb to activate it, jump down to the wooden floor straight. Use the Soothe Torment Ability on the Torment to free the light. Now that you possess the light, it’s time to make your way back to the activator.
- Once the light orb interacts with the activator, the ladder will soon drop right next to it. Climb the ladder, jump onto the platform on the right, take the ramp and you will find the last treasure chest of Hossberg Wetlands. Open it to collect your reward.
Chest Location #19 (Unique Weapon)
Location: Old Crossroad, Hossberg Wetlands
Reward: Wedge Of Destiny (Aged 10 Years)
Travel to the beacon at Old Crossroad, here turn left from the beacon and stick to the right wall. And you will find the Unique Weapon: Wedge of Destiny (Aged 10 Years) Treasure box in the cave on the right. You must destroy the corruption to get inside. Like many treasure chests in the article, the unique weapon chests also carry the same principles. Make sure to finish all the side quests and companion quests to gain access to these areas or chests.
Chest Location #20 (Unique Weapon)
Location Solitude’s Edge, Hossberg Wetlands
Rewards: Field-Commander’s Helm
Travel to the beacon at Soltitude’s Edge in Hossberg Wetlands. head to the area southwest of the beacon to find the chest. Go to the end of the area on the left, and you will find the Unique Weapon: Field Commander’s Helm inside a treasure box, next to a broken wall.
That’s it, now you have collected all the treasure chests in Hossberg Wetlands. Want to open some more chests in the game and collect the reward to set your gear to the legendary level? Then check our all-chest guides on Dock Town, Necropolis Halls, and Treviso Canals.


