Close Menu

    Subscribe to Updates

    Get the latest creative news from FooBar about art, design and business.

    What's Hot
    How To Upgrade Needle In Hollow Knight: Silksong
    September 5, 2025
    How To Defeat The Widow in Silksong
    September 5, 2025
    Simple Key Location & Use In Hollow Knight: Silksong
    September 5, 2025
    Facebook X (Twitter) Instagram
    TheGameSlayerTheGameSlayer
    • Home
    • News
    • Guides
    • Features
    TheGameSlayerTheGameSlayer
    Home»Guides»Hollow Knight: Silksong – The Lost Fleas Quest Guide
    Guides

    Hollow Knight: Silksong – The Lost Fleas Quest Guide

    By Sagnik AdhikarySeptember 5, 2025Updated:September 5, 2025
    Hollow Knight: Silksong The Lost Fleas Quest prompt.
    Hollow Knight: Silksong by Team Cherry
    Share
    Facebook Twitter Reddit WhatsApp Pinterest LinkedIn

    Hollow Knight: Silksong’s Lost Fleas Quest can be picked up by talking to Fleamaster Mooshka at the central Bench of the Marrow. Head towards the Bench to find the Fleamaster, along with some Fleas beside him. There are five Lost Fleas located around different areas in the game. In this guide, we’ll help you find all of them easily.

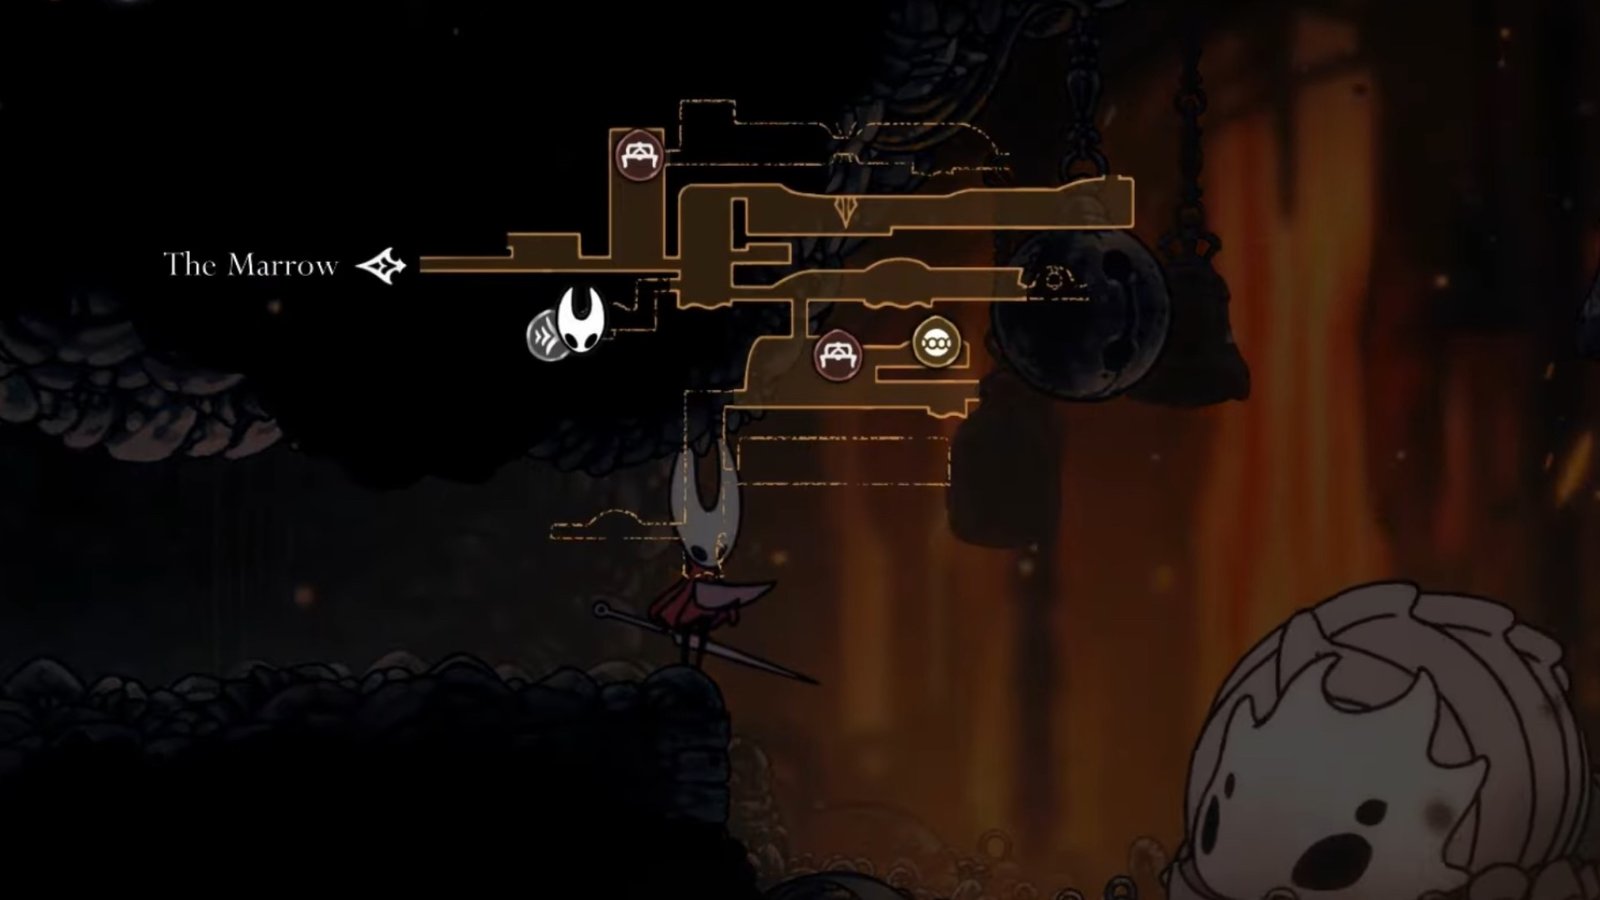
    Lost Flea #1: The Marrow

    Hollow Knight: Silksong screenshot featuring the Marrow map.
    Image via TheGameSlayer

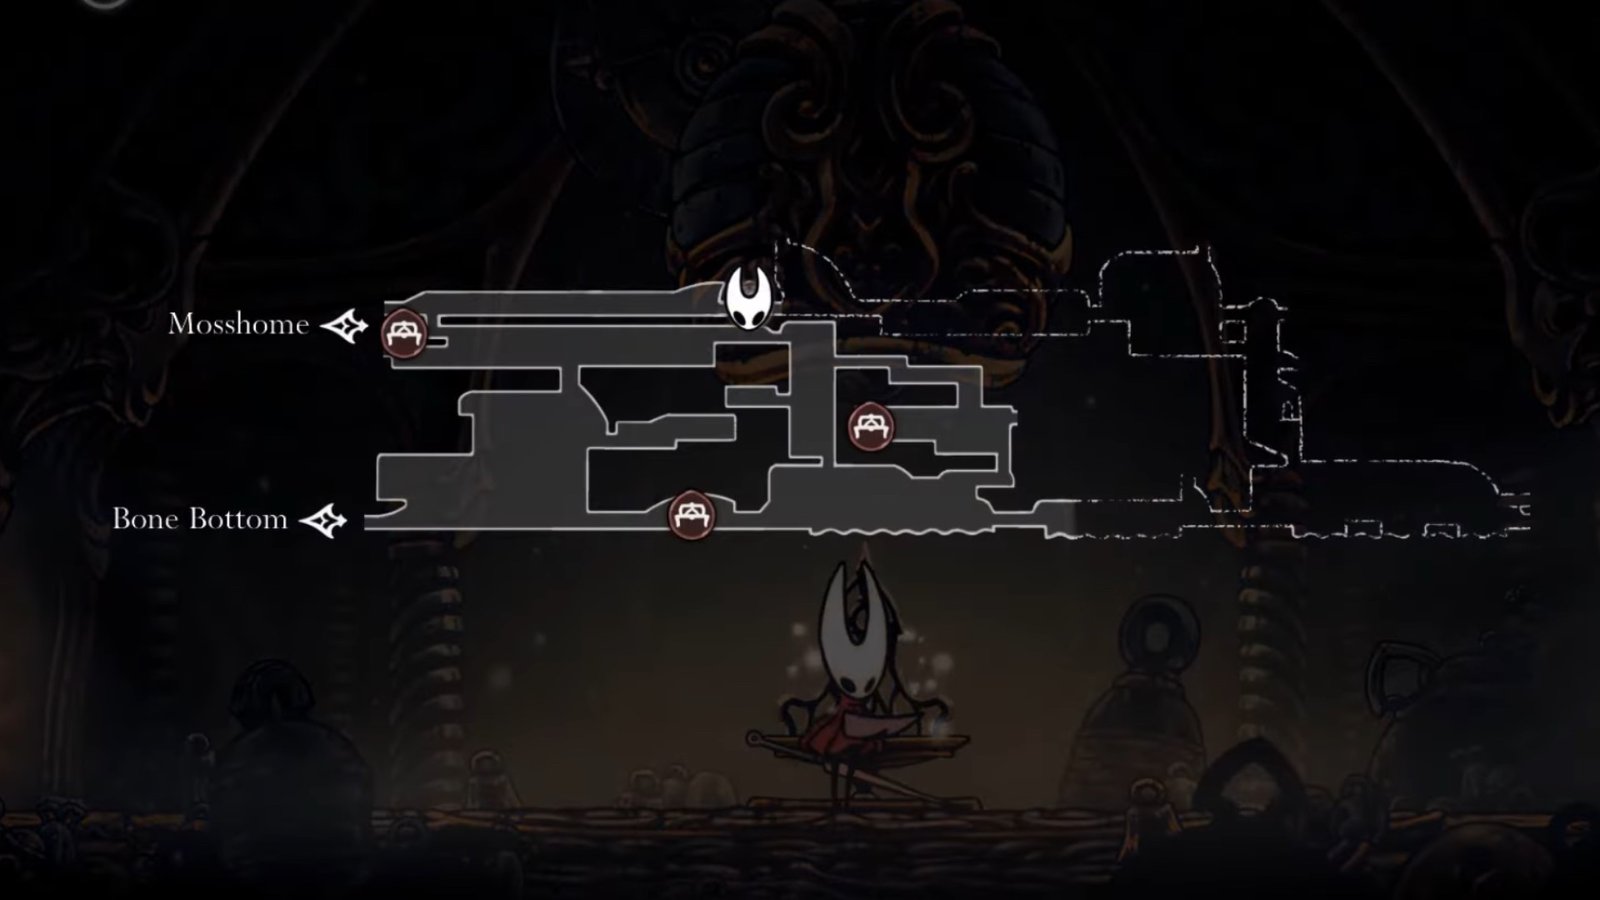
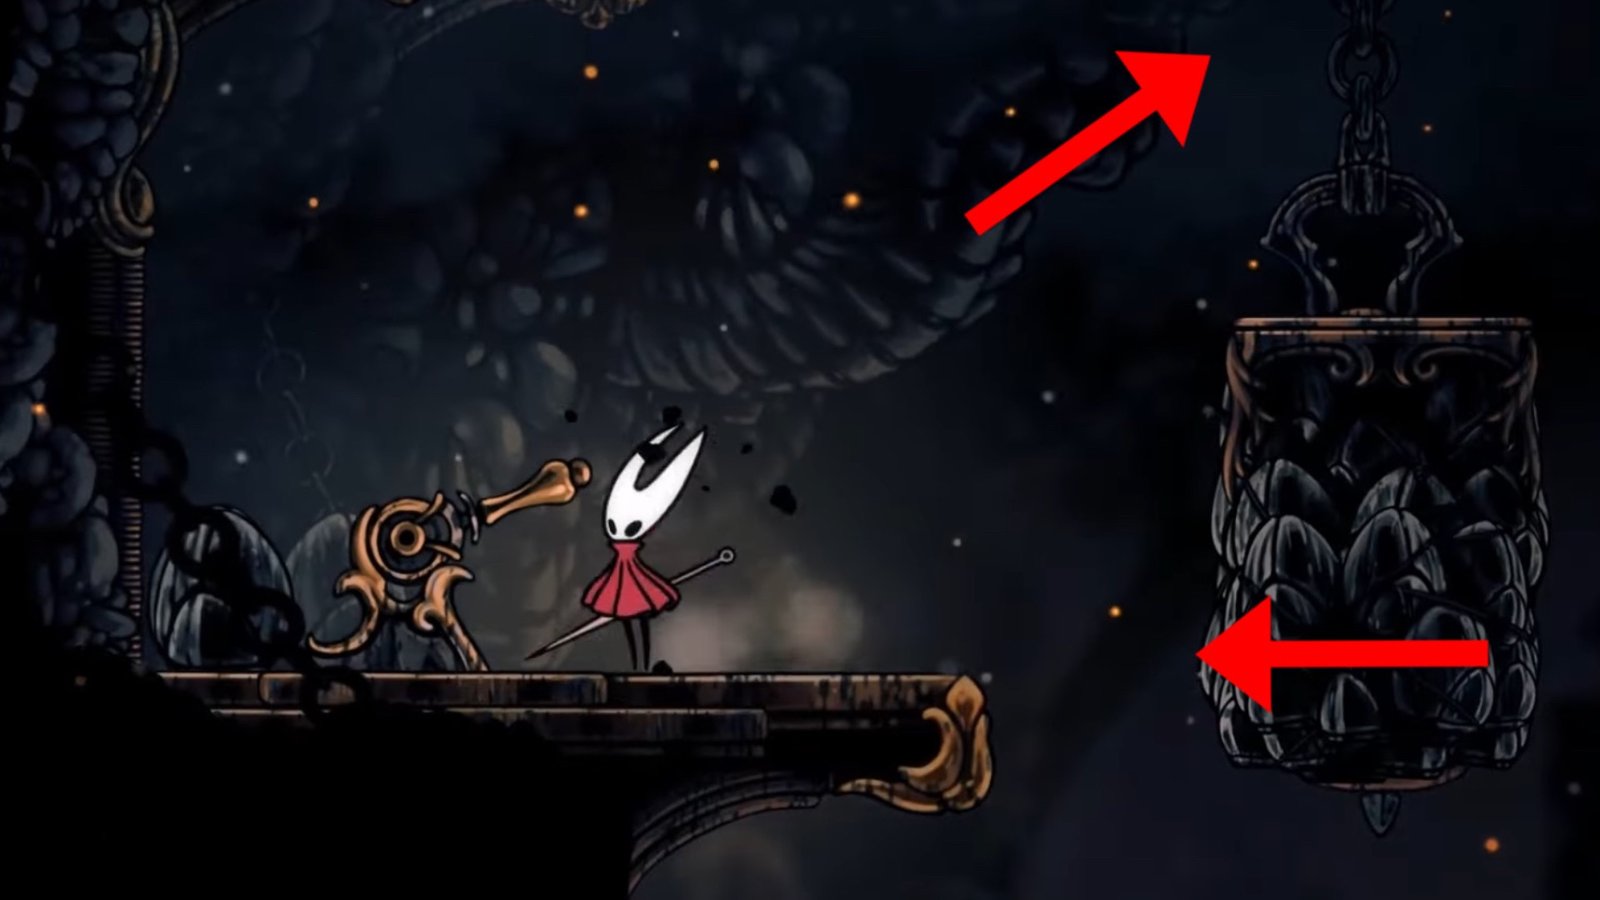
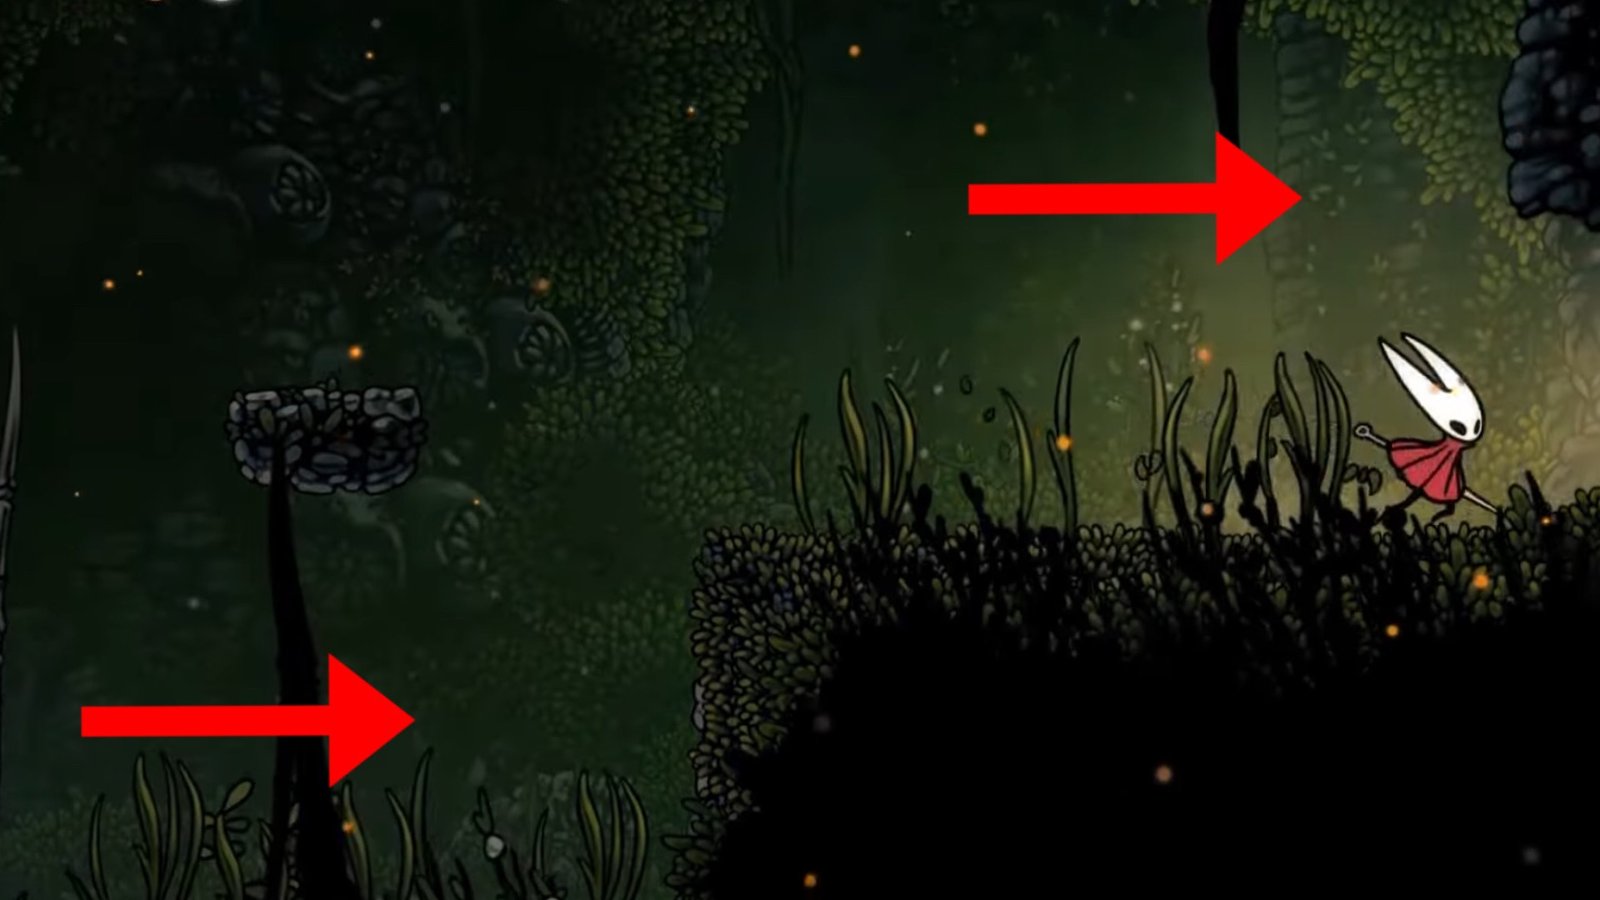
    For the first Lost Flea, start at the Bench located at the top of the map in the Marrows. From there, head right and exit the area to the next one.

    Hollow Knight: Silksong screenshot featuring Hornet on a platform inisde the Marrow.
    Image via TheGameSlayer

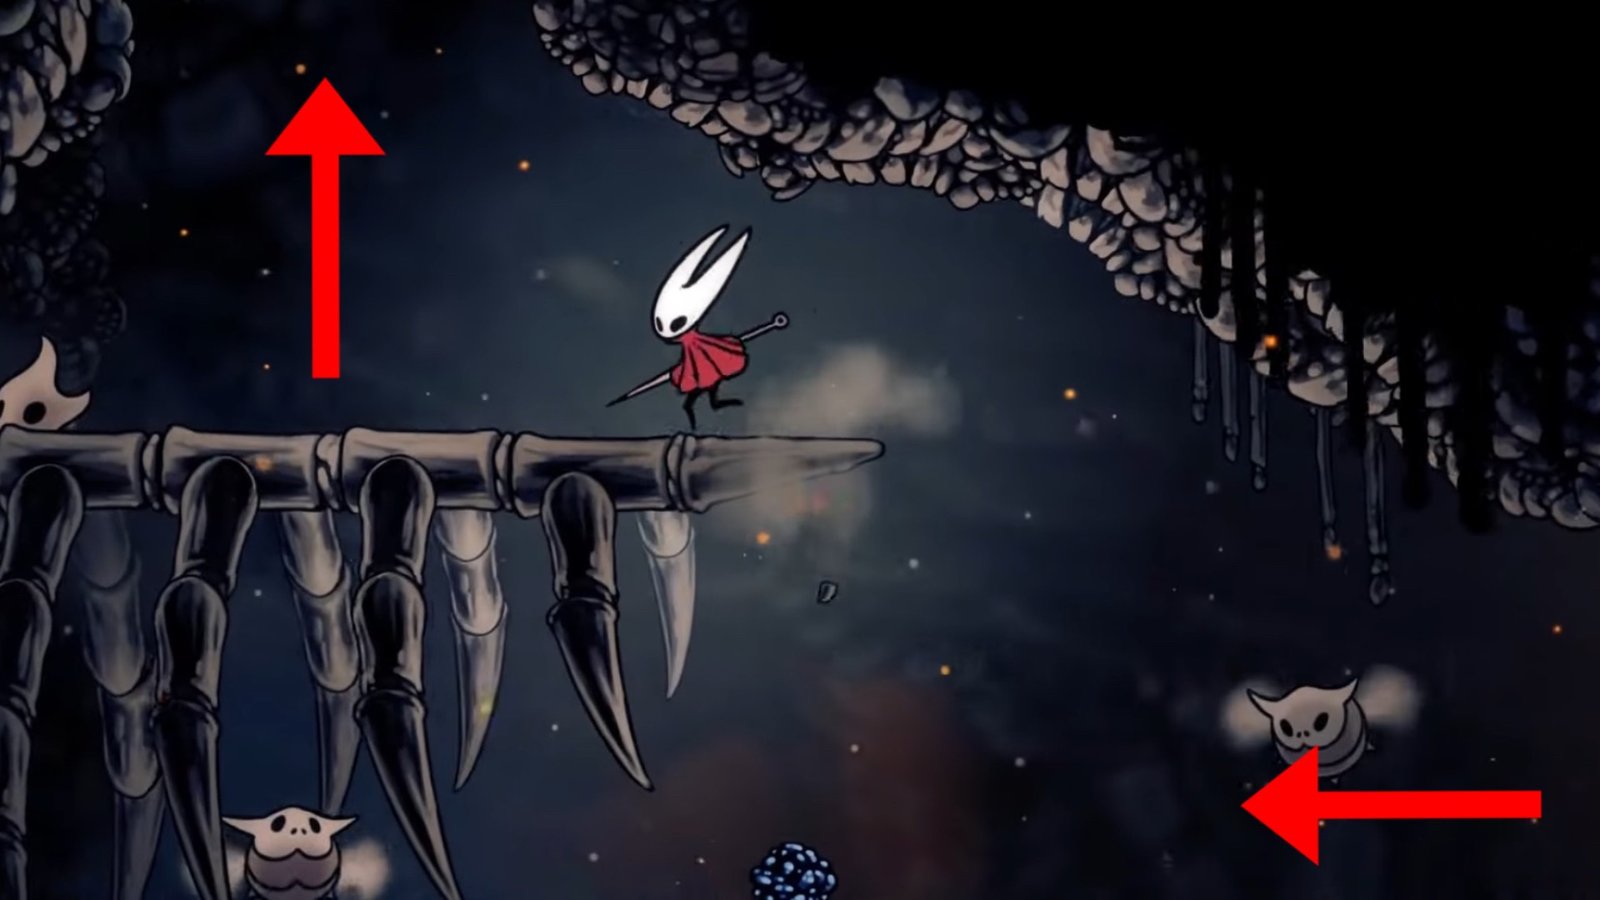
    In this area, head to the far right, then jump up and climb the platforms that are headed towards the left. Continue climbing up until you see an opening to the area above. Climb up the platform, jump through the opening to reach the next area.

    Hollow Knight: Silksong screenshot featuring Hornet on a platform inisde the Marrow, heading right.
    Image via TheGameSlayer

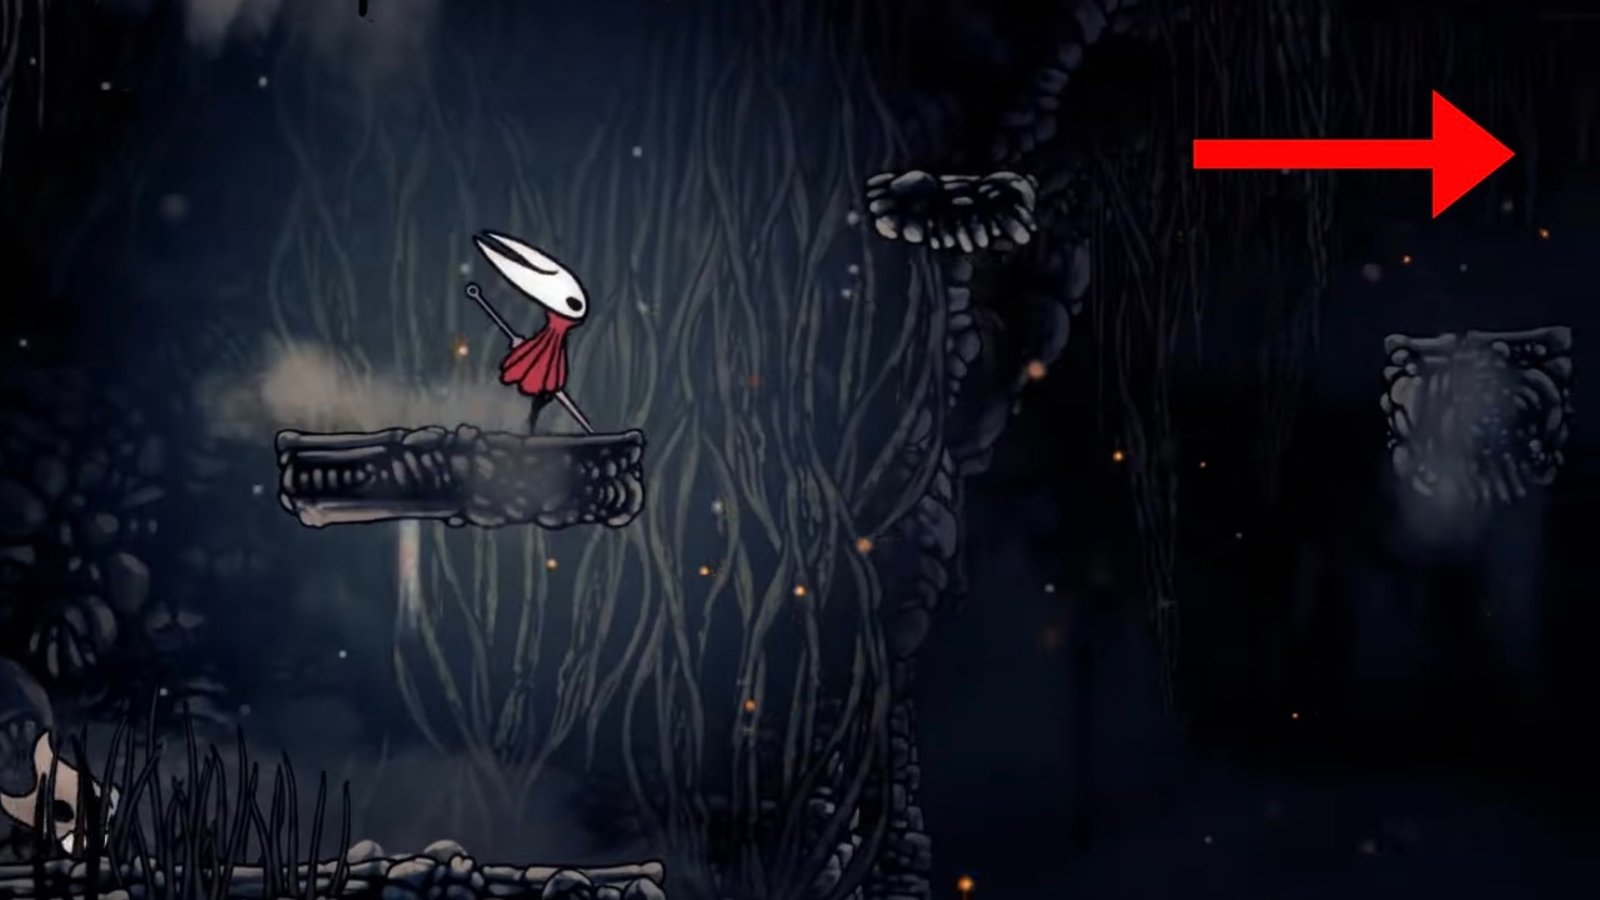
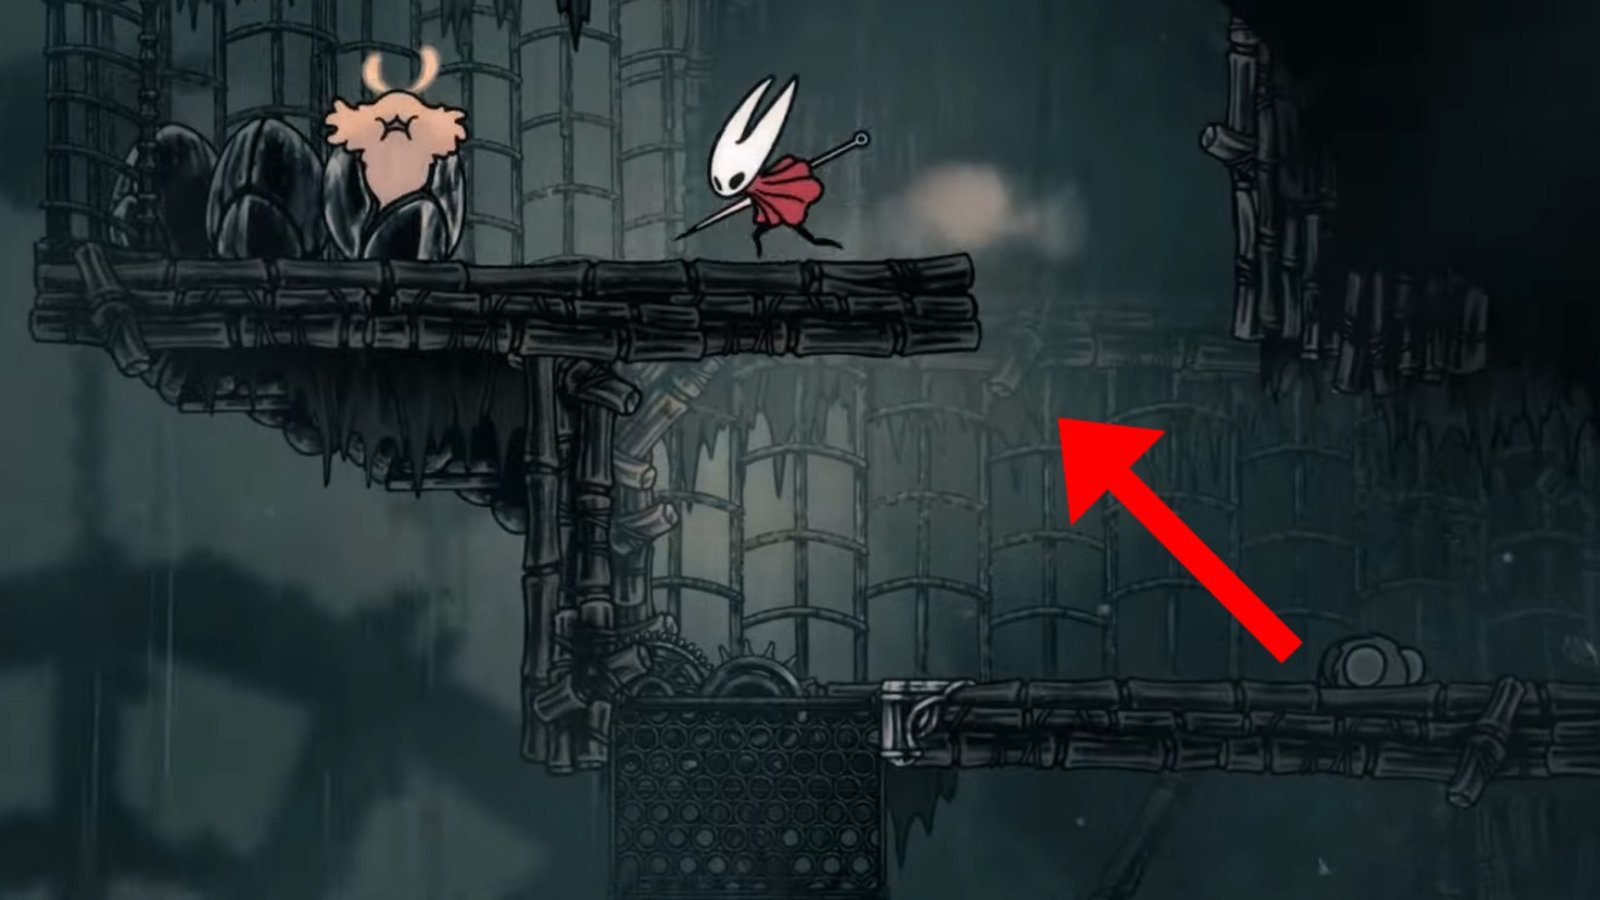
    When you enter the area, head towards the left. Continue on the path to the left until you see a skull-shaped wall. From there, jump right and keep climbing the platforms located to the right.

    Hollow Knight: Silksong screenshot featuring Hornet on a at the first Lost Flea on the wall.
    Image via TheGameSlayer

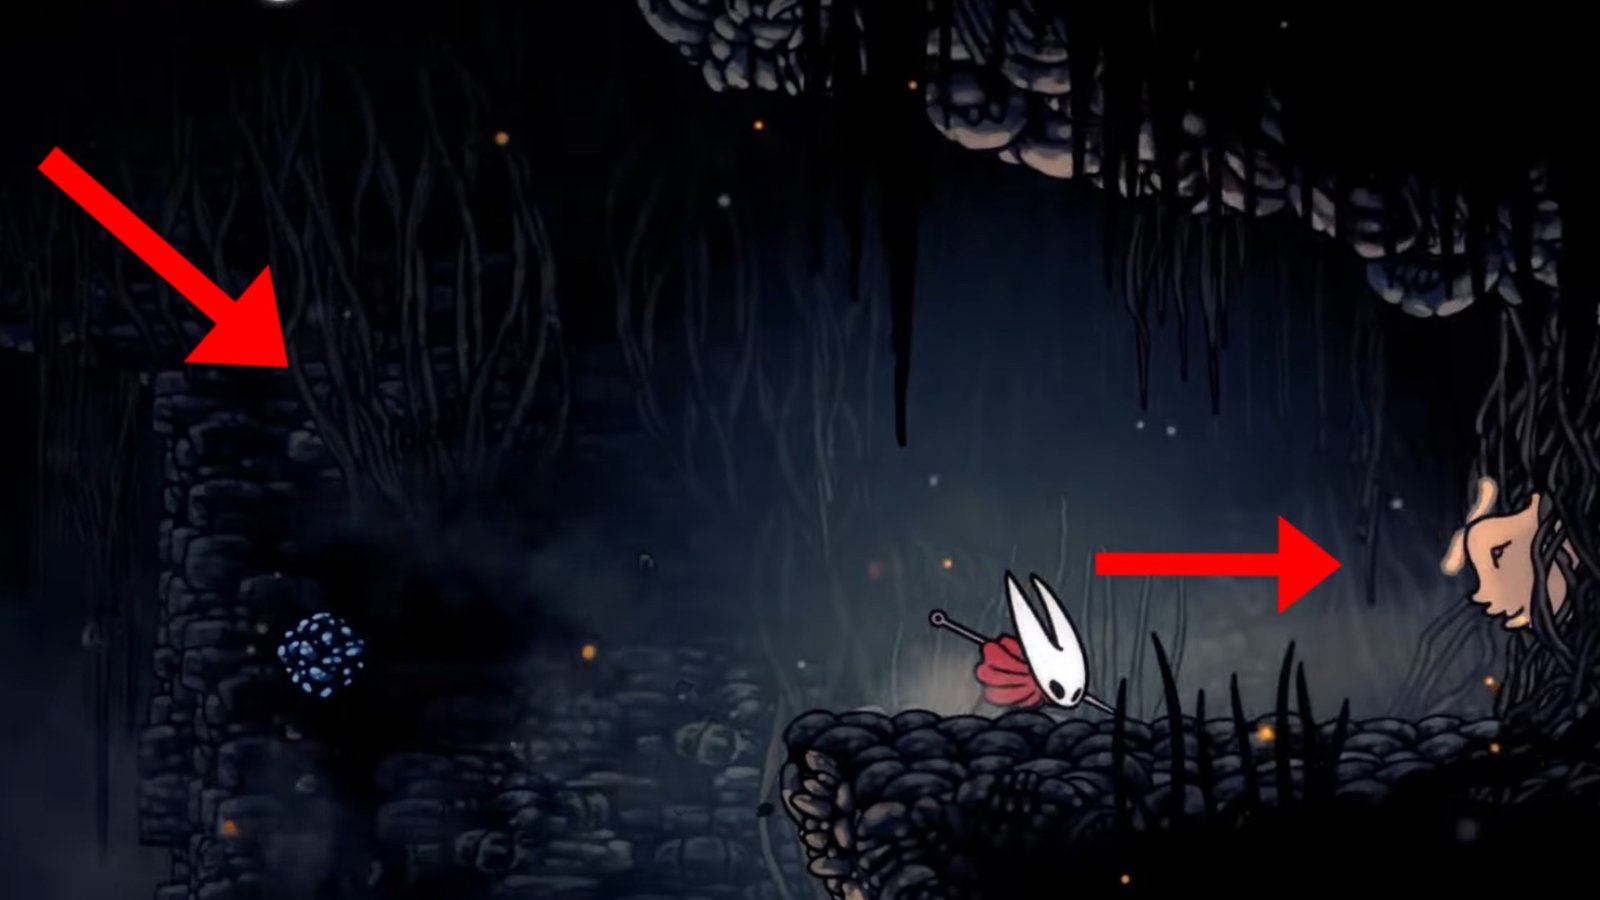
    Continue on the rightward path until you see a platform from which you can drop down to another one located at the bottom right. Jump down on it, then head right to find the Lost Flea stuck on a wall. Hit the Flea multiple times to rescue it.

    Lost Flea #2: Deep Docks

    Hollow Knight: Silksong screenshot featuring the Deep Docks map.
    Image via TheGameSlayer

    For the next one, you need to go to the Deep Docks. After you meet Mapmaker Shakra, continue leftwards until you reach the lava waterfall area. Here, you need to be careful as the lava can deal significant damage.

    Hollow Knight: Silksong screenshot featuring Hornet near the lava waterfall.
    Image via TheGameSlayer

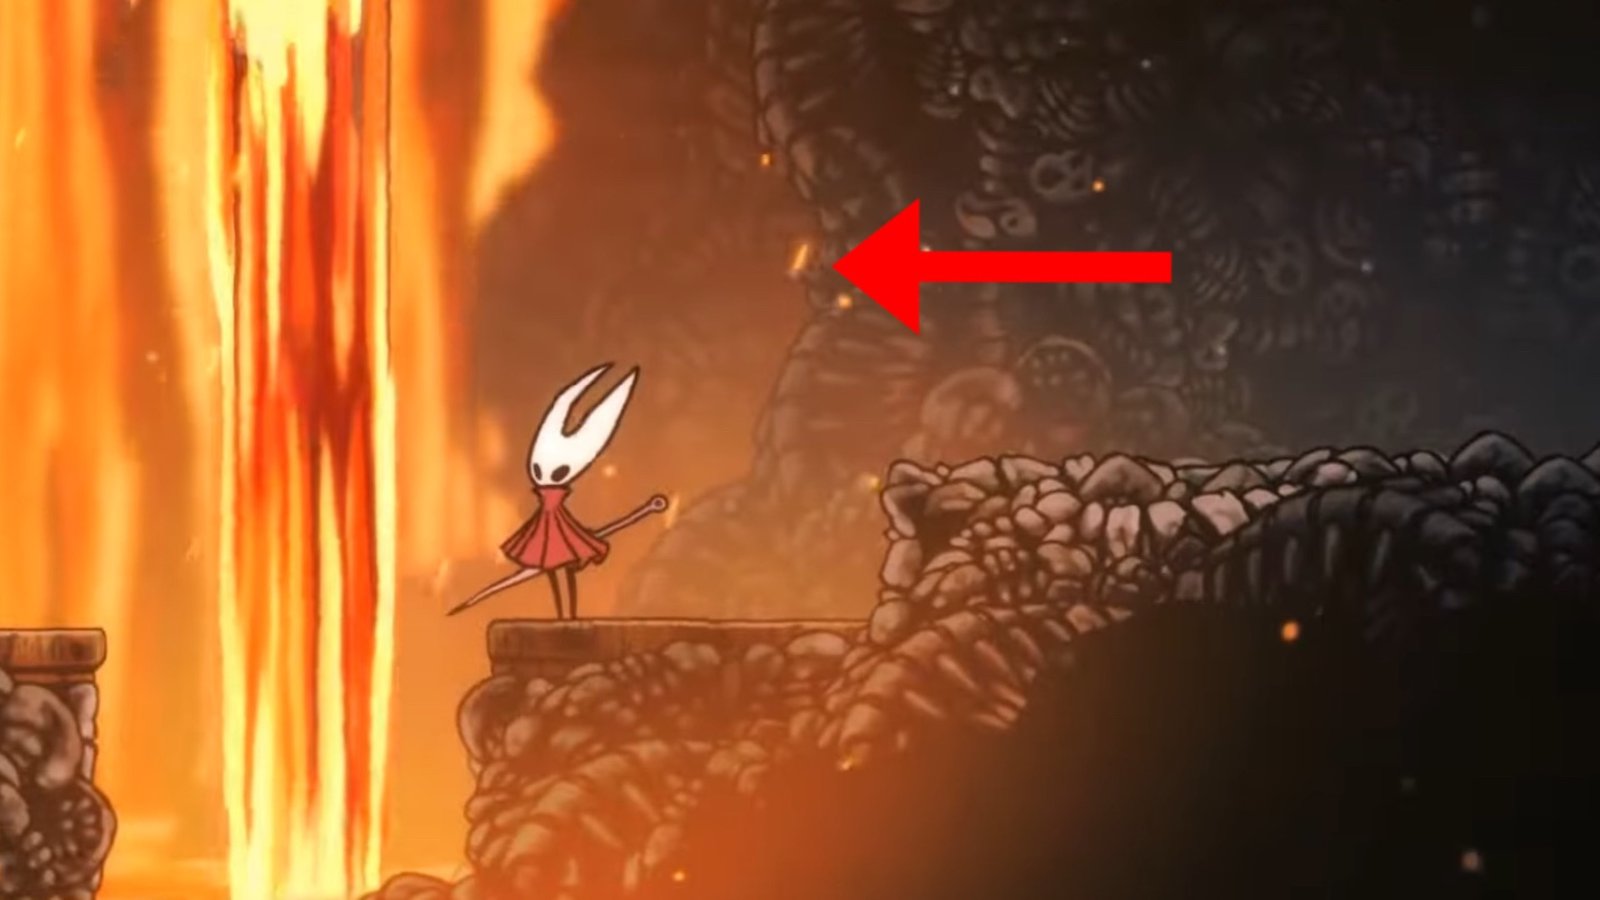
    From the lava waterfall area, continue heading left, then jump up the platform on the right. You’ll notice another safe platform on the left. Jump up to it, wait for the lava waterfall to stop, then head right.

    Hollow Knight: Silksong screenshot featuring Hornet at the second Lost Flea.
    Image via TheGameSlayer

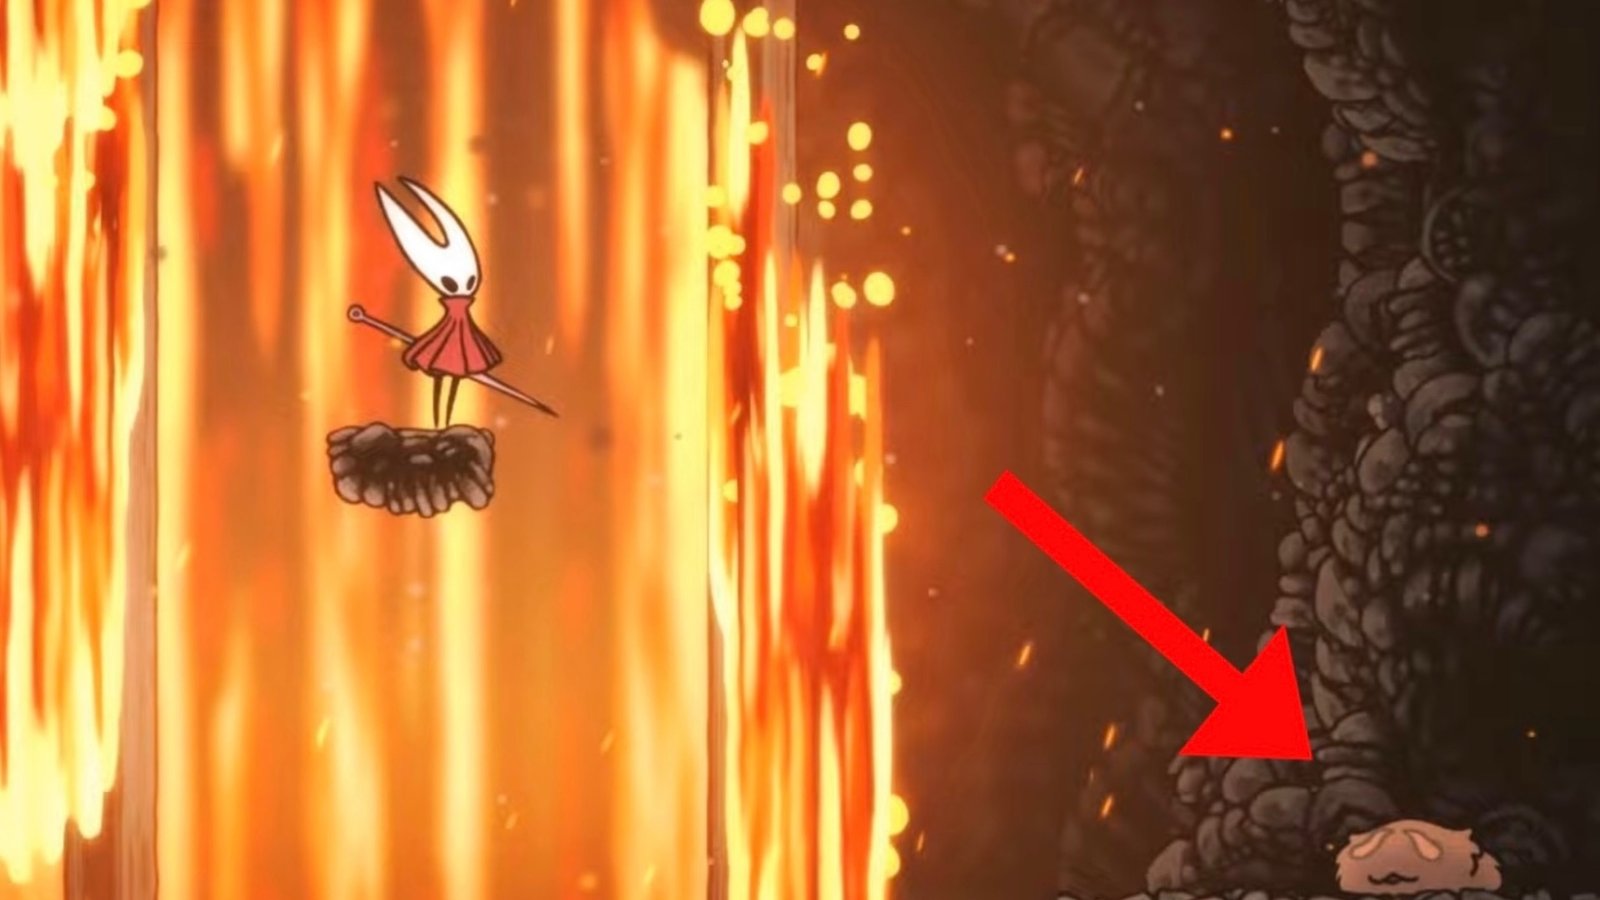
    Keep heading right, dodging the lava waterfall until you see the Lost Flea resting on the platform located to the bottom right. Watch for the lava waterfall, jump down to the platform and hit the Flea to rescue it.

    Lost Flea #3: Deep Docks

    Hollow Knight: Silksong screenshot featuring the Deep Docks map.
    Image via TheGameSlayer

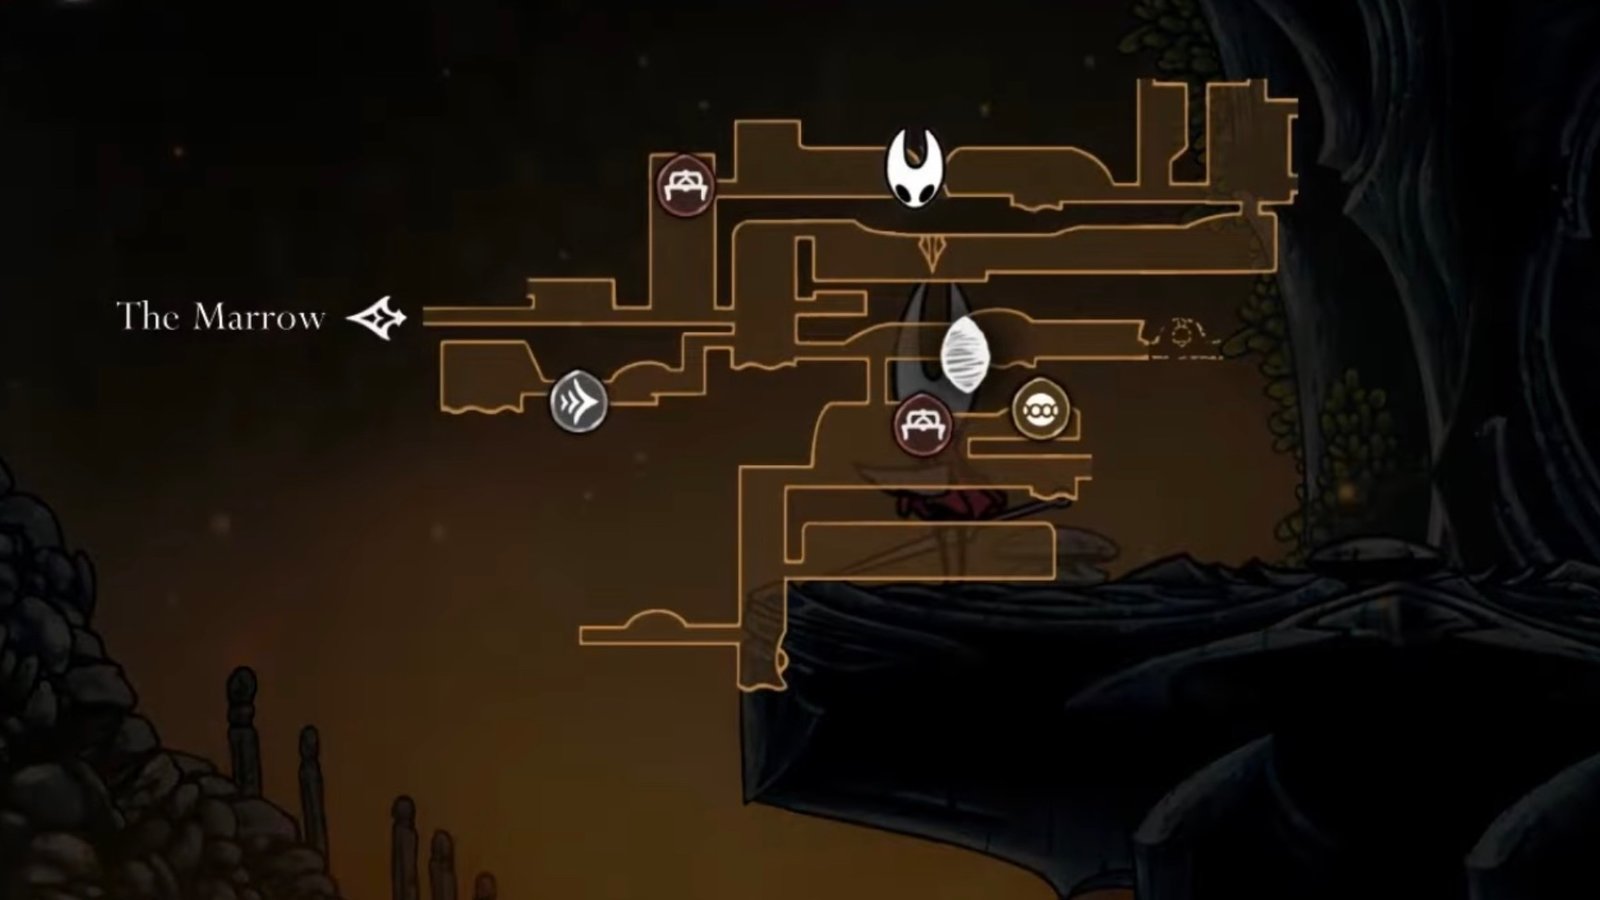
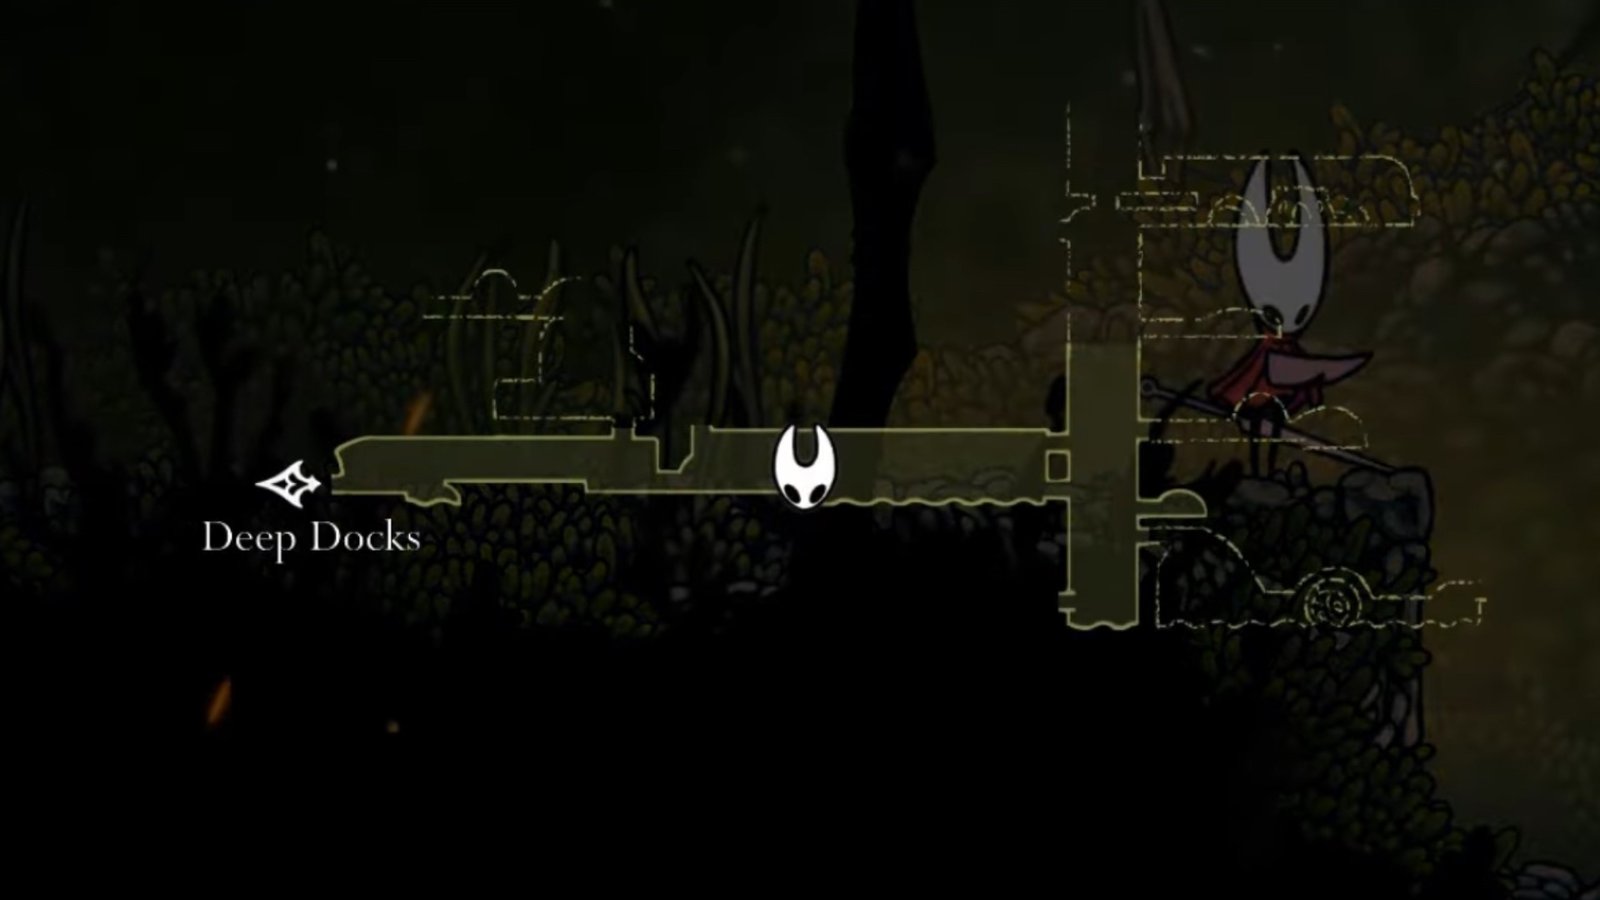
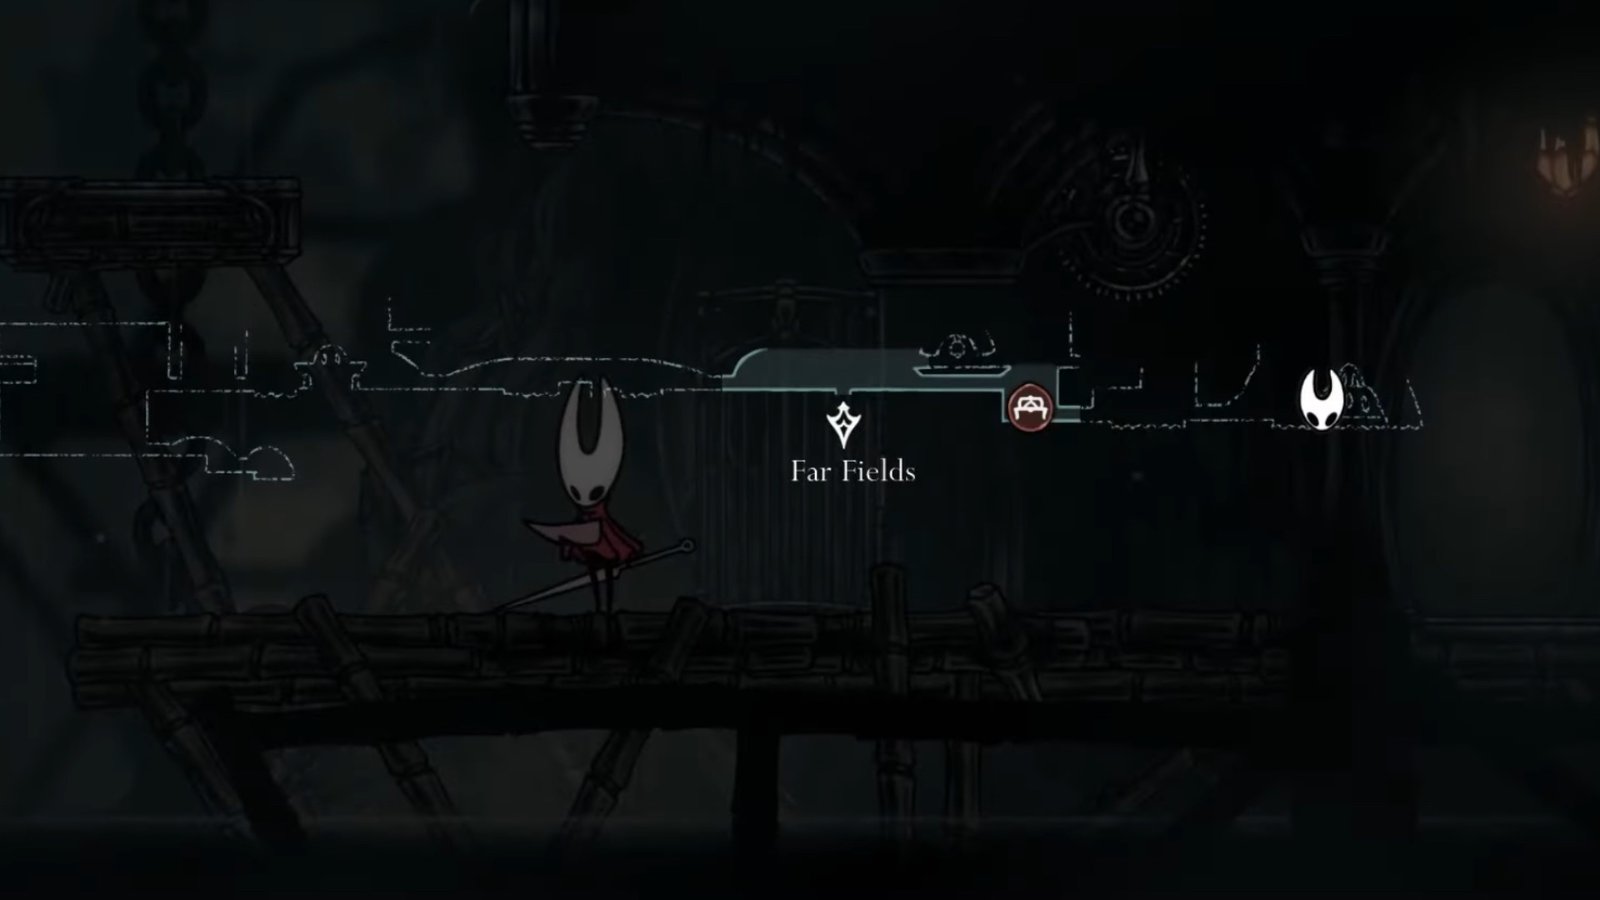
    The next one is also located at Deep Docks. First, head to the location where you can unlock the Swift Step ability. The ability location is shown on the map in the image above.

    Hollow Knight: Silksong screenshot featuring Hornet at a lever.
    Image via TheGameSlayer

    From the Swift Step ability site, continue left. Keep heading leftwards until you come across a lever at the far end. Hit the lever, then jump on the platform to the right.

    Hollow Knight: Silksong screenshot featuring Hornet at the third Lost Flea.
    Image via TheGameSlayer

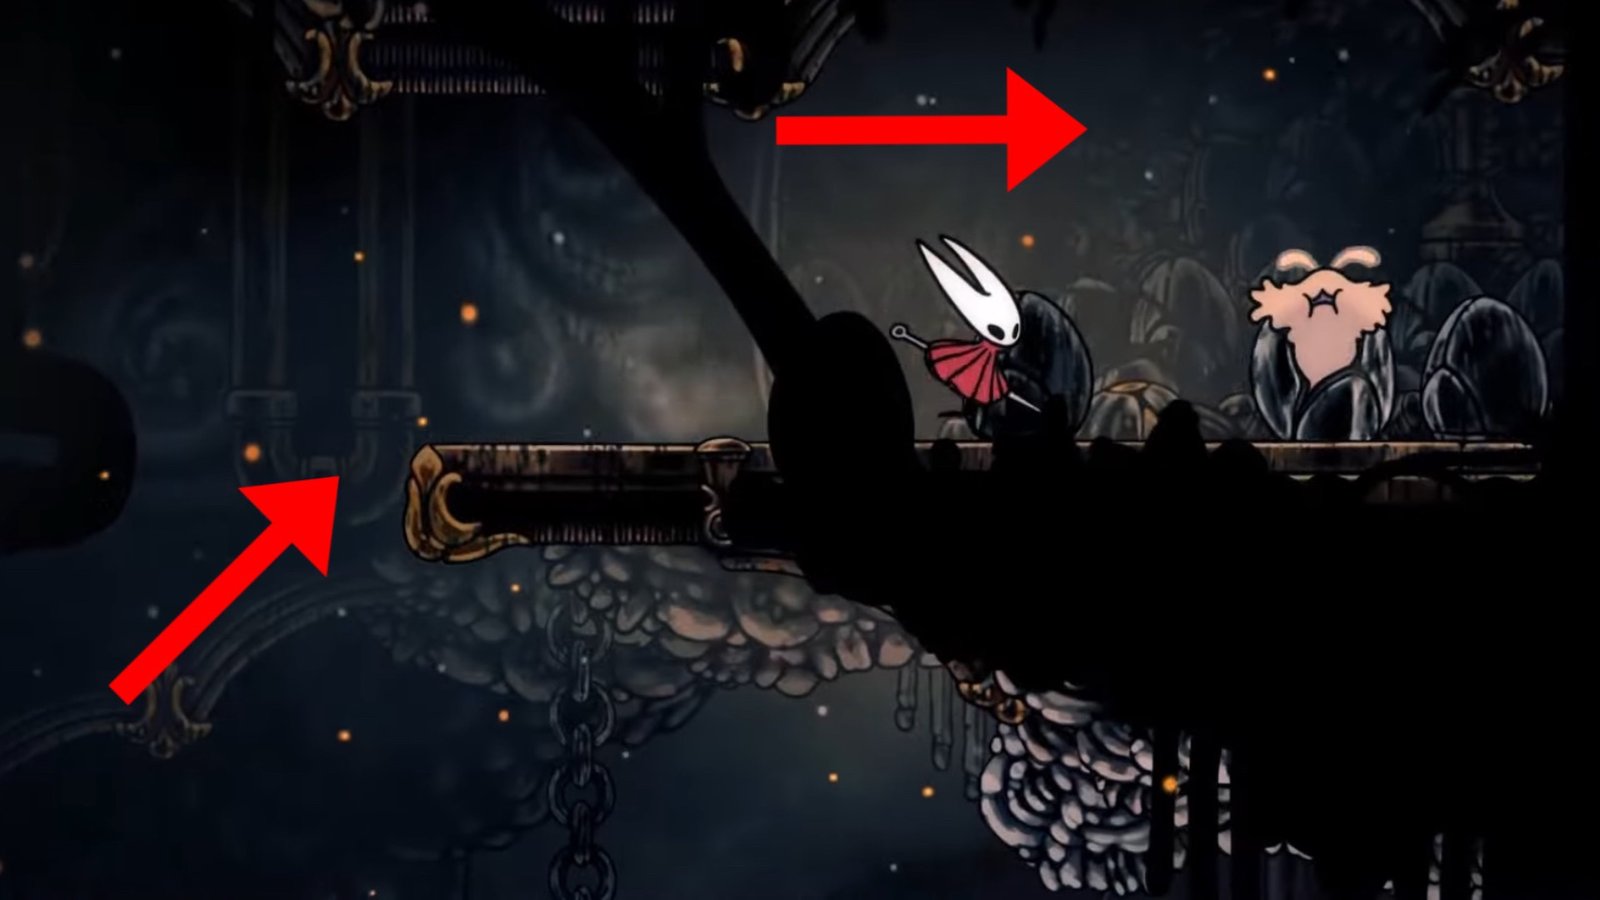
    Keep climbing up the platforms on the right to reach the third Lost Flea eventually, located to the far right of the area. Hit the Flea to rescue it.

    Lost Flea #4: Far Fields

    Hollow Knight: Silksong screenshot featuring the Far Fields map.
    Image via TheGameSlayer

    For the next Flea, start at the location on the map above. Head right towards the glowing orb until you see a large platform on the left. Jump up the platform and keep moving left. At that far end, you’ll encounter an opening at the top. Jump through the opening to the next area.

    Hollow Knight: Silksong screenshot featuring Hornet traversing Far Fields.
    Image via TheGameSlayer

    From here, go right and demolish the breakable wall. This will give you access to the next area. In the next area, climb onto the platforms located in front of you.

    Hollow Knight: Silksong screenshot featuring Hornet at an opening on the wall to the right.
    Image via TheGameSlayer

    On the third platform, with the teeth-like structures, keep heading right. Continue heading right until you reach a dark hallway. Enter the hallway, and keep moving.

    Hollow Knight: Silksong screenshot featuring Hornet at the fourth Lost Flea inside a cage.
    Image via TheGameSlayer

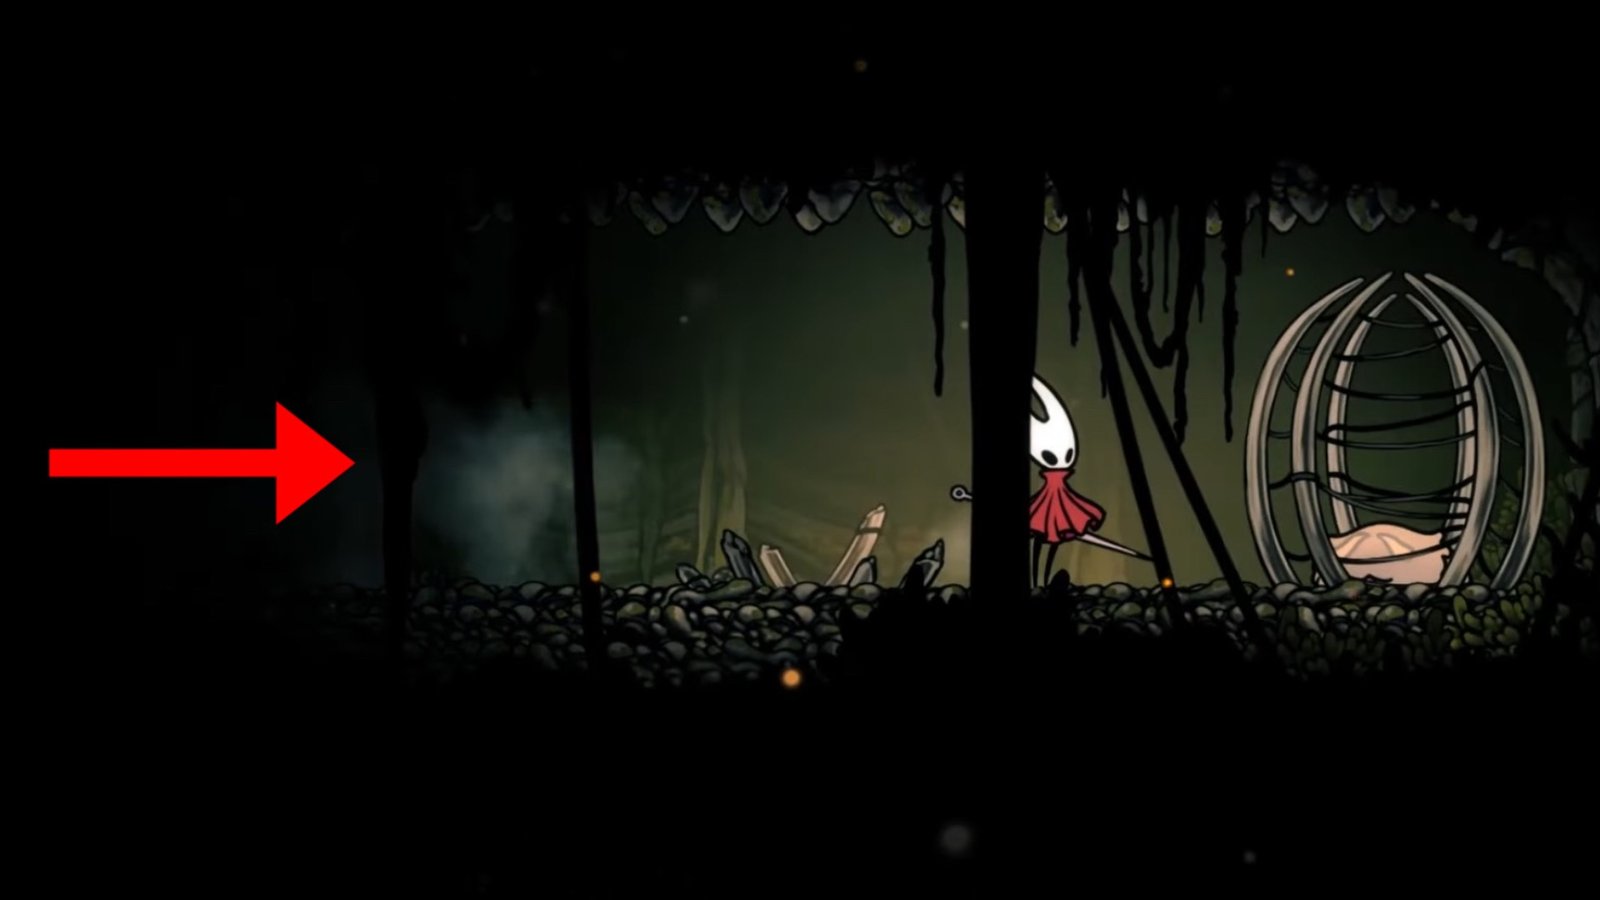
    At the far end towards the right, you’ll find the fourth Lost Flea locked inside a cage. Hit the cage multiple times to break it, then rescue the Flea.

    Lost Flea #5: Greymoor

    Hollow Knight: Silksong screenshot featuring the Greymoor Map.
    Image via TheGameSlayer

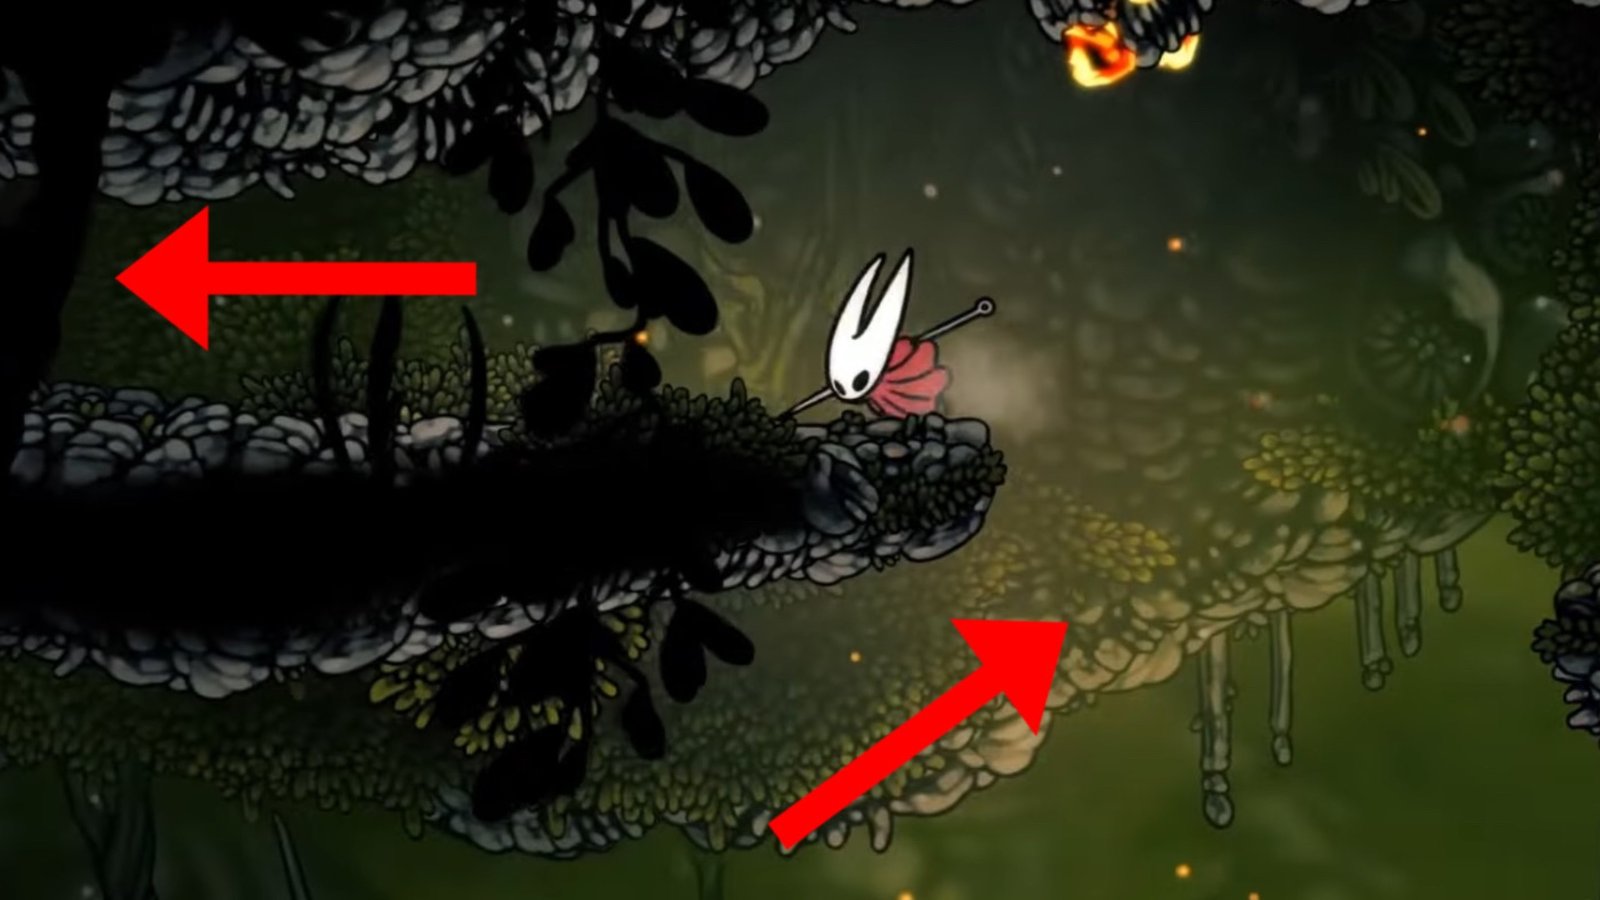
    For the final Flea, start at the location in the map above. From here, you need to go left until you come across bouncing platforms on which you can perform Pogo Jumps.

    Hollow Knight: Silksong screenshot featuring Hornet Pogo Jumping off of bouncing ball-shaped platforms.
    Image via TheGameSlayer

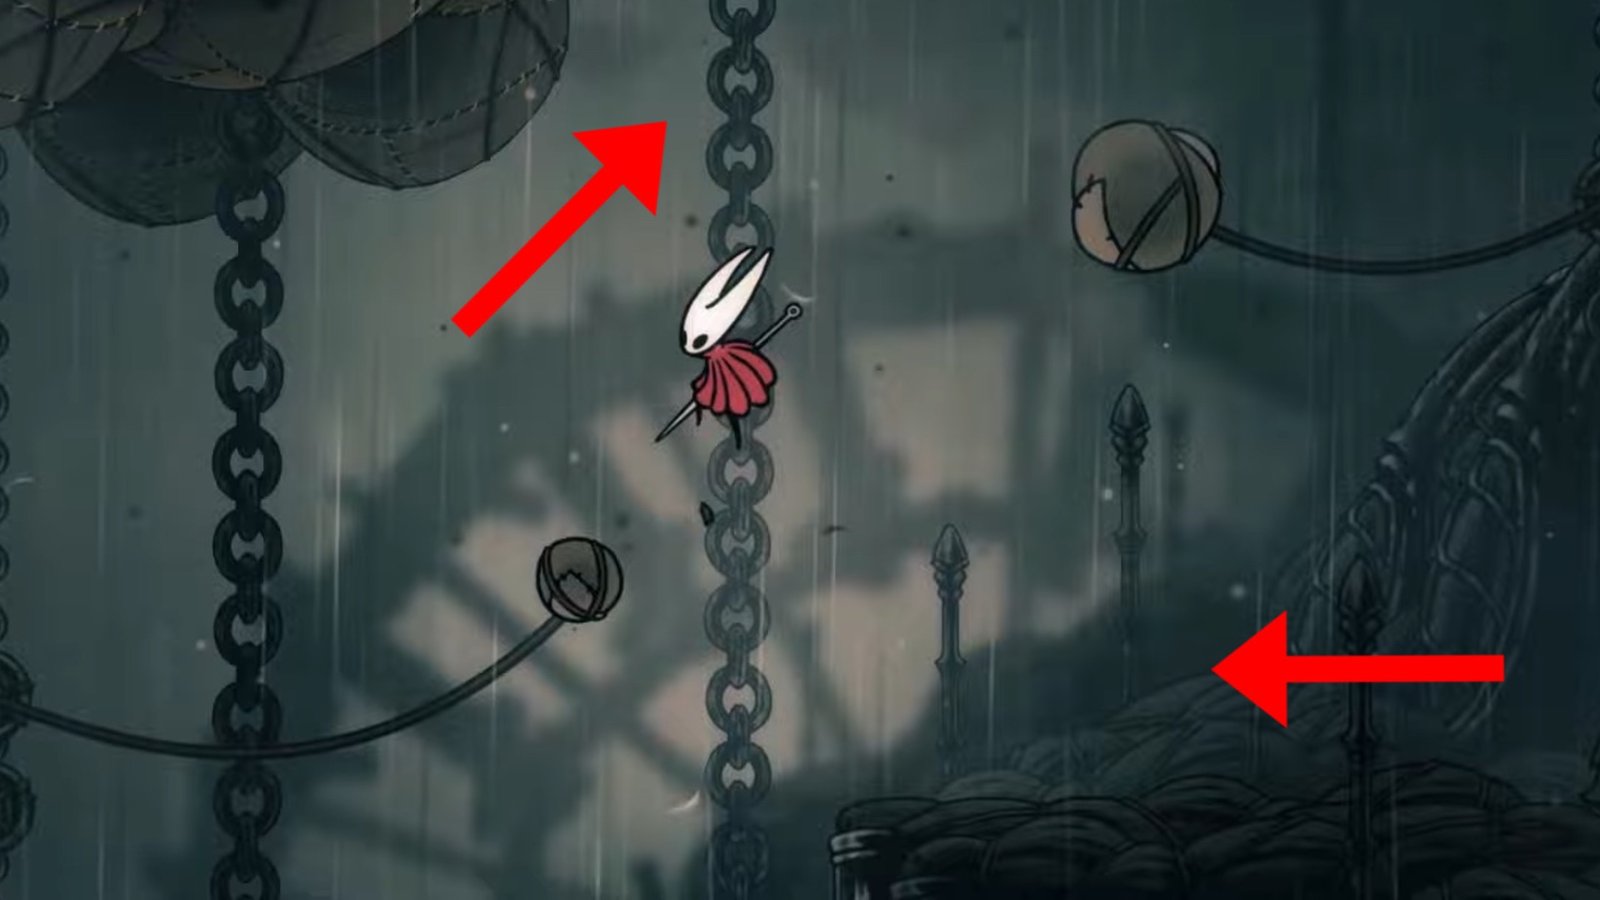
    Use the bouncing ball-shaped platforms to Pogo Jump off of towards the right. Keep climbing up until you reach a platform located to the right.

    Hollow Knight: Silksong screenshot featuring Hornet at the final Lost Flea.
    Image via TheGameSlayer

    Upon reaching the platform, keep heading right until you see an opening to drop down below on the far end. Drop down, then head left to locate the final Lost Flea to the top right. Climb up the platform and hit the Flea to complete this Wayfarer Quest.

    The Lost Fleas Quest Completion

    Hollow Knight: Silksong screenshot featuring the Lost Fleas Questline completion.
    Image via TheGameSlayer

    Upon completing the Lost Fleas Questline, head back to the Fleamaster Mooshka at the central Bench of the Marrow. After you interact with him, he’ll ask you to ride with him and his Fleas inside the Flea Caravan. Accept his offer and ride the Flea Caravan, which will trigger a short and wholesome cutscene, and complete the Lost Fleas Wayfarer Quest.

    If you complete this quest before the Moorwing boss, you can skip the fight completely as the Flea Caravan occupies the area where you would have normally fought the boss.

    There are more Fleas located around the map, but you’ll need only five of them to complete this Quest. That’s all you need to do to complete the Lost Fleas Questline in Hollow Knight: Silksong.

    Hollow Knight: Silksong
    Sagnik Adhikary
    • LinkedIn

    You'll probably find me writing on video games most of the time, but when I'm not writing, you can look for me in Marvel Rivals or inside the beautiful world of Expedition 33. Sometimes, you might catch me wandering around the mysterious town of Silent Hill too!

    Related Posts

    How To Upgrade Needle In Hollow Knight: Silksong

    September 5, 2025

    How To Defeat The Widow in Silksong

    September 5, 2025

    Simple Key Location & Use In Hollow Knight: Silksong

    September 5, 2025
    Don't Miss
    Guides
    How To Upgrade Needle In Hollow Knight: Silksong
    September 5, 2025

    Just like in the original, the sequel, Hollow Knight: Silksong, also allows you to upgrade…

    How To Defeat The Widow in Silksong

    September 5, 2025

    Simple Key Location & Use In Hollow Knight: Silksong

    September 5, 2025

    How To Easily Defeat Sister Splinter In Silksong

    September 5, 2025

    Hollow Knight: Silksong – Deep Docks Full Walkthrough

    September 5, 2025

    How To Easily Defeat the Moorwing In Silksong (or Skip the fight)

    September 5, 2025

    Mask Shard Locations in Hollow Knight: Silksong

    September 5, 2025
    • Home
    • Privacy Policy
    • About Us
    • Contact Us
    © 2025 TheGameSlayer

    Type above and press Enter to search. Press Esc to cancel.

    We use cookies to ensure that we give you the best experience on our website. If you continue to use this site we will assume that you are happy with it.