


The new map Citadelle des Morts in BO6 Zombies comes with its own main quest Easter Egg, and we must follow a proper path and go through a lot of puzzles to reach the climax. There are many steps and are pretty tough to figure out. Here we come to help pick up the burden, just sit back and relax. In this guide we run you through all the steps to reach the final phase of the game, finish the map, and get you to receive the reward for all of the hard work.
List Of Steps To Complete The Citadelle des Morts Main Quest Easter Egg
Here is the list of steps you must follow to complete the easter egg in Citadelle des Morts.
- Activate the Pack-A-Punch in Citadelle des Morts
- Talk to the Old Man Gabriel Krafft
- Unlock Elemental Sword Forms
- Collect Four Pages for a Secret Book
- Solve the Rune Puzzle
- Activate Four Power Traps
- Obtain Four Ritual Items
- Upgrade the Four Ritual Items
- Inspect Elemental Swords at Knights
- Complete Mystic Orb Four Elemental Challenges
- Start the Final Phase and Defeat the Guardian
Note: All the steps are written in sequence in mind, while the subparts of the steps can be done in any order, we will let you know if that is the case, but for most of the guide it is best that you follow the steps in the given sequence.
#1. Activate The Pack-A-Punch In Citadelle Des Morts
First, we have to unlock the Pack-A-Punch machine in the Citadelle des Morts Map.
Here we have to get into the castle and defeat a monster to unlock the machine. We have a guide to help you activate the Pack-a-Punch with all the steps and essence cost behind opening the gates to the endpoint
#2. Talk To The Old Man Gabriel Krafft
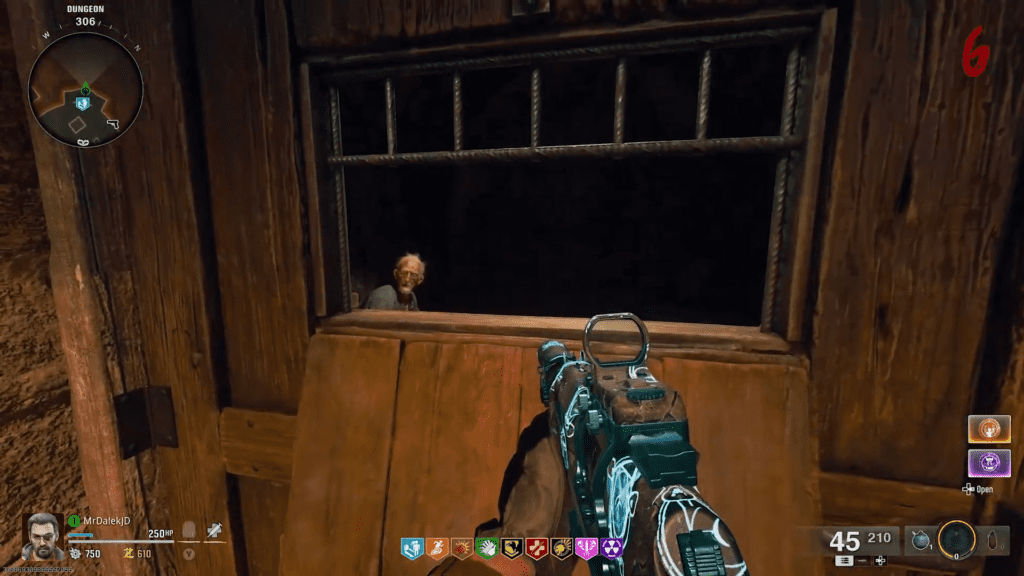
Head to the Dungeon area in the Undercroft section of the castle. Interact with the locked door northwest of the map. Here you will find the door Quick Revive Perk-A-Cola machine. It doesn’t open however, a small hatch within the main door will open up, and through the hole, you can talk to the old man Krafft.
#3. Unlock Elemental Sword Forms

We have to craft 4 Elemental Swords and then upgrade them.
It would be best if you made it to round 10 in the Dining Hall to begin this task. It is not going to be easy to unlock the Elemental Sword right away, you must follow specific steps to execute it properly. Luckily, we have an in-depth guide to help you figure out every little step you need to perform to unlock the Elemental Swords in the Citadelle des Morts map.
#4. Collect Four Pages For A Secret Book
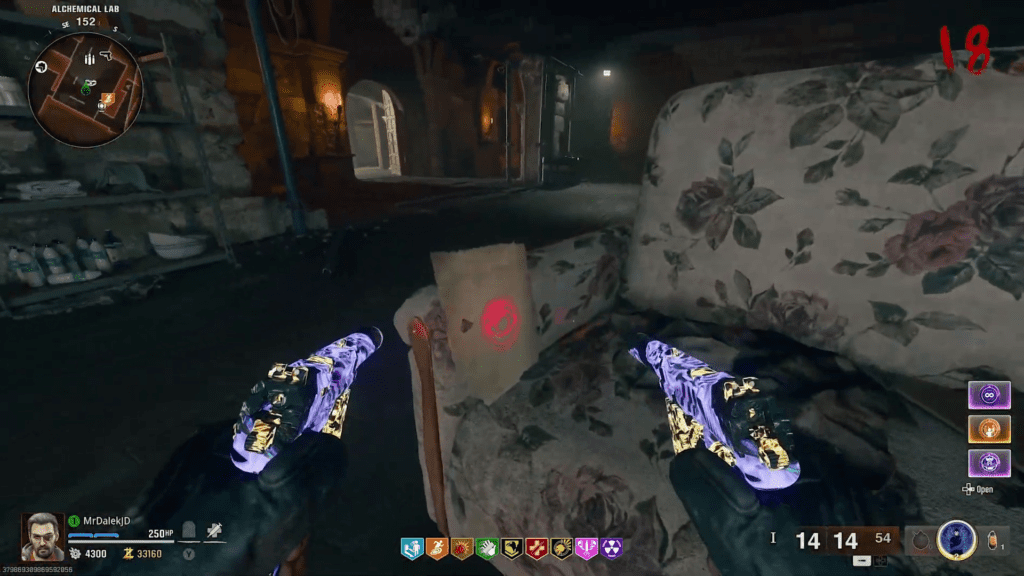
Here we must collect four pages of a secret book in the Sitting Room.
Location: Sitting Room
The pages will have a red mark, and you will find nine of them in the Sitting Room. You can reach the room by taking the left of the stairs from the castle entrance. The glowing symbol on the pages makes them easier to spot. Some will be lying on the bed or next to a wall.
#5. Solve The Rune Puzzle
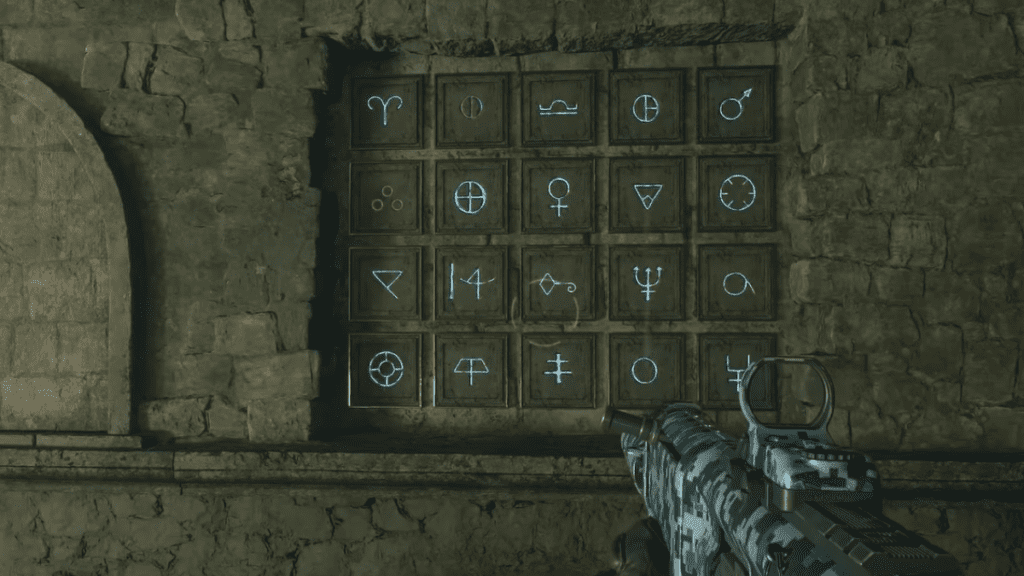
Head to the main hall in Undercraft, here break the wall south of the room to reveal a Rune puzzle. You can not shoot the wall, you need Melee Macchiato to punch the wall and reveal the puzzle. This puzzle can be a tad bit difficult, but we have a guide to help you figure out every step of the puzzle easily without breaking a sweat.
#6. Activate Four Power Traps
Activate Four Traps from the Four pages of the secret book.
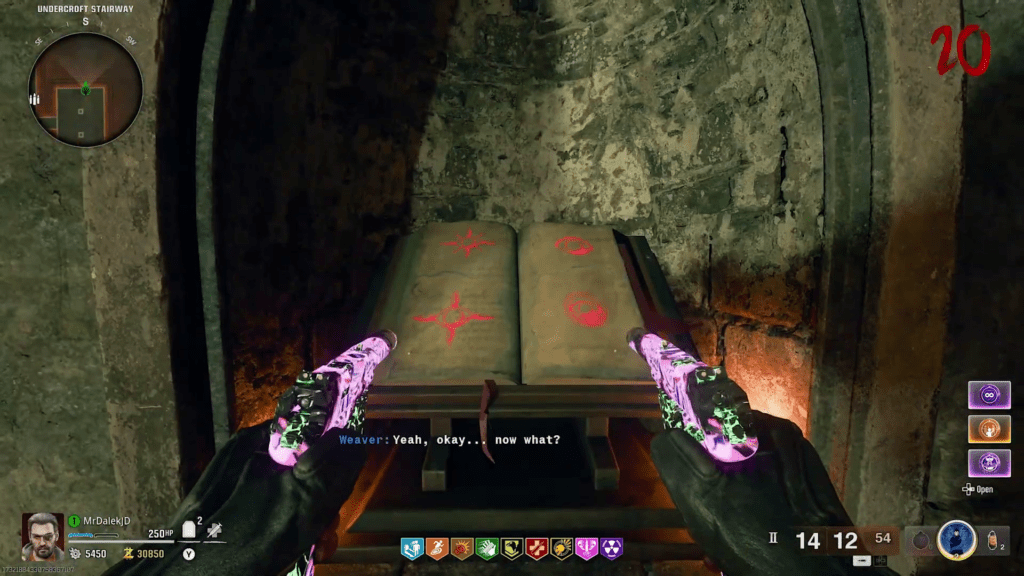
Once the puzzle is solved, a red orb will appear and hit the wall next to the puzzle revealing a strange book. Here we insert all four pages we collected from the Sitting Room. Now the symbols on four pages will direct to traps in the map. The order and placement of the symbols that will be shown in the book will be different for every playthrough, however they will be either of these:
- An eyeball symbol with a circle
- An eye symbol with 4 points
- An eye symbol with eyelashes
- An eye symbol with 8 points.
The important part here is to note the order in which they appear in the book.
On the book:
- The first symbol is at the top left of the book.
- The second symbol is located directly under the first symbol, located bottom-left of the book.
- The third symbol is located at the top-right of the book.
- Lastly, the fourth symbol is at the bottom-right of the book.
How to Activate The Power Traps?
We must interact with the traps with Essence to activate them.
Each of the symbols leads to a power trap on the map. Follow the symbols in the book and activate the power trap in order. It is better to take a screenshot of the book and then hit the gameplay. Open up the map and explore the area to find the proper trap spot.
- Activation: Once you reach the power trap, activate it by spending the 1500 Essence. Here you need to fend off zombies while staying inside the trap zone. Once you have killed enough zombies (mostly 10), the trap shuts down.
- Checking: You can head back to the book in the Undercroft to check the symbol on the page. If you clean the correct trap, the symbol on the book will stop glowing red. If the logo on the page has gone dark, it means it has been completed. Then you are on the right path.
Note: The order in which these symbols appear in the book will be different in every playthrough.
You have to repeat the process three more times until all the symbols on the book have stopped glowing. Once all of them are turned off we can move forward to the next phase of the easter egg,
#7. Obtaining Four Ritual Items
We need to obtain Four ritual items by completing four different tasks.
To continue with the easter egg, we must collect:
- Pegasus Horseshoe
- Ra’s Ankh
- Paladin’s Brooch
- Raven’s Talon
Obtain Pegasus Horseshoe Ritual Item
Objective: First get the item Otto’s Horseshoe then Grab the Pegasus Horseshoe by firing yourself from a cannon.
I know it sounds fun, and in many ways, it is to shoot yourself out of a cannon to chase a lightning cloud that drops the Pegasus Horseshoe.
Obtain Otto’s Horseshoe
First make it to the Barn, located at Nature Path. Get inside the barn, you will find the horseshoe hanging on the wall above the left exit. Shoot the horseshoe to make it drop on the ground. Interact with the Otto’s horseshoe to pick it up. The first part is over, now we use Otto’s Horseshoe to Grab the Pegasus Horseshoe.
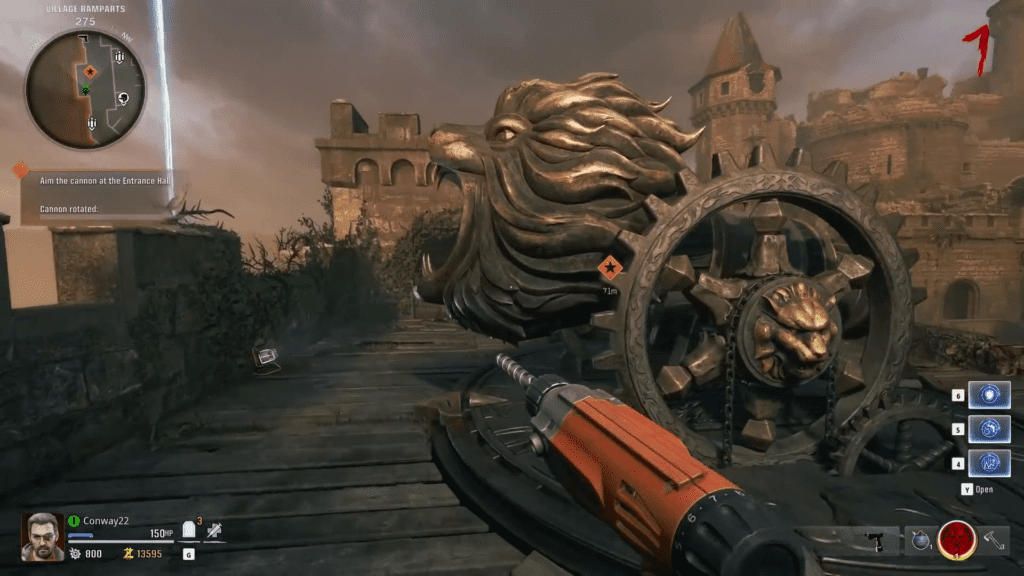
Fire Yourself Via Cannon
With Otto’s Horseshoe in our inventory, make it to the Cannon in the courtyard, the one we used to break open the castle door. Here use Otto’s Horseshoe in the cannon and fire yourself to the spawn area, the southern region of the map.
Note: it will cost 500 Essence to fire yourself from the cannon.
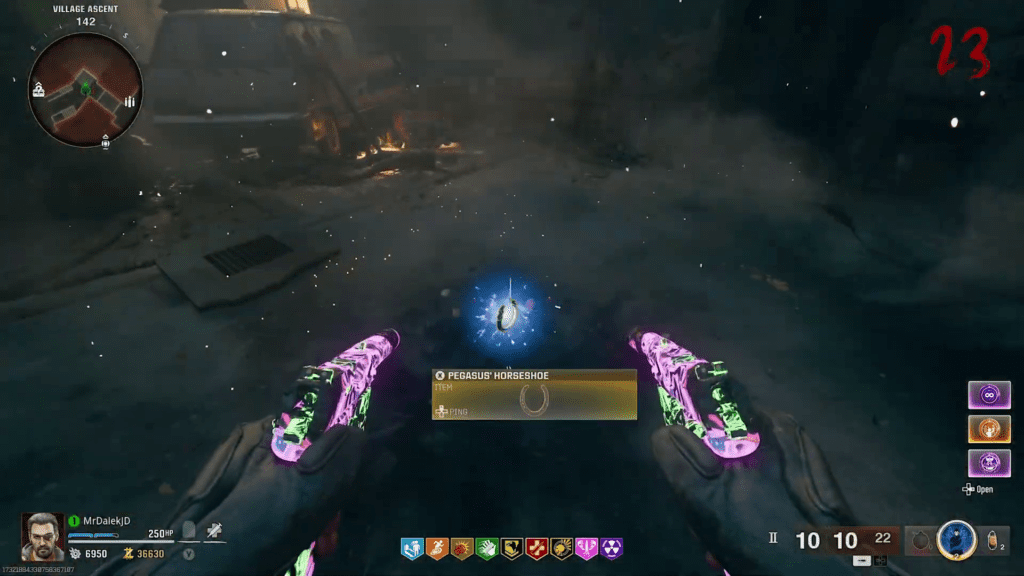
Obtain Pegasus Horseshoe
Once the cannon fires, you will see lightning surrounding you as you land on the ground. Don’t worry you didn’t gain any new power, here look at the sky and look for any electric cloud. It is random, but if you look up, you will easily spot a lightening cloud.
Get to the area directly below the lightning cloud and you will find the Pegasus Horseshoe.
Obtain Ra’s Ankh Ritual Item
Objective: We need to throw Molotovs at three wooden piles in the courtyard.
Compared to the last one, this one is dialed back in terms of craziness. First, get to any Crafting Table and craft 3x Molotovs. Then make your way to the courtyard outside the castle.
Then we need to fire the Molotov at specific spots, and all of them can be found from the courtyard, Two of the Wooden Piles are placed on the top of the castle entrance and the third one is located outside. We will recommend you get to the cannon location to spot all three of them easily.
- First Wooden Pile (Hillside Ramparts): Topleft edge of the castle, directly above the doorway. Take the route left of the cannon, and you will see it directly above the doorway exit.
- Second Wooden Pile (Hillside Ramparts): The second one will be on the top of the castle’s entrance. If you stand in front of the cannon, you will easily spot the second Wooden Pile placed on the top of the castle entrance.
- Third Wooden Pile((Hillside Ramparts): The third spot is located outside the castle, you will find it right off the acid trap. Just take the route right of the cannon, and the second you see the acid drop on your right, pull out the Molotov, in the distance, you will easily spot the third Wooden Pile.
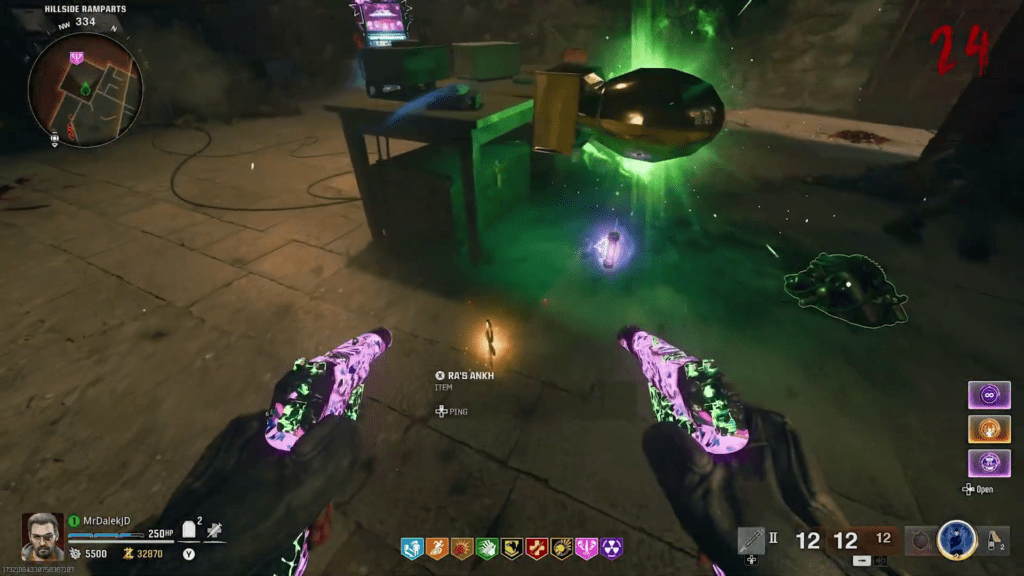
Once all three of them are lit up, the fireball will spawn immediately. In the end, a Doppleghast will spawn to ruin your day, defeat the monster and you will have the Ra’s Ankh.
Obtain Paladin’s Brooch Ritual Item
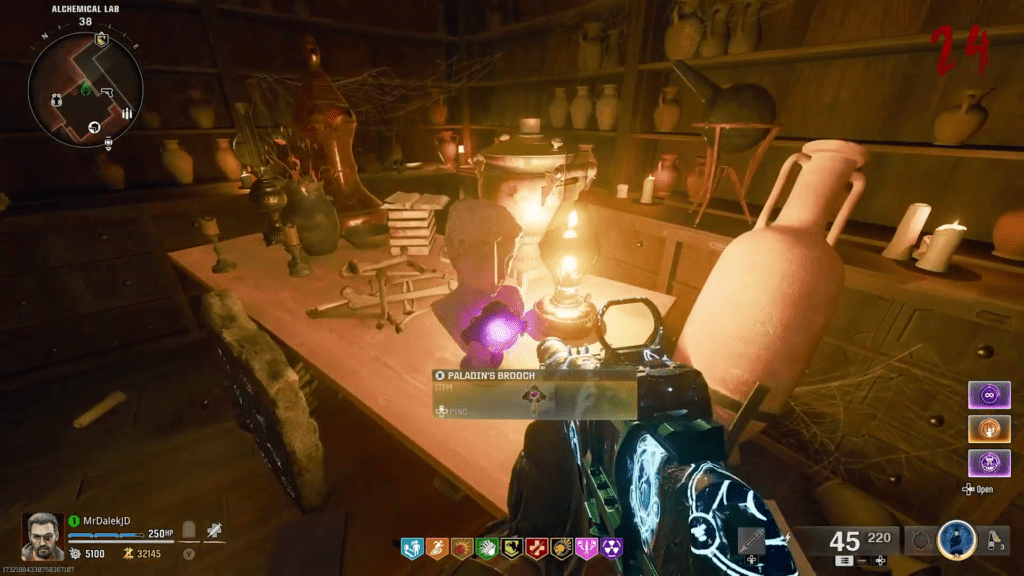
Objective: Here finish the light puzzle to grab the item.
We have a helpful guide to navigate you through the light puzzle to obtain Paladin’s Brooch.
Obtain Raven’s Talon Ritual Item
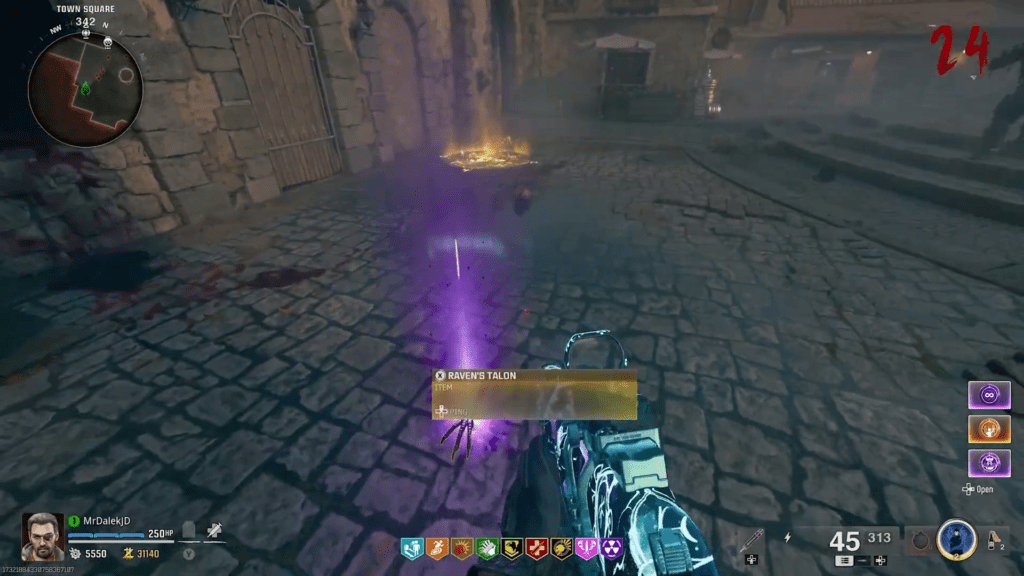
Objective: Shoot down a raven in the cave, and then shoot down another raven flying in the sky to grab the item.
Now we have to kill two birds, both of them will require precision firings. Get the trigger switch ready here!
Shoot Down the Raven In the Cave
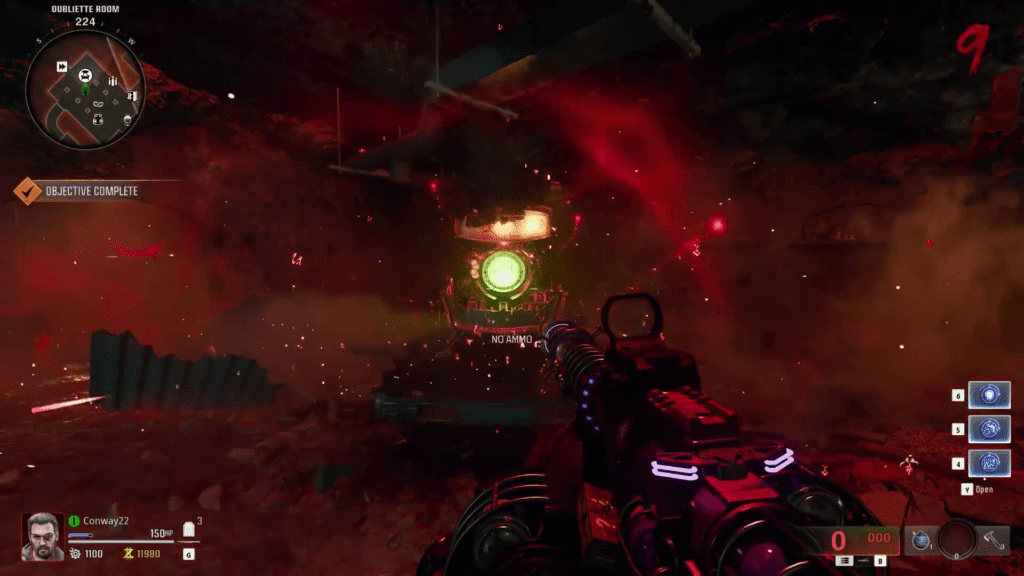
- First, make your way to the Oubliette Room located in the Undercroft section. The same room where we unlocked the Pack-A-Punch machine. Interact with the Cave Slide button for 500 Essence south of the room, left of the machine.
- Here you will take a slide down to the spawn point, but don’t lose yourself in the fun. Right at the end of the slide, you will spot a raven to your right, sitting on a rock. Shoot it before getting off the slide. It is sitting directly below the light on the top. So you will not miss that bird.
Once you shoot the bird, Krafft will talk about the raven. If the dialogue didn’t trigger for you, you probably missed it, time to go down the slide again.
Shoot Down the Flying Raven
Once you get off the slide, and enter the Town Square, you will see a raven flying in the sky. Just simply pull out the gun and shoot down the raven from the sky. It will drop the Raven’s Talon.
If you do miss the shot, then you will see and hear the raven flying around the Town Square. Just keep your eye on the bird to appear, then quickly pull out the gun and kill one bird with one stone.
#8. Upgrade The Four Ritual Items

Here we take all four ritual items and upgrade them by placing them in the yellow circles.
Once you have all four ritual items, the next objective is to upgrade them. Upgrading them will also unlock a special golden chest in the room. Which will help out in the next phase of the easter egg quest.
Upgrade Paladin’s Brooch
Interact with the yellow circle in the Dining Hall to upgrade the first item. Once you interact with the yellow circle, zombies will spawn in, defeat them to change the ritual item to upgrade it.
Upgrade Ra’s Ankh
The second yellow circle is located outside the castle’s entrance. Here place the Ra’s Ankh to charge the item with the soul of the enemies.
Upgrade Pegasus Horseshoe
The third yellow circle is located in the Town Square, head up to the symbol and drop the Pegasus Horseshoe to upgrade it.
Upgrade Raven’s Talon
To upgrade Raven’s Talon, you must get to the yellow circle located in the Undercroft section of the castle. Again defeat the enemies to charge the item with their soul.
Note all the locations of each one, we will come back to these points later on to finish off other requirements of the easter eggs.
#9. Inspect Elemental Swords at Knights
Now we inspect the elemental swords and Incantations at their respective knights.
Before we start thinking about inspecting, we need to get our hands on some Incantations. We will need Dark, Light, Electric, and Fire Incantations.
Finding the Symbols
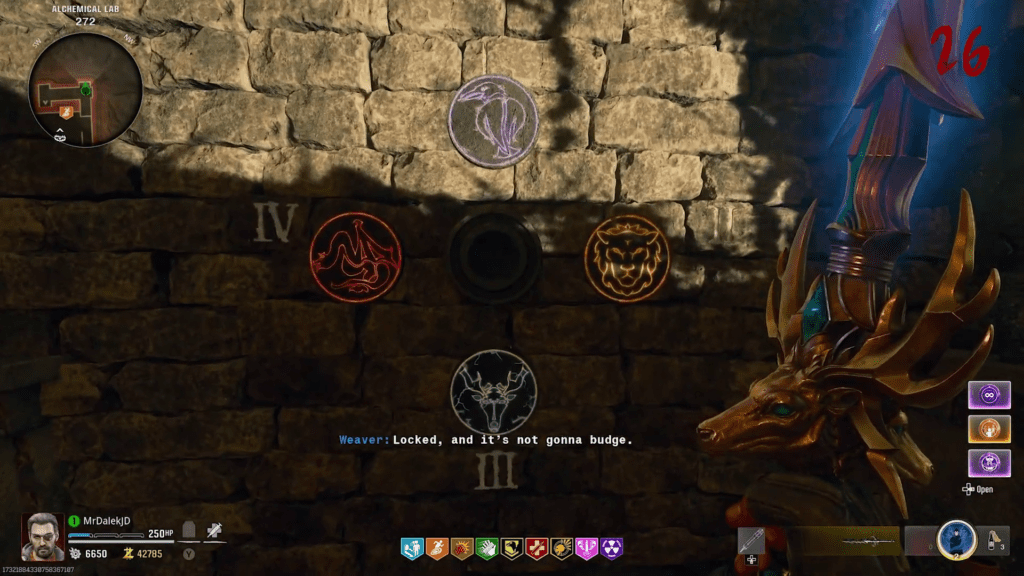
Now head up to the Alchemical Lab, go down the stairs near the Stamin-Up Perk-a-Cola machine and you will see strange symbols on the wall. All the symbols are linked to the element sword we used earlier. Each element symbol on the wall will have a Roman numeral number attached to it. And they will be different for every playthrough.
- Purple Raven Symbol (I): We need to use Balmung Sword, and emit a Dark Purple Aura.
- Yellow Lion Symbol (II): We need to use Solais Sword, to emit a golden light aura.
- Blue Stag Symbol (III): We need to use the Durendal Sword, to emit electricity.
- Red Dragon Symbol (IV): We must use the Caliburn sword, and emit fire around it.
What to do: Equip the elemental sword based on the numerals attached to the symbol on the wall. Then head to the golden chests associated with elements and use the proper sword type to break it. On our wall, we had Purple Raven on one, Yellow Lion on two, Blue Stag on three, and lastly Red Dragon on four.
In your game, the symbols will stay the same but the order or the the Roman numeral attached to it will always be different.
Purple Raven Symbol Location:
We will find the Golden Chest attached to the Purple Raven Symbol In the Undercroft
- We charged the Raven’s Talon in the Undercroft section. So head up Undercroft, and hit the Golden chest with the Dark Purple Sword. Once you hit the chest, it will drop Dark Incantation.
- Now take the Incantation to the Dining Room, where we found the sword from the statues. Find the knight that matches your sword’s symbol. Use the Dark Incantation, then Inspect the Sword.
If all of it goes well, the knight will accept the sword clearing out the first phase.
Yellow Lion Symbol Location:
The golden chest attached to the Yellow Lion Symbol is located in the Dining Hall.
- We charged the Paladin Brooch in the Dining Hall. So head up to the room, where you will find a golden chest, and pull out the Light Sword to hit the chest to receive the Light Incantation.
- Now find the statue that matches the symbol of the sword, use the Light Incantation, and then inspect the sword to give it away to the statue.
Blue Stag Symbol Location:
Blue Stag Golden Chest can be found in Town Square.
- Here make your way to the Town Square, where we charged the Horseshoe. Find the golden chest hit with the Electric Sword to grab the Electric incantation.
- Now head up to the Dining Hall in the Castle, use the Electric Incantation, and inspect the Sword at the correct knight statue to finish the ritual.
Red Dragon Symbol Location:
Head to the Castle Entrance Hall to locate the Golden Chest Attached to the Red Dragon Symbol.
- Now head to the Entrance hall, where we charged the Ra’s Ankh, you will find the golden chest here. Use the fire sword to hit the chest to get the Fire Incarnation.
- Use the Fire Incantation on the right statue or knight in the Dining Hall and inspect the sword to end the ritual.
Once all the Incantations are given back to the knights, then they will spawn a Mystic Orb for us to pick up.
#10. Complete Mystic Orb Four Elemental Challenges
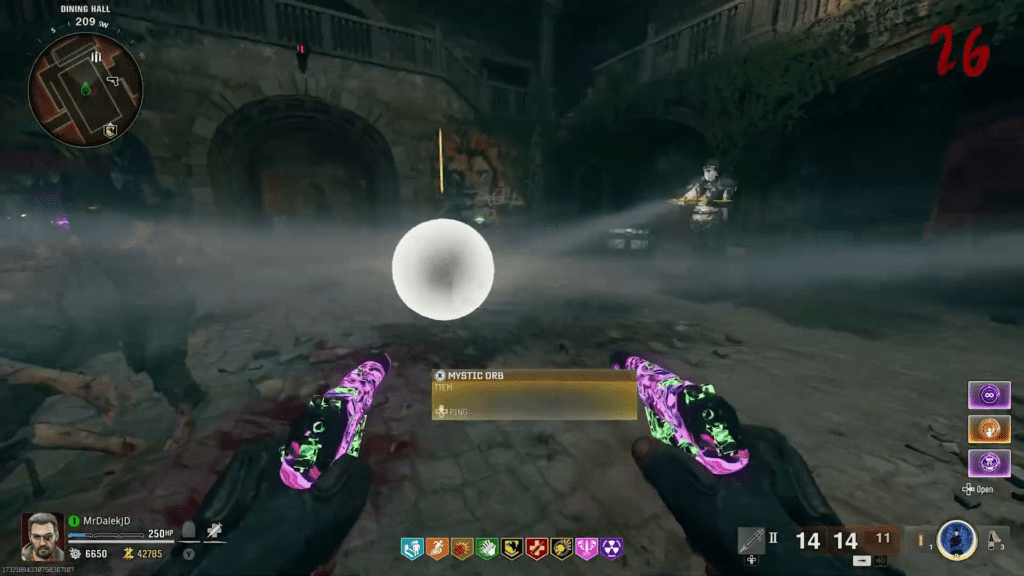
Now we must install the Mystic Orb into four specific places to carry out its set of challenges to finish off this part of the easter egg.
Note: There is no order attached to the sequence of it, you can do it however you like.
First Challenge Spot:
Location: Second Floor, Dining Room
Objective: Here we must use the Solais Sword or Light Sword and collect all the green orbs to complete the challenge.
- Head up to the second floor of the Dining Room. The Mystic Orb holder is located opposite Vulture Aid. Place the orb in the holder to start the challenge in the room.
- Here we must collect Green Orbs that spawn around the Dining Room until the Mystal Orb is complete. Once you stay in the Green Orb for a few seconds, a tiny green orb will shoot out of the orb and will head towards the place of Mystic Orb. After that, the green orb will disappear.
We have to carry out the process for all the Green Orbs in the area.
Prepare to face a lot of zombies, as they will come at you in massive numbers. Once you start the challenge, you will face infinite spawn zombies. So kill the zombie and grab the green orb. Once the Mystic Orb is charged up Krafft will notify you at the end of the challenge with a dialogue. Head up to the place where you placed the Mystic Orb and grab it off the floor.
Second Challenge Spot:
Location: Town Square
Objective: Use a Special attack with Durendal Sword or Electric Sword to kill the zombies to complete the challenge.
- Here head up to the west of Town Square, and you will find another Mystic Orb holder next to the doorway to the Nature’s Path. Zombies will soon spawn on the map, the way to finish this challenge is to pay attention to the orb.
- You will need to use an elemental sword attached to the element on the orb. But most of the time, it’s always electric. So pull out the Electrical Sword and paint the town red with the zombies using the sword.
Use the Electric Incantation and Special Electric Sword attacks to charge up the Mystic Orb to finish the challenge here. Once the challenge is complete, pick up the Mystic Orb and head on to the next challenge.
Third Challenge Spot:
Location: Courtyard, Near Castle Entrance
Objective: Use Caliburn Sword or Fire Sword, special attacks to kill the zombies to complete the challenge.
- You will find the Mystic Orb in the courtyard, opposite the Arsenal. Head up to the hilltop area and you will find the holder here. Install the Mystic Orb to start the challenge.
- Here use Fire Incantation and Special Fire Sword attacks immolations, to kill the zombies in the area.
Once it is fully charged you can pick it off the floor and continue with the last challenge.
Fourth Challenge Spot:
Location: Oubliette Room, Undercroft
Objective: For the last challenge, we use the Balmung sword or Purple Dark sword to finish the challenge.
- Head to the Oubliette Room on the West wall of Undercroft, here you will find the Mystic holder right next to the chest.
- Use the Dark Incantation and dark purple or Balmung sword to take down enemies in the area to charge up the Mystic Orb here.
Use Dark Incantation and Void Tears to defeat the enemies to complete the challenge. Once all the challenge is complete, you are ready to move to the final stage of the easter egg.
#11. Starting The Final Phase

Face the final boss of the Citadelle des Morts
Get the Guardian key
With the Mystic Orb in your possession, head to the four elemental Symbols on the wall in the Alchemical Lab. Place the Mystic Orb inside the holder in the center of all four symbols. This will unlock a Secret Study Room, and interact with the Cylinder to activate the holographic recording. Here you will obtain the Guardian key.
Now take the key and get to the Town Square, the spawn point area. Here interact with the giant statue in the middle to start the final encounter.
Tips to Defeat the Guardian
The guardian is a strong enemy, it does live up to its name. Our job is to break the armor of the Gurdian to reveal the weak point while simultaneously killing all the zombies and the Doppleghast around us. It’s not going to be an easy fight. So we have details of some of the ways you can defeat it a bit easily.
Offense Tactics:
- Target Boots, Wrist, Gauntlets, the idea is to break down the armor to reveal the weak spots.
- Always look out for the glowing broken armor to deal heavy critical damage.
- If the number of zombies seems too many in the area, kill them off before focusing on the Guardian.
Defense Tactics:
- Dodge the Fireballs, while they may not look lethal but they are, however, they are easily dodgeable.
- Use the perks and armor to survive lethal shots. Most of the time it only takes one shot to knock you out.
- Shoot down the zombies to receive the armor.
Once you defeat the guardian, it will drop the Amulet. Picking it up will trigger the final cutscene in the game. Here the game will hand you two choices, either to continue forward or exit the game.
Rewards: After defeating the Guardian, the game will give you: a Citadelle des Morts Quest Complete Calling Card, Jacknife Operator Skin for Weaver, and Doppelghast Accessory.