


The surprise drop of Blashphemous 2: The Third Sin DLC is a gift that keeps on giving. The new area is filled with all sorts of collectible items, hidden weapons, upgrades, and many more, ready to be found once you unlock the The Third Sin DLC in your game.
Here in this guide, we will take a look at the Altarpiece of Favours. Each one comes with its own unique bonus that can drastically change your gameplay for the better. You wouldn’t want to miss out on any of them. Here is the location for all the Altarpieces of Favours found in the Blasphemous 2: The Third Sin DLC.
All Altarpiece of Favour Locations in Blasphemous 2 The Third Sin
There are 9 Altarpieces of Favour found in different zones in the new Blasphemous 2: The Third Sin DLC. Each one offers its own effect that you can use to set perfect combos for your game. Here is a brief overlook at all the Altarpieces of Favour found in the game.
| Altarpiece of Favour Names | Location | Effect |
| The Perfidy | Stone Entrails | Helps with the Servant’s effectiveness |
| Eliseo | Stone Entrails | Raises the base Embrujo damage. |
| The Grief | The Vibrating of the Organs | While using Bile Flasks, gain invulnerability |
| The Judicious One | The Vibrating of the Organs | Raises the Embrujo’s Unholy damage. |
| Cartography Of The Bones | The Vibrating of the Organs | Enemy’s knockdown attacks will only cause knockback. |
| The Ascension | Geometry of Knowledge | Release a shockwave after performing Passage of Ash. |
| Lady Of The Mist | Usurped Halls | Killing enemies increases the damage to all weapons gradually. The damage boost disappears if you get hit, die, or rest at a Prie Dieu. |
| Inner Voice | The Vibrating of the Organs | Wail of Flame uses less of the gauge’s power |
| Crescencia | The Vibrating of the Organs | Servants inflict contact damage on enemies |
#1. The Perfidy | Stone Entrails
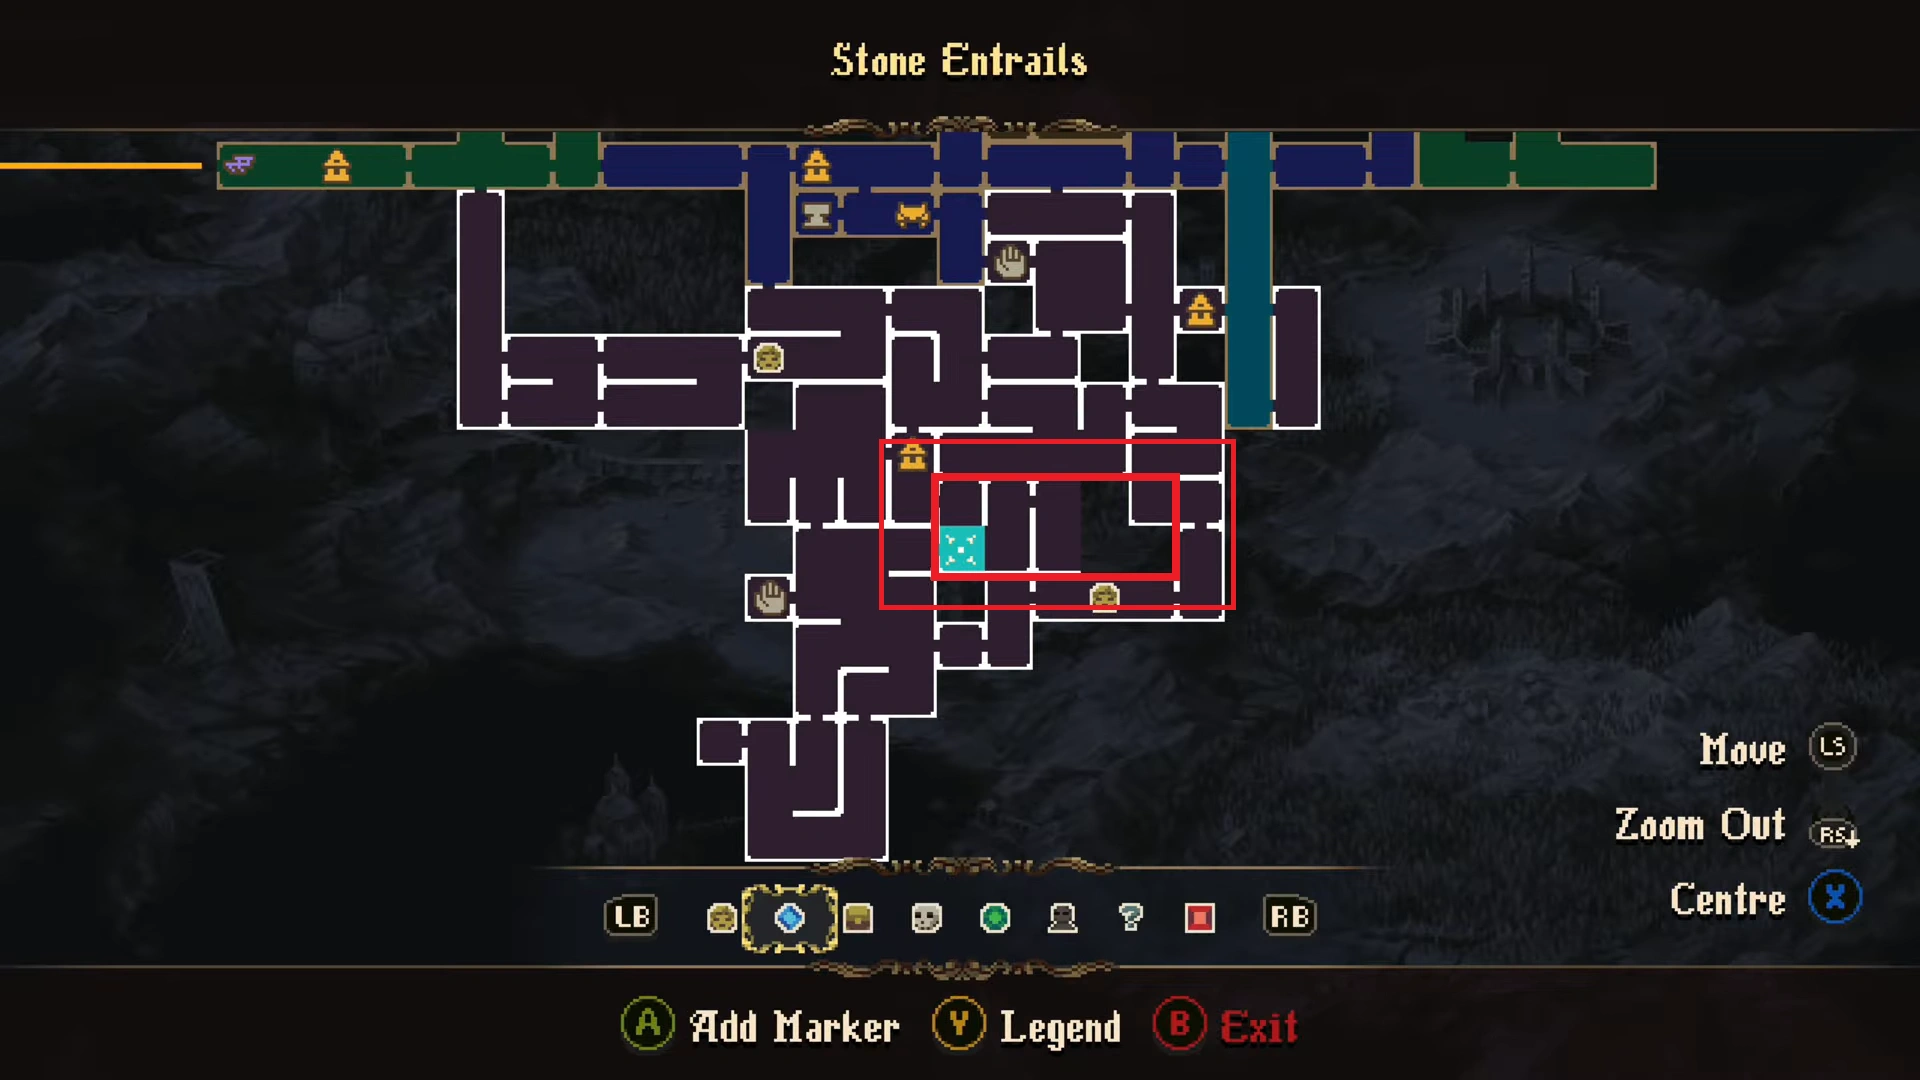
The first one, The Perfidy, is located inside a golden treasure chest in the middle section of the Stone Entrails. The chest is trapped between a steel barricade, and you will have to ring the bell on the right side of the chest to lift the steel barricade and open the box to get the treasure. Put on your platforming boots for this one, as the small room has a platforming puzzle side to it, where you will use the grappling hook to navigate over the spiky floor.
Note: This item is completely different from another item that shares the same name, ‘Perfidy‘. The other one is a skin item. If you want to know how to acquire the Perfidy skin, follow our quick guide to get the costume quickly.
#2. Eliseo | Stone Entrails
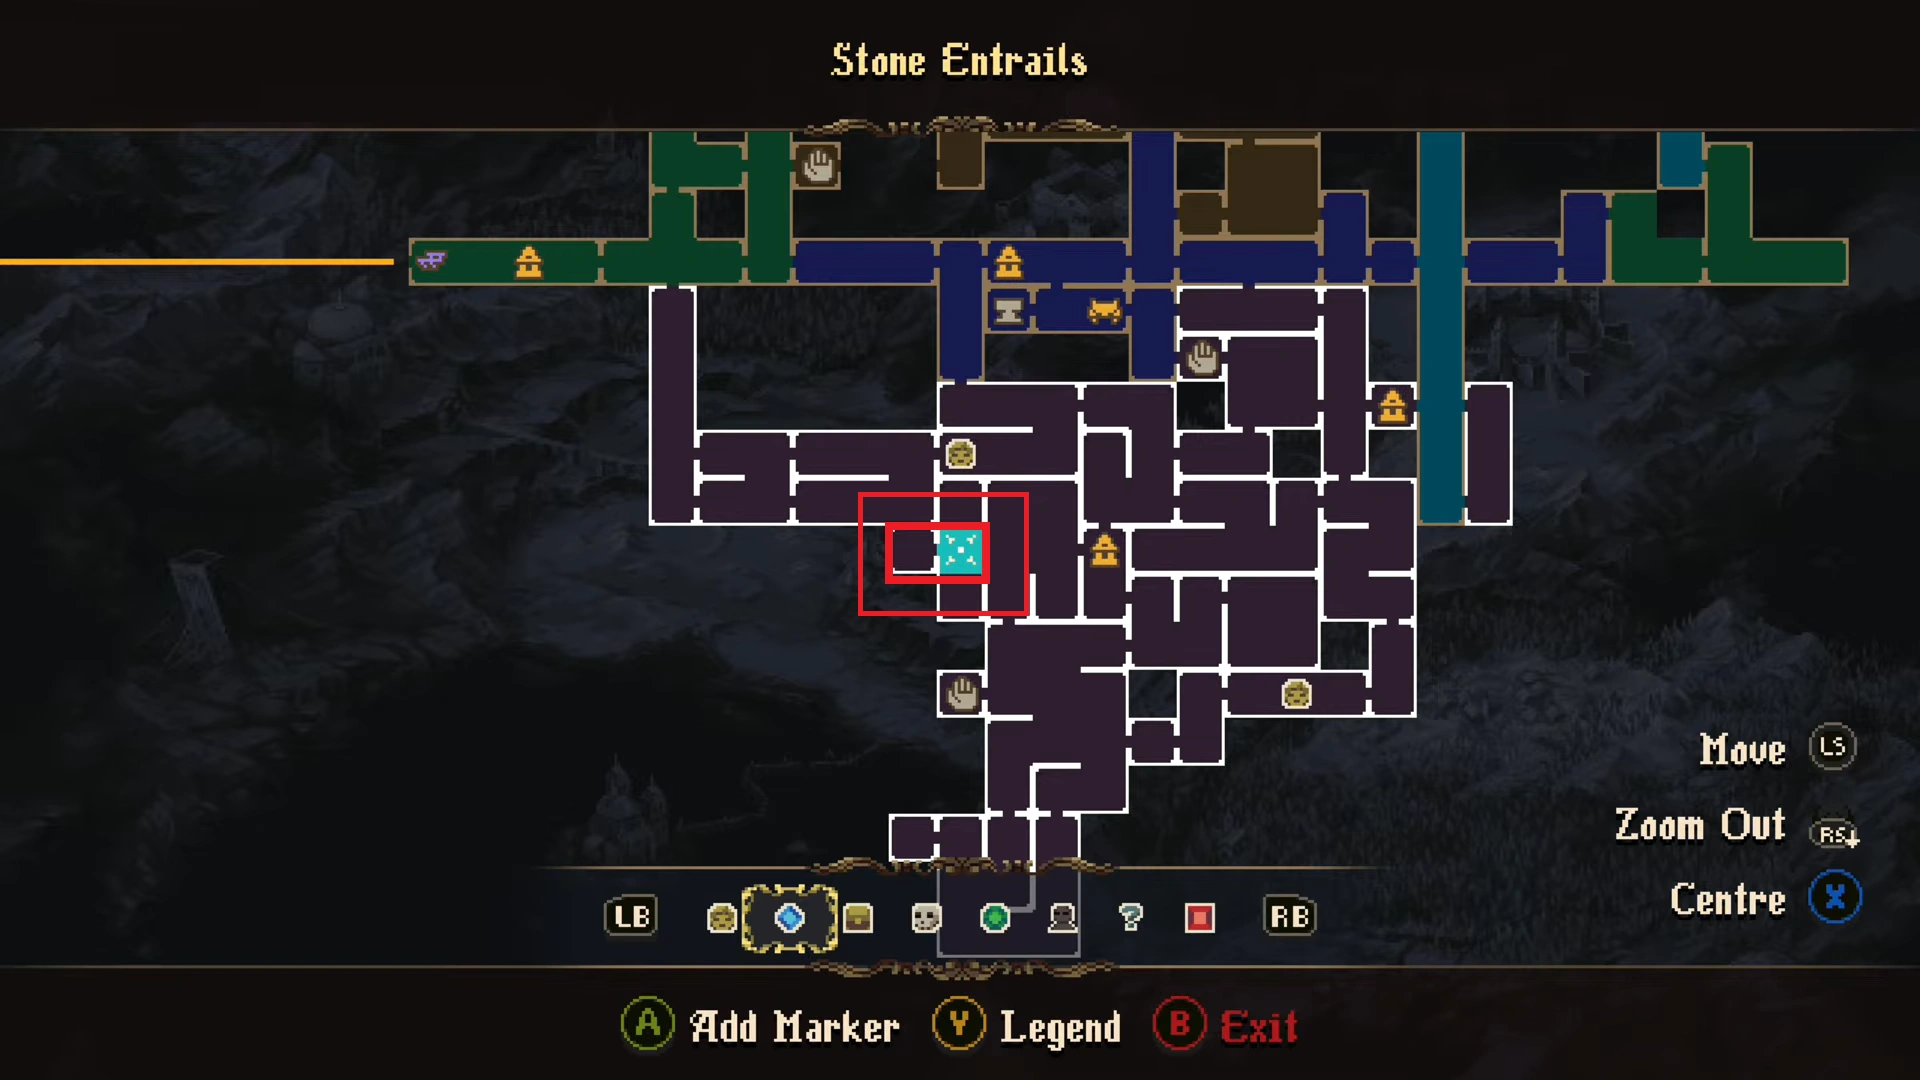
This one takes us all the way west of Stone Entrails. Once you step into the room, the golden treasure chest will be out in the open at the corner. But you probably know that it’s too good to be true. Once you get closer to the chest, the barricade will drop down on the side of the chest, and a boss will spawn to give you a hard time. Defeat the boss to lift the barricade to get the item, ‘Eliseo.’
#3.The Grief | The Vibrating of the Organs
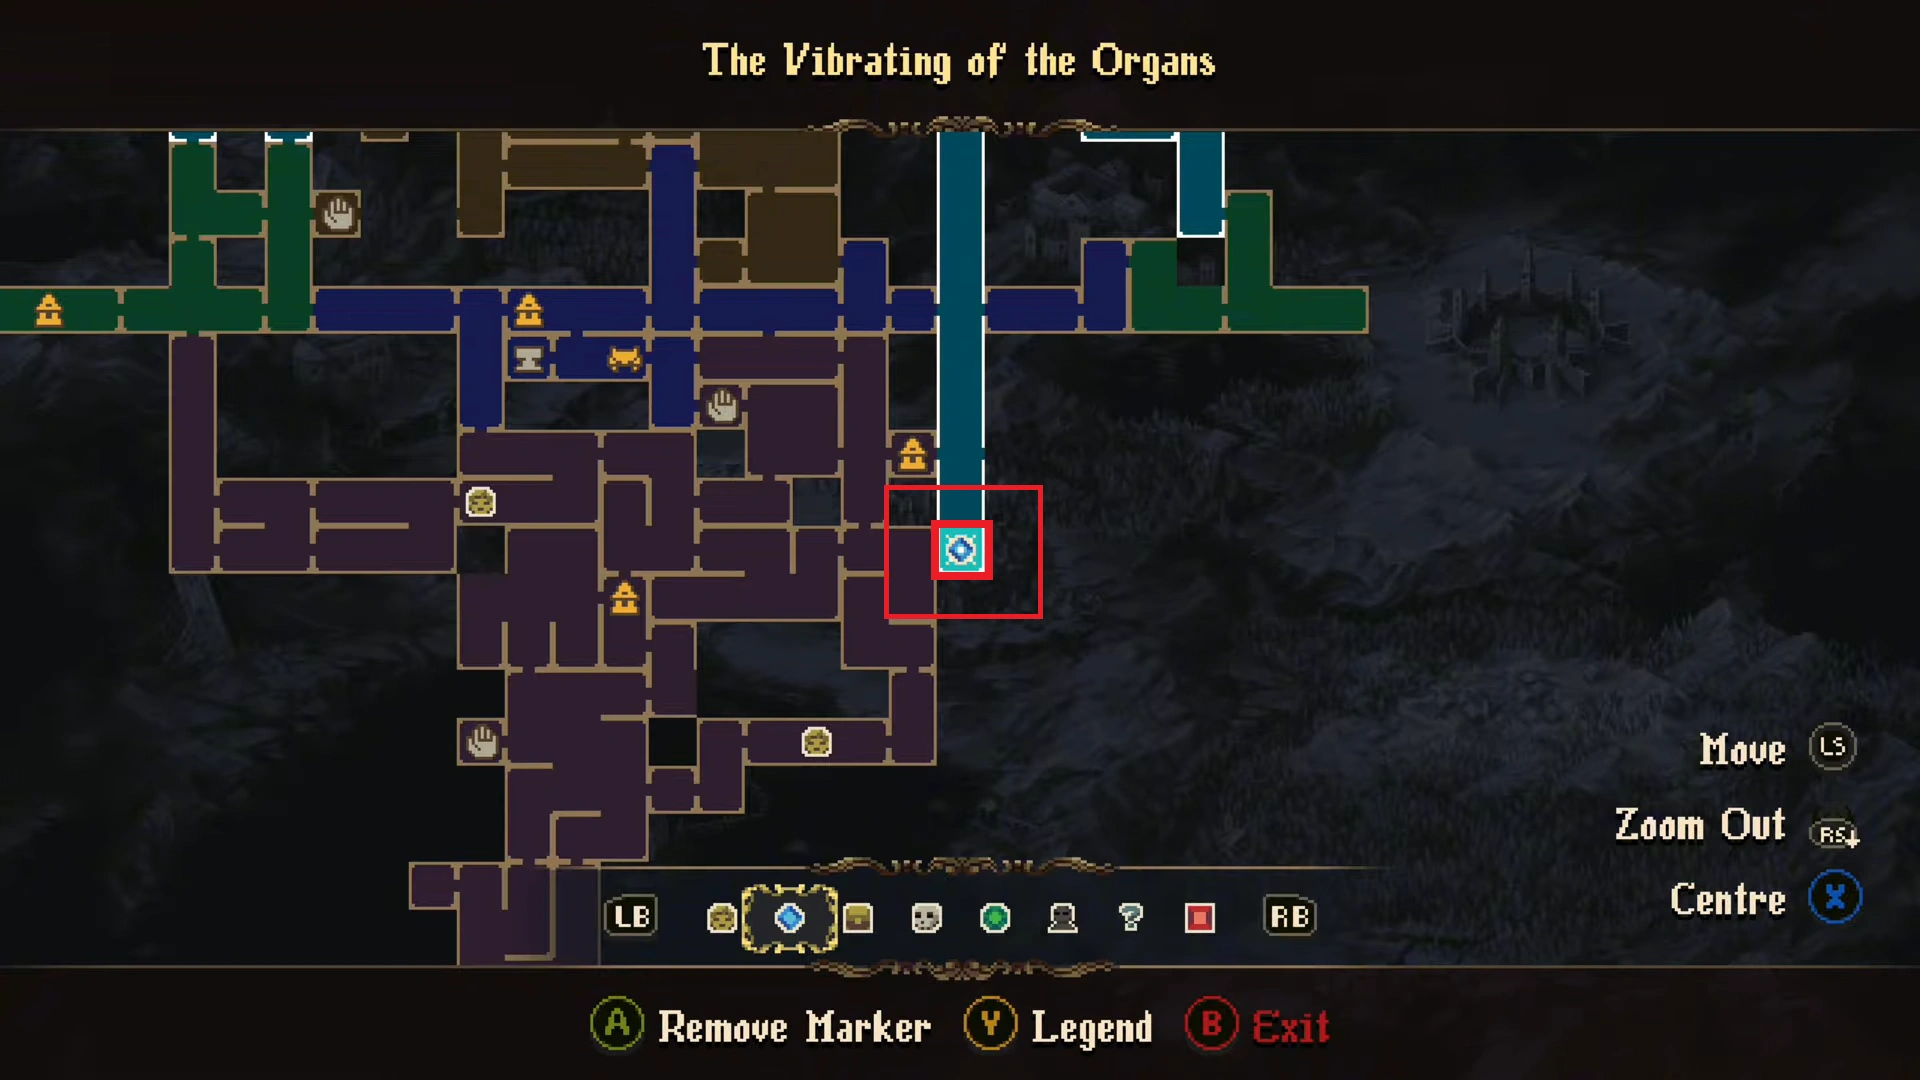
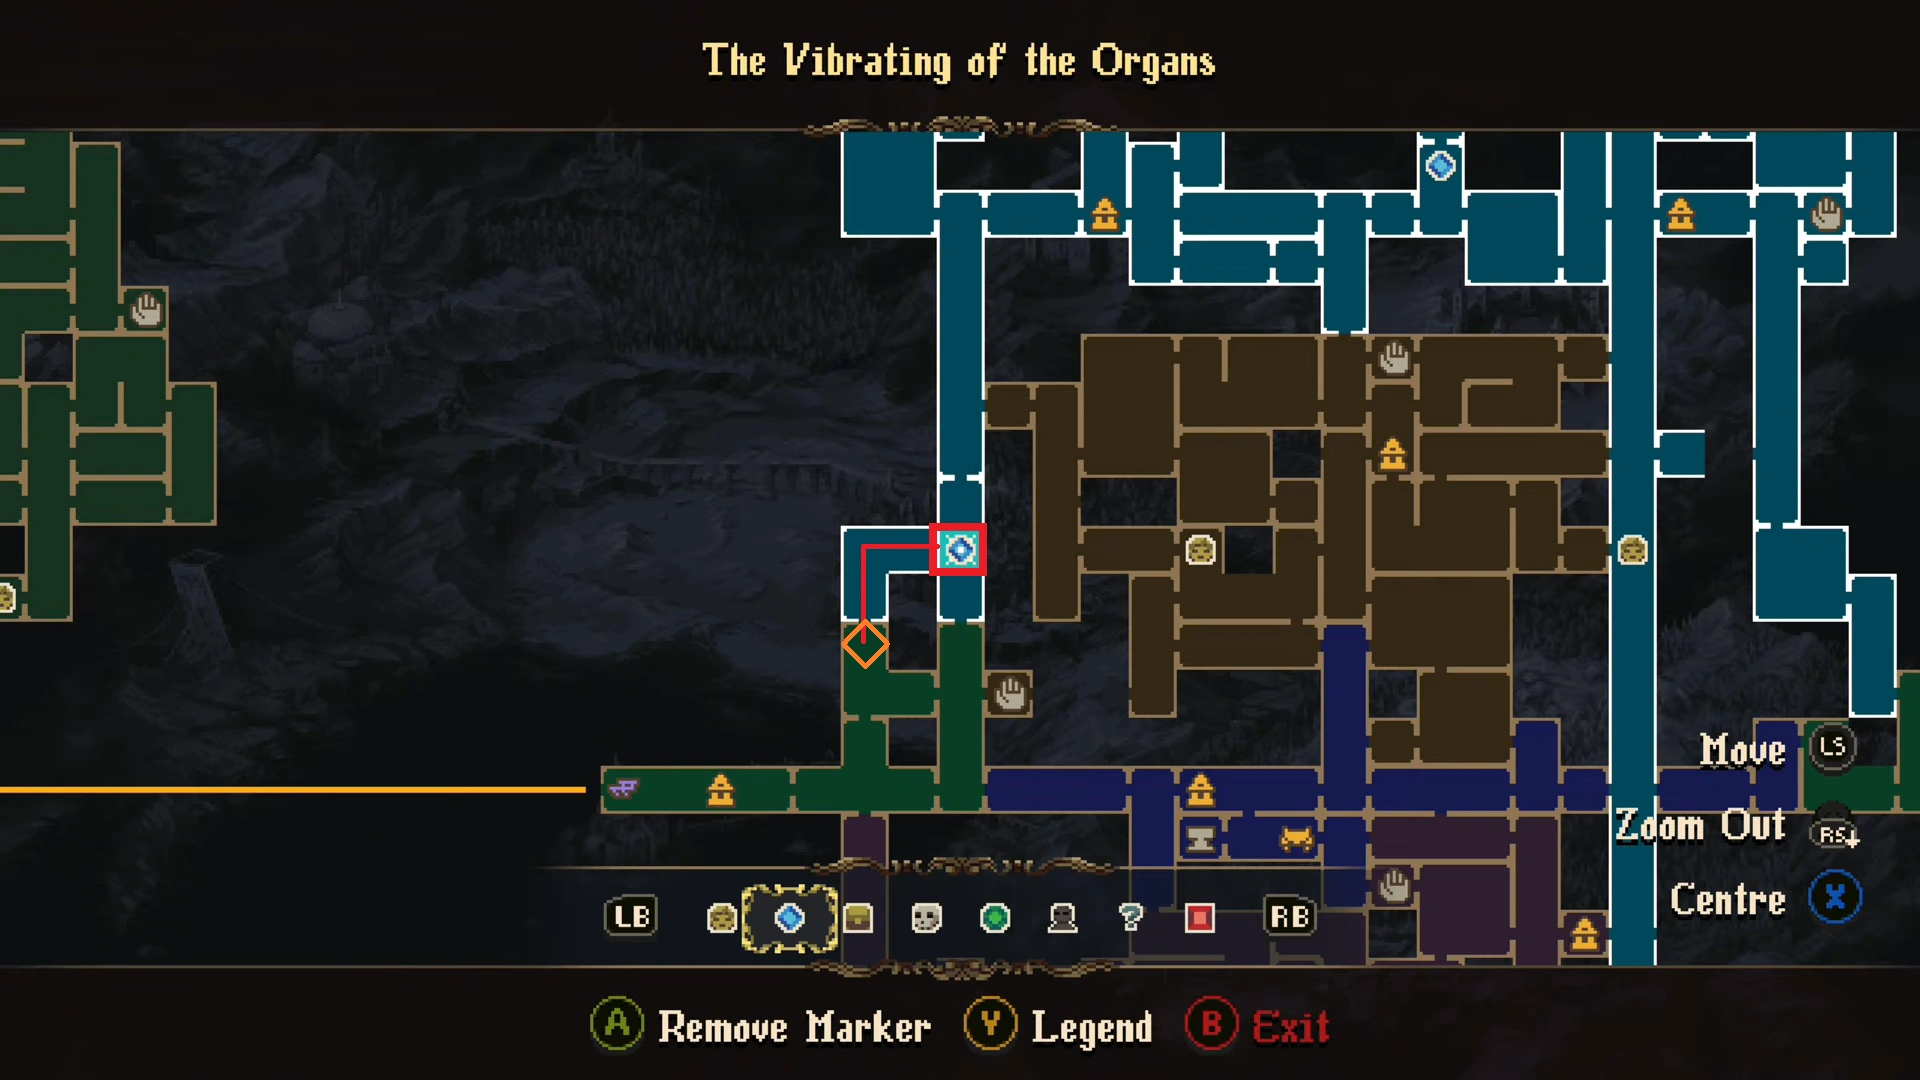
This one is located all the way down south in the Vibrating of the Organs zone. Once you are at the bottom, take the path on the right to enter the next room, now wall jump to the floor above to grab the item on the tiny platform to the left wall. That’s it, just grab the white ball item off the floor, and you will have the Grief.
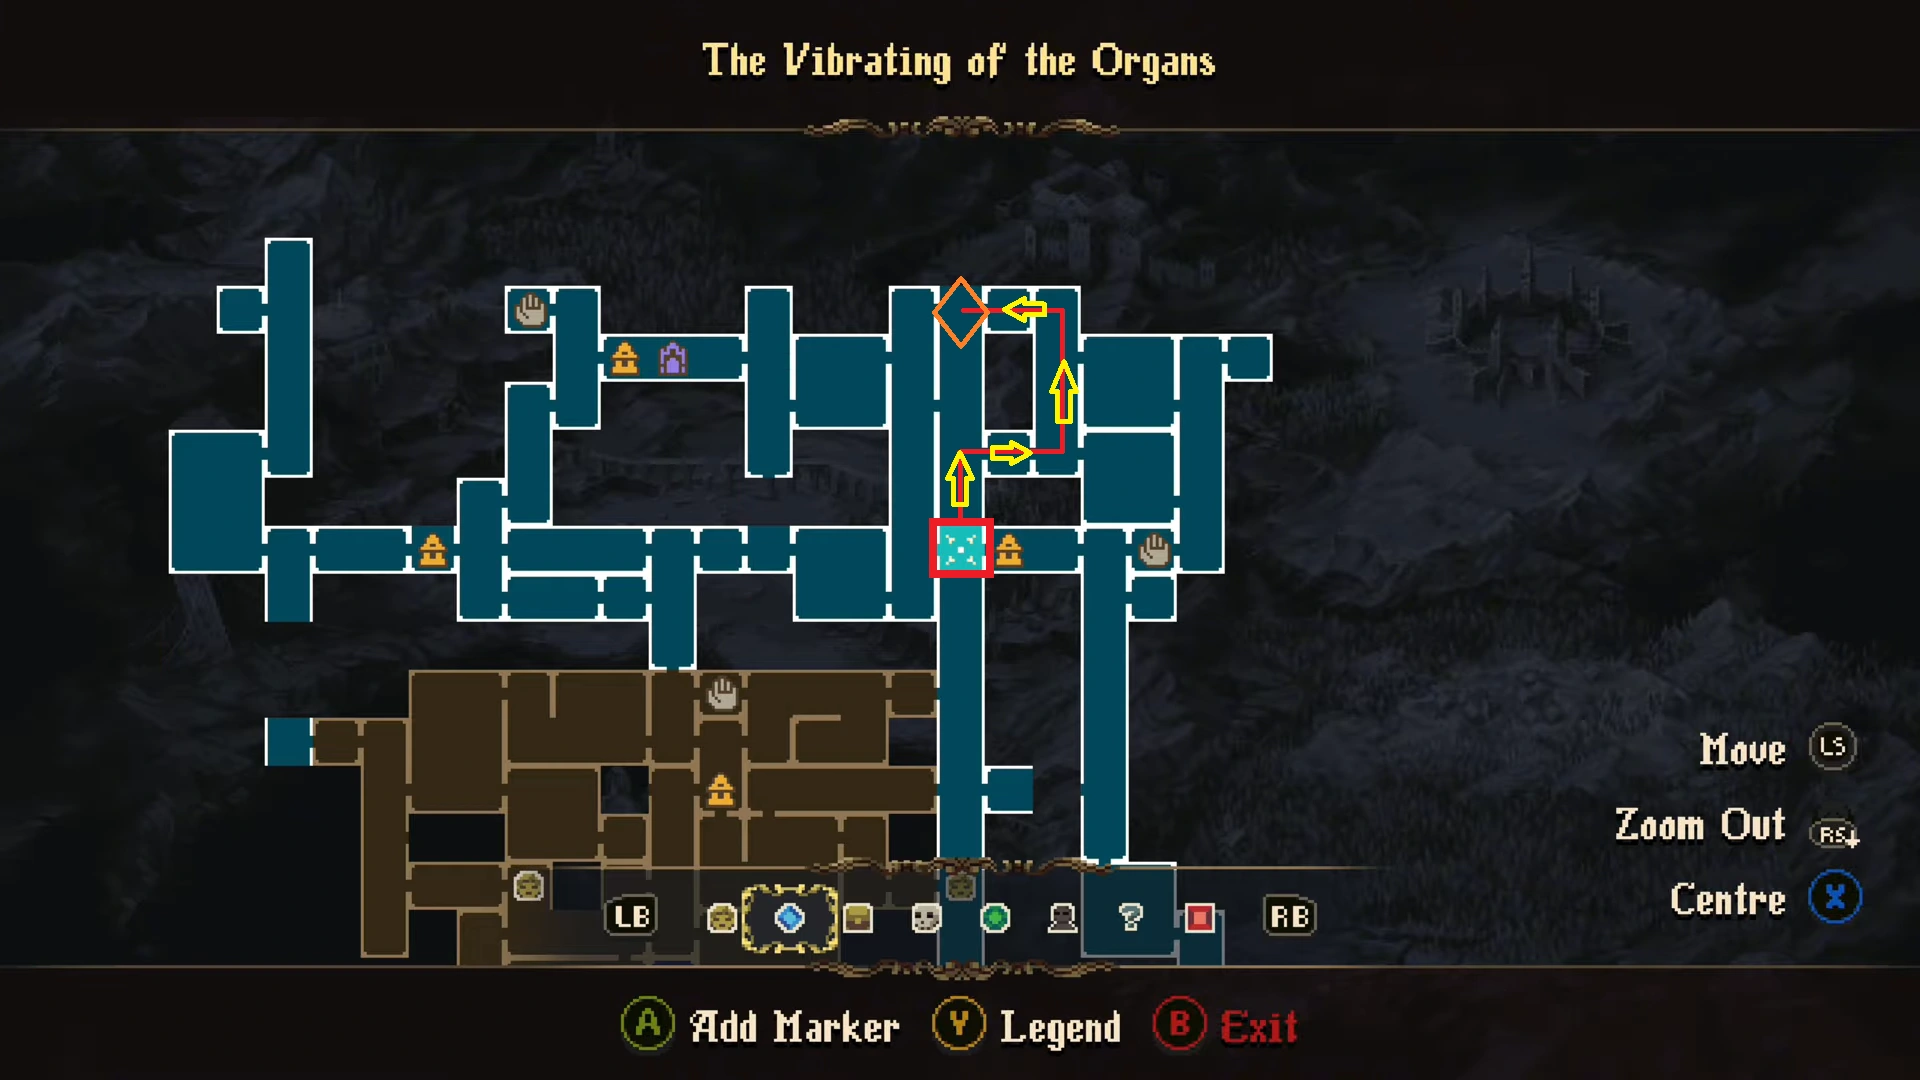
#4. The Judicious One | The Vibrating of the Organs
Now we move all the southeast of the Vibrating of the Organs zone. Get to the marked spot, and take the room on the left. Here, you will be in an open area, with grappling hook points hovering in the air. First, hit the lever above the platform, then use the grappling hook points to land on the hanging ceiling floating above. Here, you will find the Judicious One.
#5. Cartography of the Bones | The Vibrating of the Organs
This one is located northeast of the Vibrating of the Organs zone, next to the fast travel point. Get to the marked spot, you will find an elevator in the middle, do not go inside it, instead climb on the wall on the right to grab the ladder. The ladder will not be visible from the floor; you will be able to see it once you do a wall jump move.
Climb the ladder to the platform. Now, don’t go up the ladder on the top; instead, take the path on the right. Jump over the platforms to get to the next area. The new area will be filled with pointy spikes. Our goal is to make our way to the top until we see an enemy with a golden circle weapon. Make your way to the top, skip the enemy, and head to the doorway on the left.
Now keep moving left until you see a lever next to the gap on the platform. Hitting the lever will call an elevator. As soon as it shows up, jump on the roof of the elevator, and you will be able to access the Cartography of the Bones from this location.
#6. The Ascension | Geometry of Knowledge
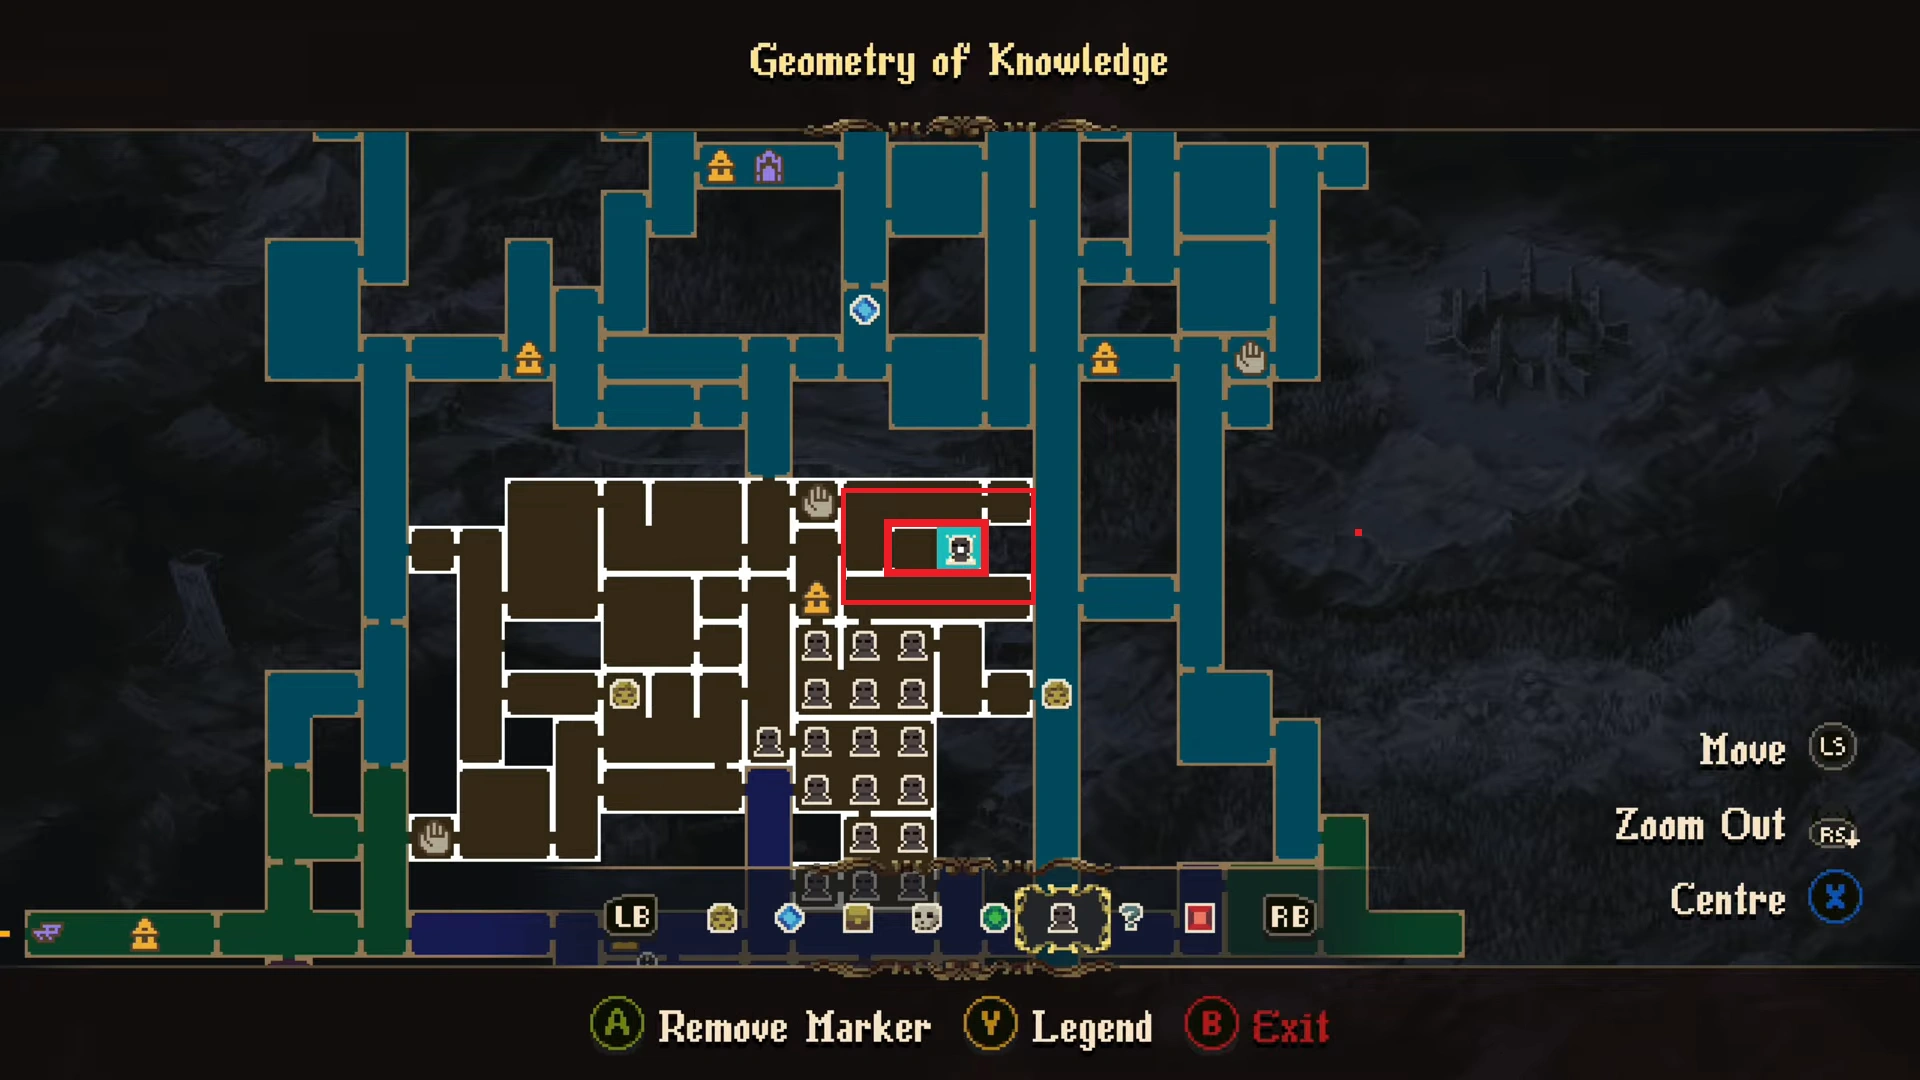
Get to the library section in Gemometry of Knowledge, located northeast of the zone. The golden treasure box will be located left of the room, inaccessible, as it will be on the top of the bookshelf. The ladder will be located on the right side of the room. Get to the marked spot, now hit the ladder with your weapon to push it to the left. That’s it, now climb the ladder, and you will have the golden treasure chest within your reach.
#7. Lady of the Mist | Usurped Halls
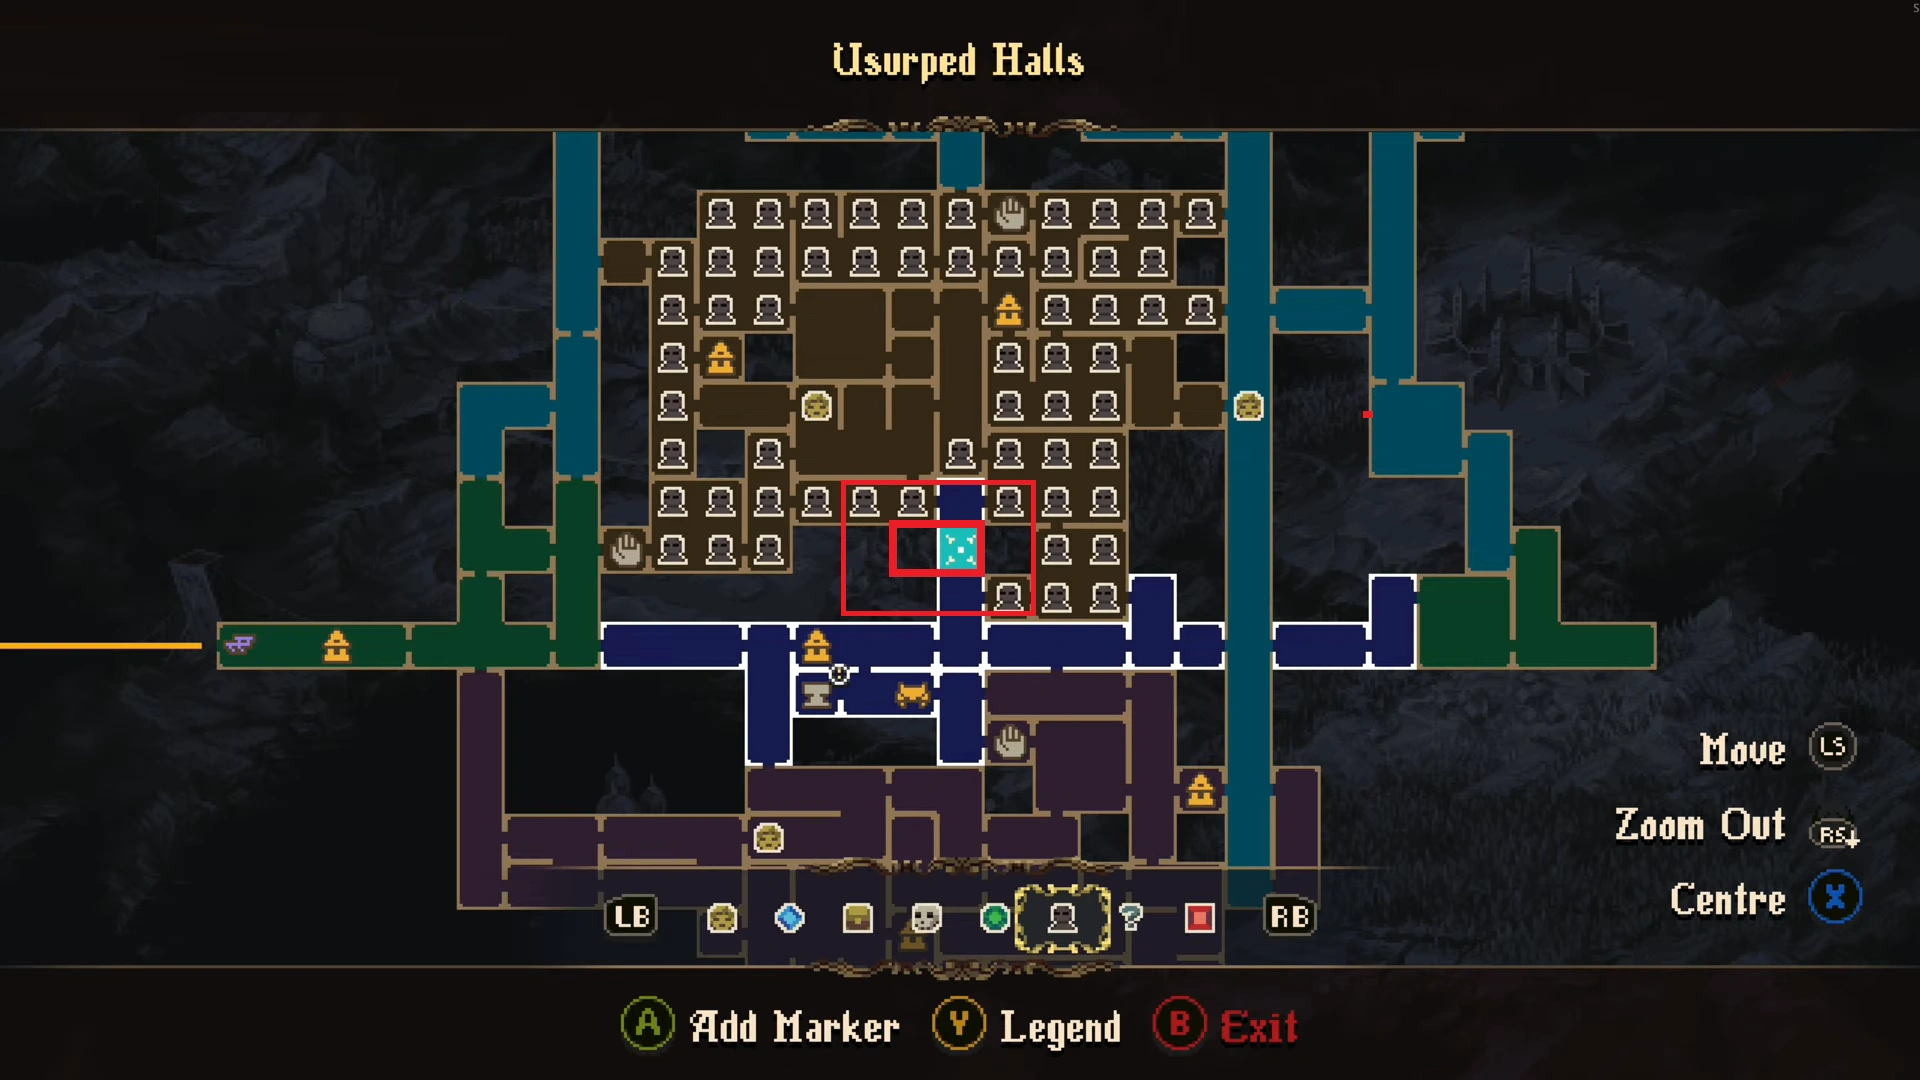
Head to the north of the Usurped Halls zone, marked on the image above. Take the path on the left, and you will find the golden treasure chest in the middle of the room. Open it, and you will have the Lady of the Mist.
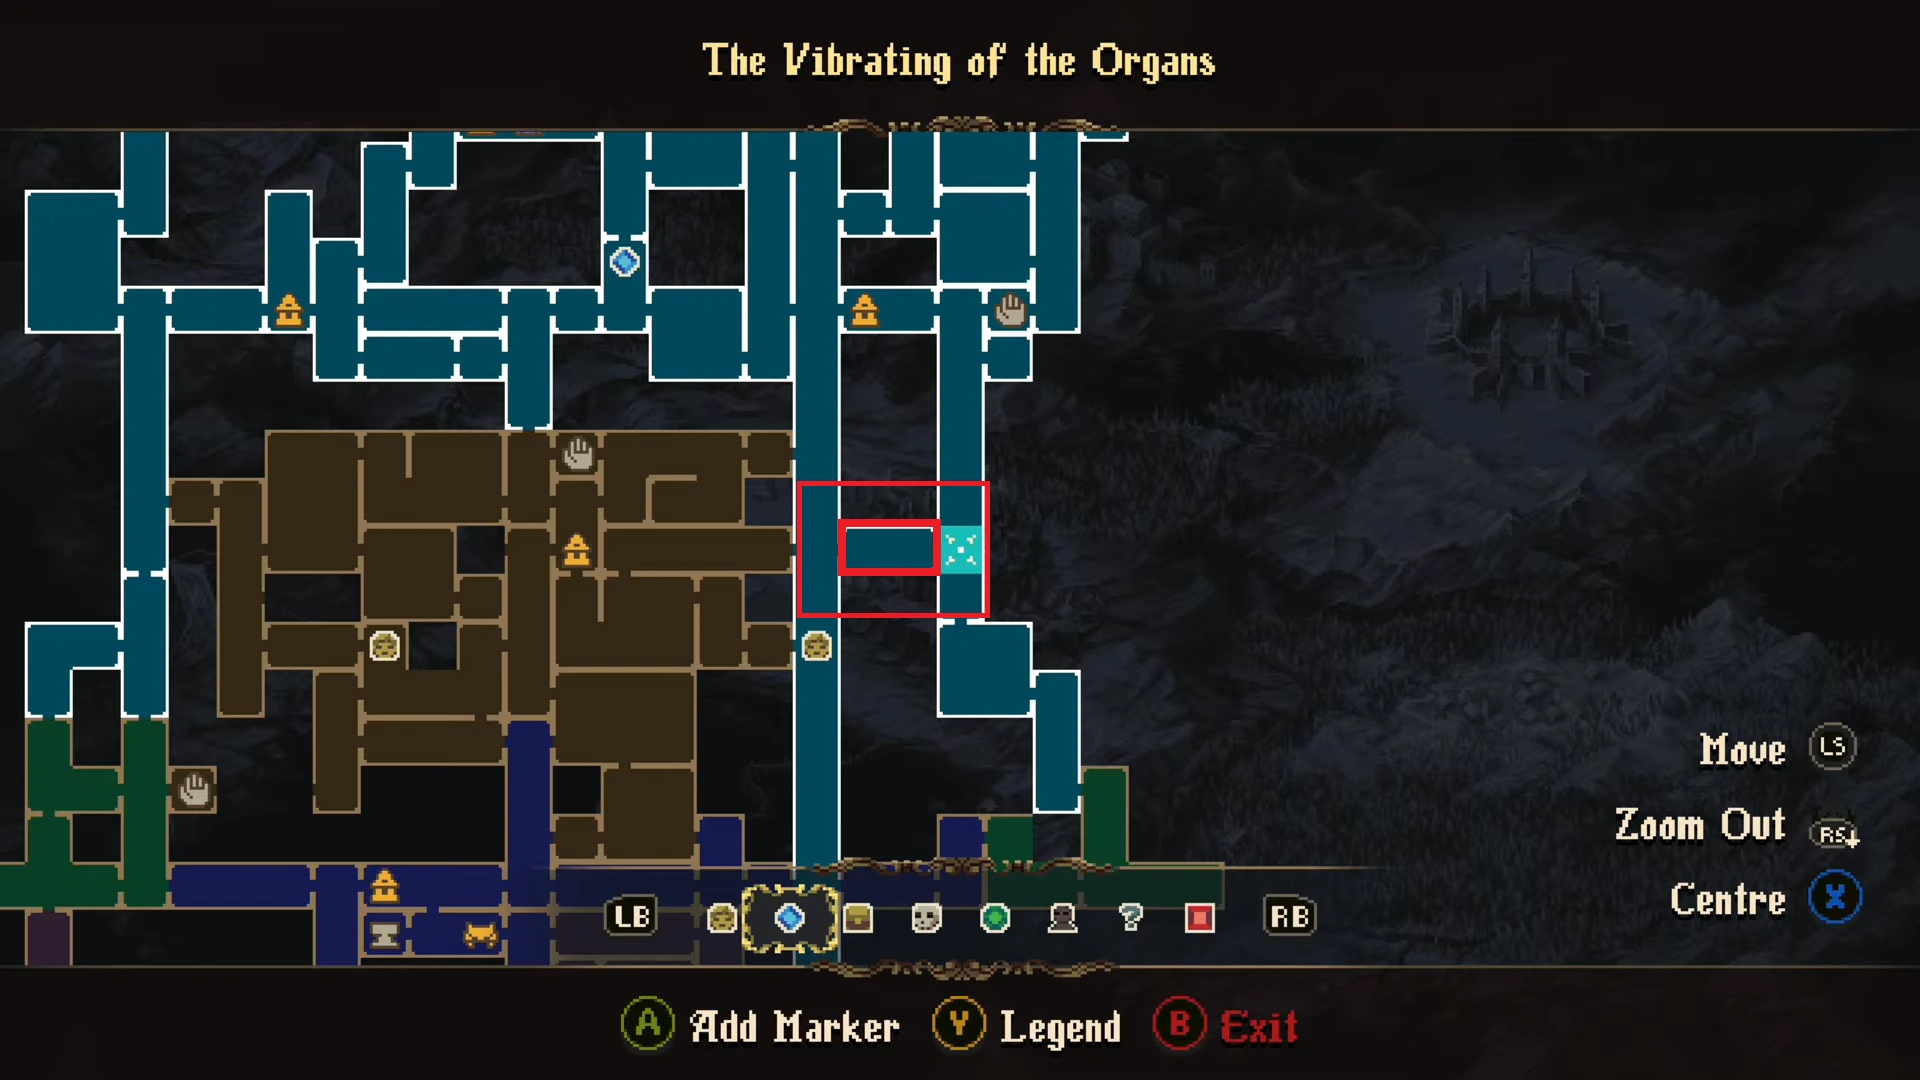
#8. Inner Voice | The Vibrating of the Organs
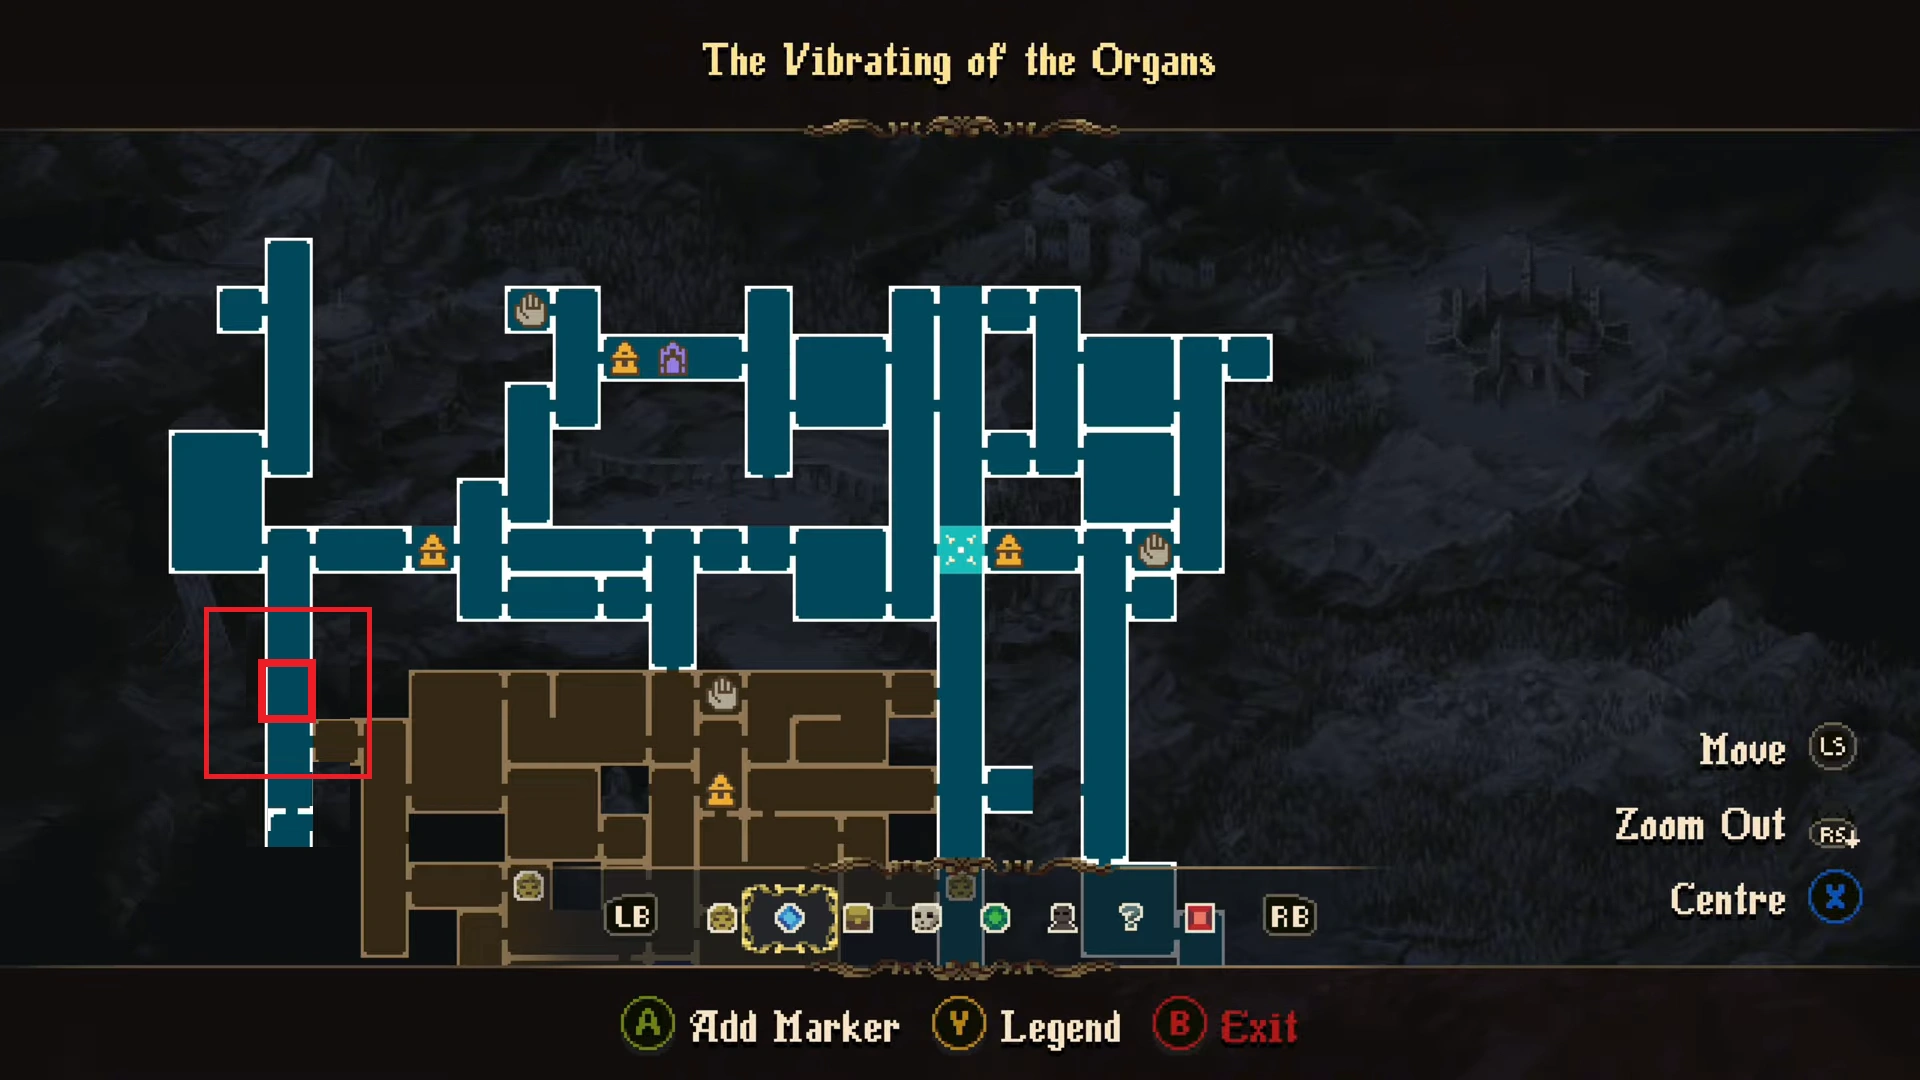
This takes us to the southwestern section of the Vibrating of the Organs zone. Here, get the marked spot, use the grappling hook points floating near the ceiling, above the ladder on the bottom floor. Use the grappling points to gain access to the platform with the golden treasure box.
#9. Crescencia | The Vibrating of the Organs
The last item on the list will take us all the way southwest of the Vibrating of the Organs zone. Get to the marked spot, and hit the lamp-like item to open the hidden path on the left. Move to the left, and you will reach a dead end. Don’t worry, just cross your fingers and jump from the ledge into the void below, and you will land on the platform, taking you to the next area, ‘Castle of the Mist.’
That’s it, now you have all 9/9 Altarpieces of Favours in Blasphemous 2: The Third Sin DLC.