


Blasphemous 2: The Third Sin introduces quite a few things to the base game. Once you gain access to the DLC, the world is your oyster, as there are collectibles that can unlock a secret skin and weapon upgrades scattered around the map. Some of these are easily missable, as you must get off the main route to find them in the game.
Here in the guide, we will help you find one of the best weapons introduced in the Blasphemous 2: Third Sin DLC: the Embrujo. Finding and getting the weapon is only the tip of the iceberg; the rest of the fun lies in its upgrades. I have detailed out the locations to find the Embrujo weapon and all 19 Marks of Embrujo located in four different areas of the new The Third Sin DLC in Blasphemous 2.
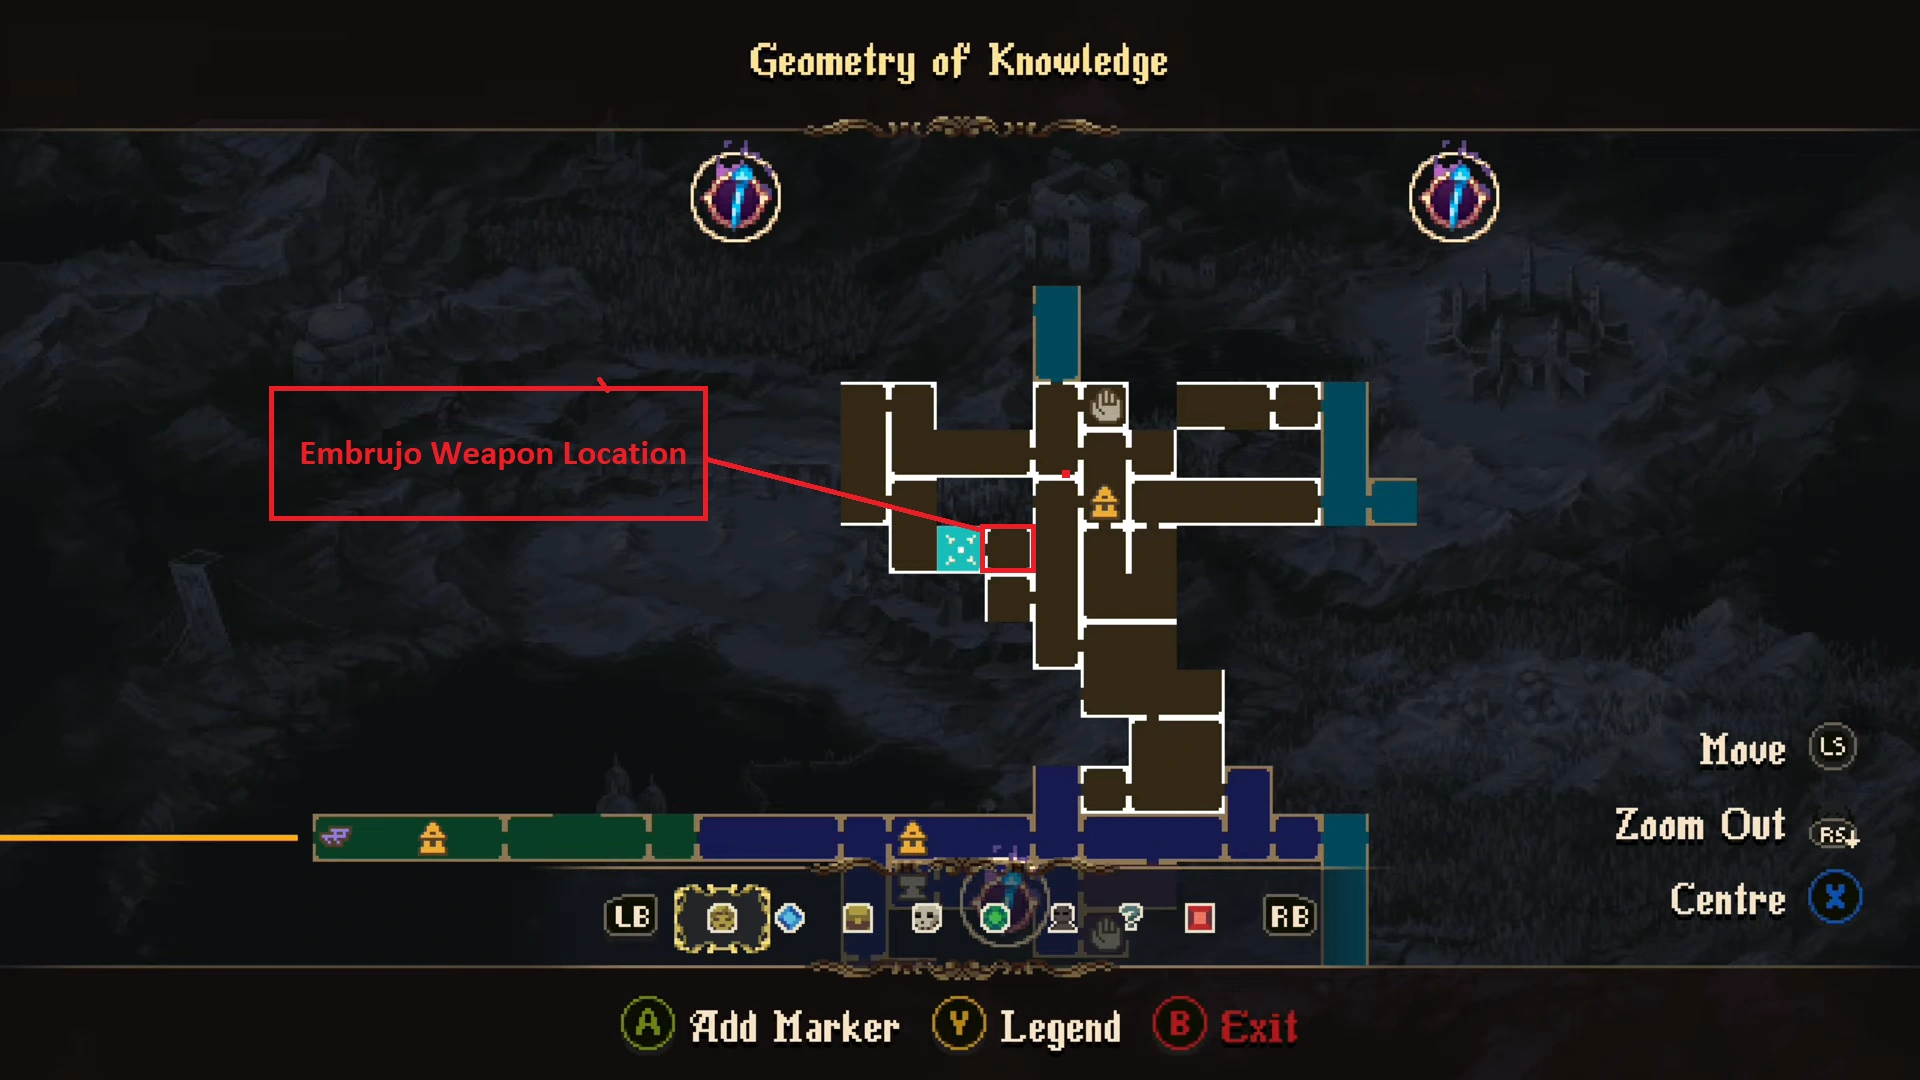
Embrujo Weapon Location
The Game Kitchen
Embrujo is a weapon located on a dead body hanging off the ceiling in the Geometry of Knowledge. The path to Embrujo will be filled with blue spikes, typical sights that we encounter during the findings of virtue fragments to unlock the Penance of Virtue Skin, one of many skins in Blasphemous 2.
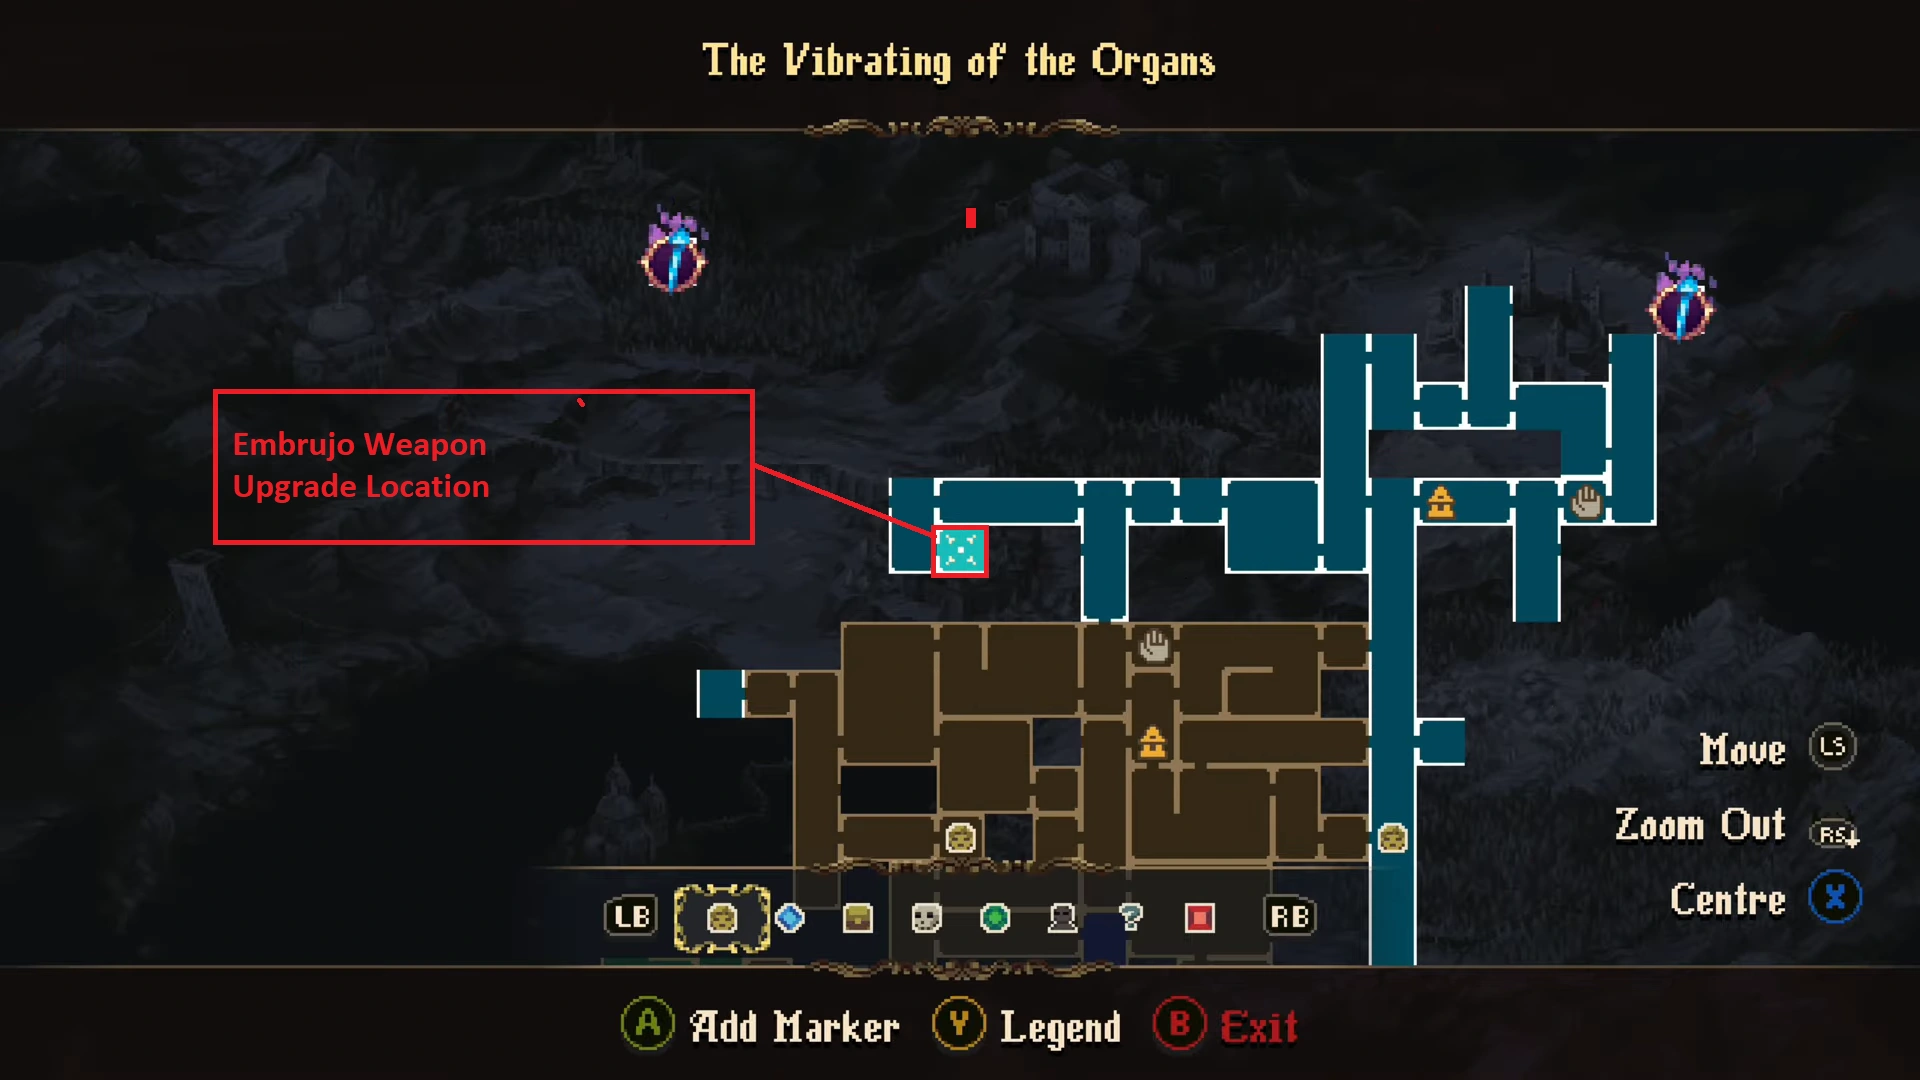
Upgrading the Embrujo in Blasphemous 2
The Game Kitchen
Make your way to the west of the Vibrating of the Organs, and get to the spot marked on the map. Now you will have to carry out a bit of platforming, which requires ringing the bell to make the object appear around them. Use that as a grappling point to get across the other side. You will find a statue that you can interact with and get the upgrade. This will unlock the 2nd slot on Embrujo.
Mark of the Embrujo Locations
There are 19 Marks of the Embrujo available in the Third Sin DLC. Here we will mention all 19 Marks of the Embrujo along with the location details.
- Geometry of Knowledge – 4x Mark of the Embrujo
- The Vibrating of the Organs –8x Mark of the Embrujo
- Castle of the Mist –1x Mark of the Embrujo
- Stone Entrails – 6x Mark of the Embrujo
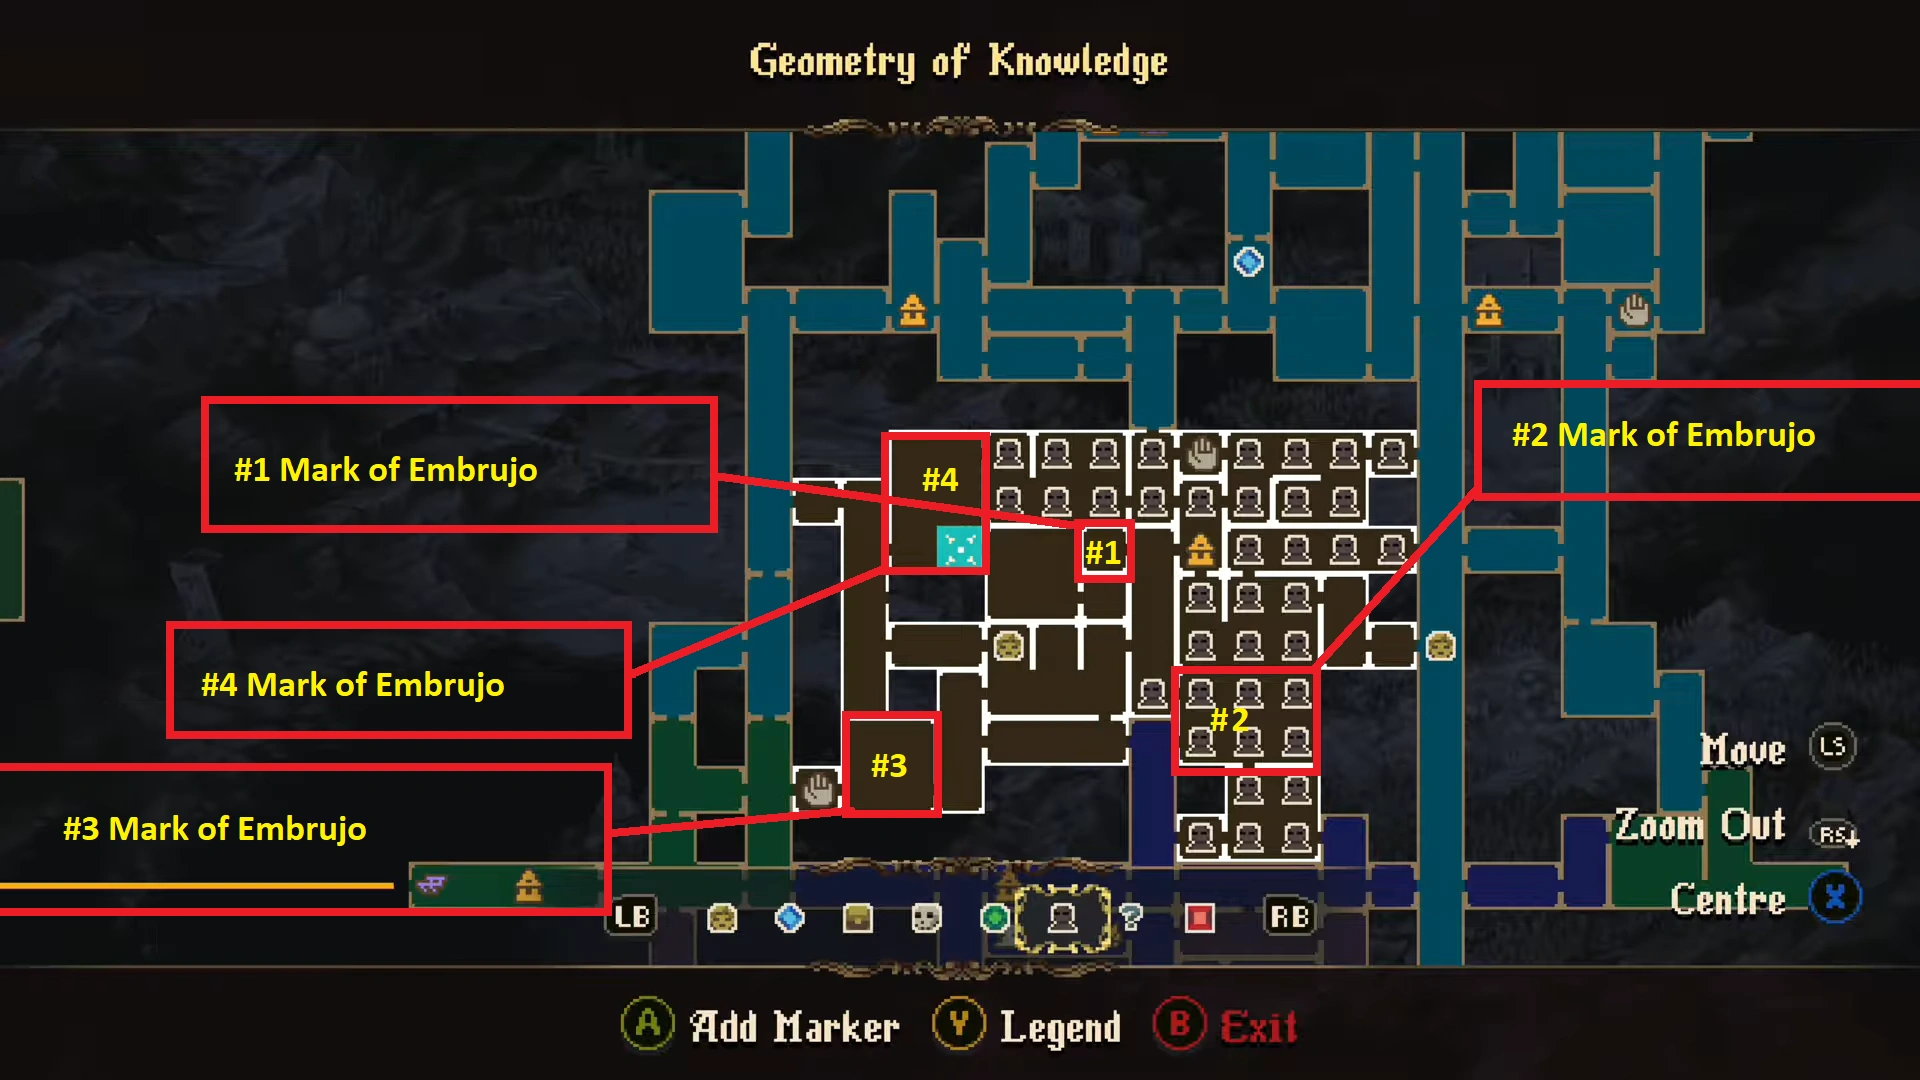
All Mark of the Embrujo Locations in Geometry of Knowledge (1 – 4)
The Game Kitchen
There are four Marks of the Embrujo found in Geometry of Knowledge. All of them are located in different sections of the map; you can check the marked spot on the image above to pinpoint the next one.
Mark of the Embrujo #1
Get to the spot highlighted on the map, head to the left area, defeat the boss, and you will find the first Mark of the Embrujo. Just interact with the item on the floor, and you will get the Mark of the Embrujo in the game.
Mark of the Embrujo #2
Located in the southeast of Geometry of Knowledge, get to the marked spot on the map. It’s in the giant room, just take the ladder and use the grapple hook to get across the other side, where you will find the second Mark of the Embrujo.
Mark of the Embrujo #3
This one is found in the southwestern section of Geometry of Knowledge. I have marked the spot on the map. Once you enter the room, you will be attacked by the boss in the room. But you don’t have to fight the boss to get the Mark of the Embrujo. If you take a look at the middle of the room, you will see the Mark of the Embrujo barricaded by steel gates on both sides. The lever on the other side of the barricade holds the key to lifting the barricade on both sides to gain access to the item.
Now make your way to the top of the room by using the mirrors above the boss. Follow the linear route, and you will find yourself on the other side of the steel barricade. Hit the chain to lift the barricade and grab the Mark of the Embrujo inside.
Mark of the Embrujo #4
The last Mark of the Embrujo in Geometry of knowledge, found on the northwestern section of the map. Ring the bell, and use the grappling hook to navigate between platforms to get to the item.
All Mark of the Embrujo Locations in The Vibrating of the Organs (5-12)
The Game Kitchen
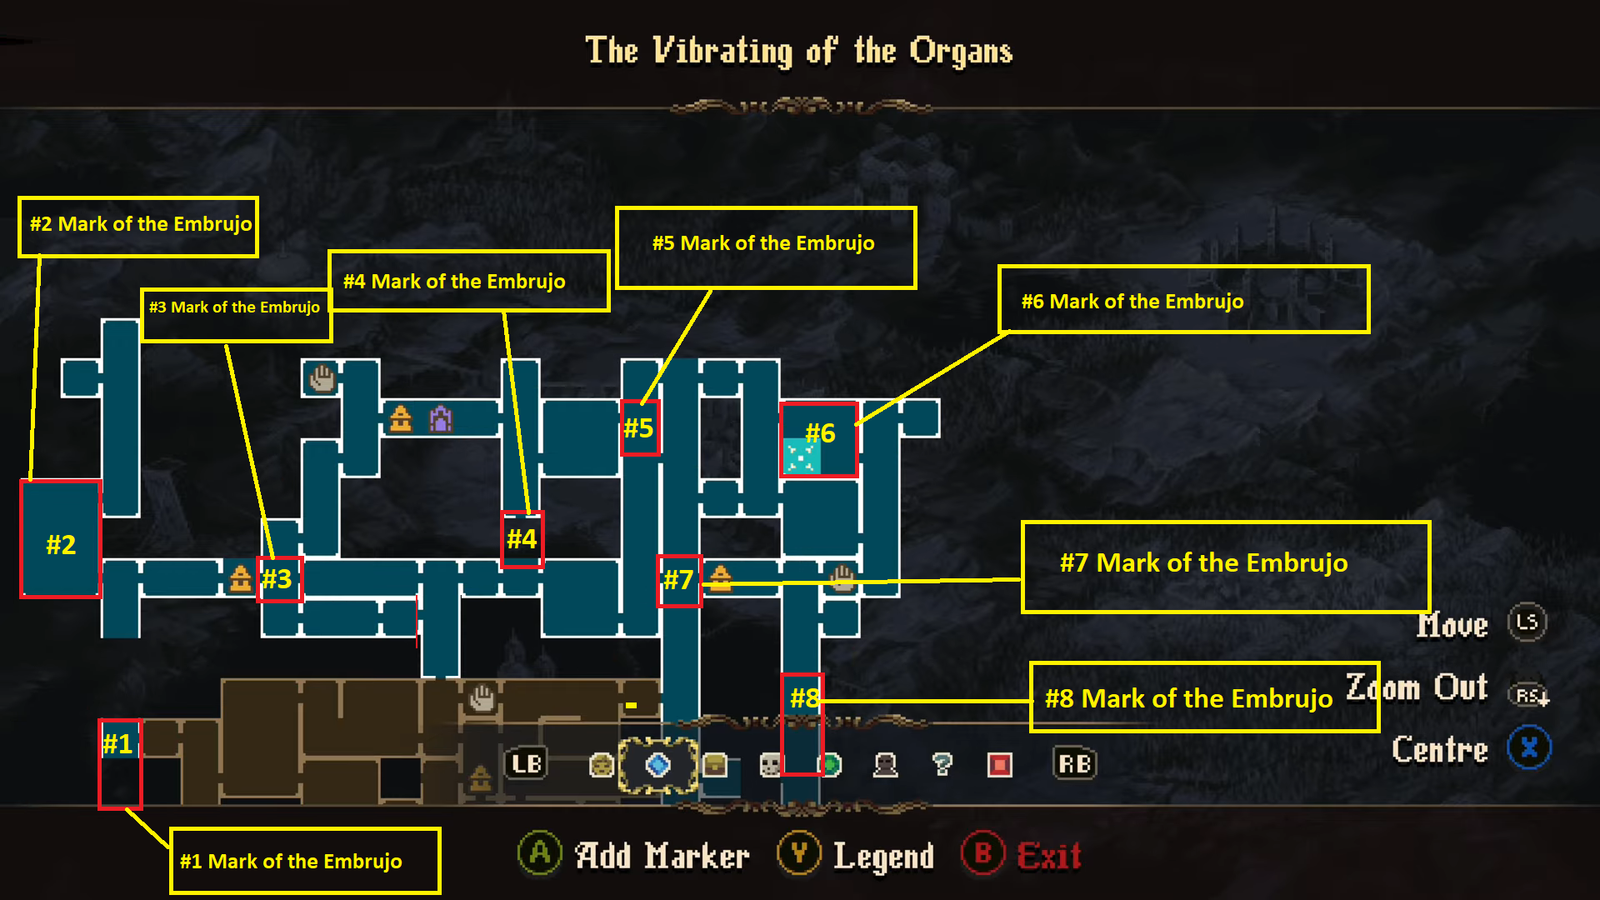
Compared to the rest of the locations in this article, Vibrating of the Organs zone holds the largest amount of Mark of the Embrujo, totalling the final amount to eight. Look at the picture above for the location guide to all of them in the zone.
Mark of the Embrujo #5
This one takes us all the way to the southwest section of The Vibrating of the Organs. Once you are here, make your way down the vertical room. Go all the way down, right at the bottom, you will find the first Mark of Embrujo in the zone.
Mark of the Embrujo #6
This one takes us all the way west of the Vibrating of the Organs map. Get to the edge, now you will have to use your grappling hook to get across the other side. Then use the hook to move up to the top to grab the second Mark of the Embrujo in this area, and the sixth overall.
Mark of the Embrujo #7
Get to the point shown on the map; it’s located a bit west of the Vibrating of the Organs map, next to the fast travel point. You will find the Mark of the Embrujo altar sitting on the platform. There are no puzzles or any secret lever to the piece, just plain grab and get it.
Mark of the Embrujo #8
Now we head to the center of the Vibrating of the Organs zone, and you will find it on the platform between two ladders. Just like the last one, this one is plainly open for us to grab without facing any challenge.
Mark of the Embrujo #9
The fifth Mark of the Embrujo (and the ninth overall) is also available in the middle of the Vibrating of the Organs zone, at the top of the vertical room. You will find it simply sitting on the platform at the corner of the area.
Mark of the Embrujo #10
Now we move to the northeastern section of the map for our next Mark of the Embrujo. Prepare to do some platforming on hanging lamps to get to our prize.
Mark of the Embrujo #11
It’s located next to the fast travel point at the eastern section of the Vibrating of the Organs zone. The Mark of the Embrujo is sitting on the tiny platform on the wall to the right. For this one, you will need to jump down a room with nothing in the middle. As you are heading down, press the direction button to move your character to the right, and you will land on the tiny platform with the Mark of the Embrujo.
Mark of the Embrujo #12
The final Mark of the Embrujo in the Vibrating of the Organs zone is quite a bit hidden, located in the southeastern section of the area. Wall jump on the right, and you will find a hookable grappling spot near the ceiling. Follow the linear route to unlock the last Mark of the Embrujo in Blashemous 2.
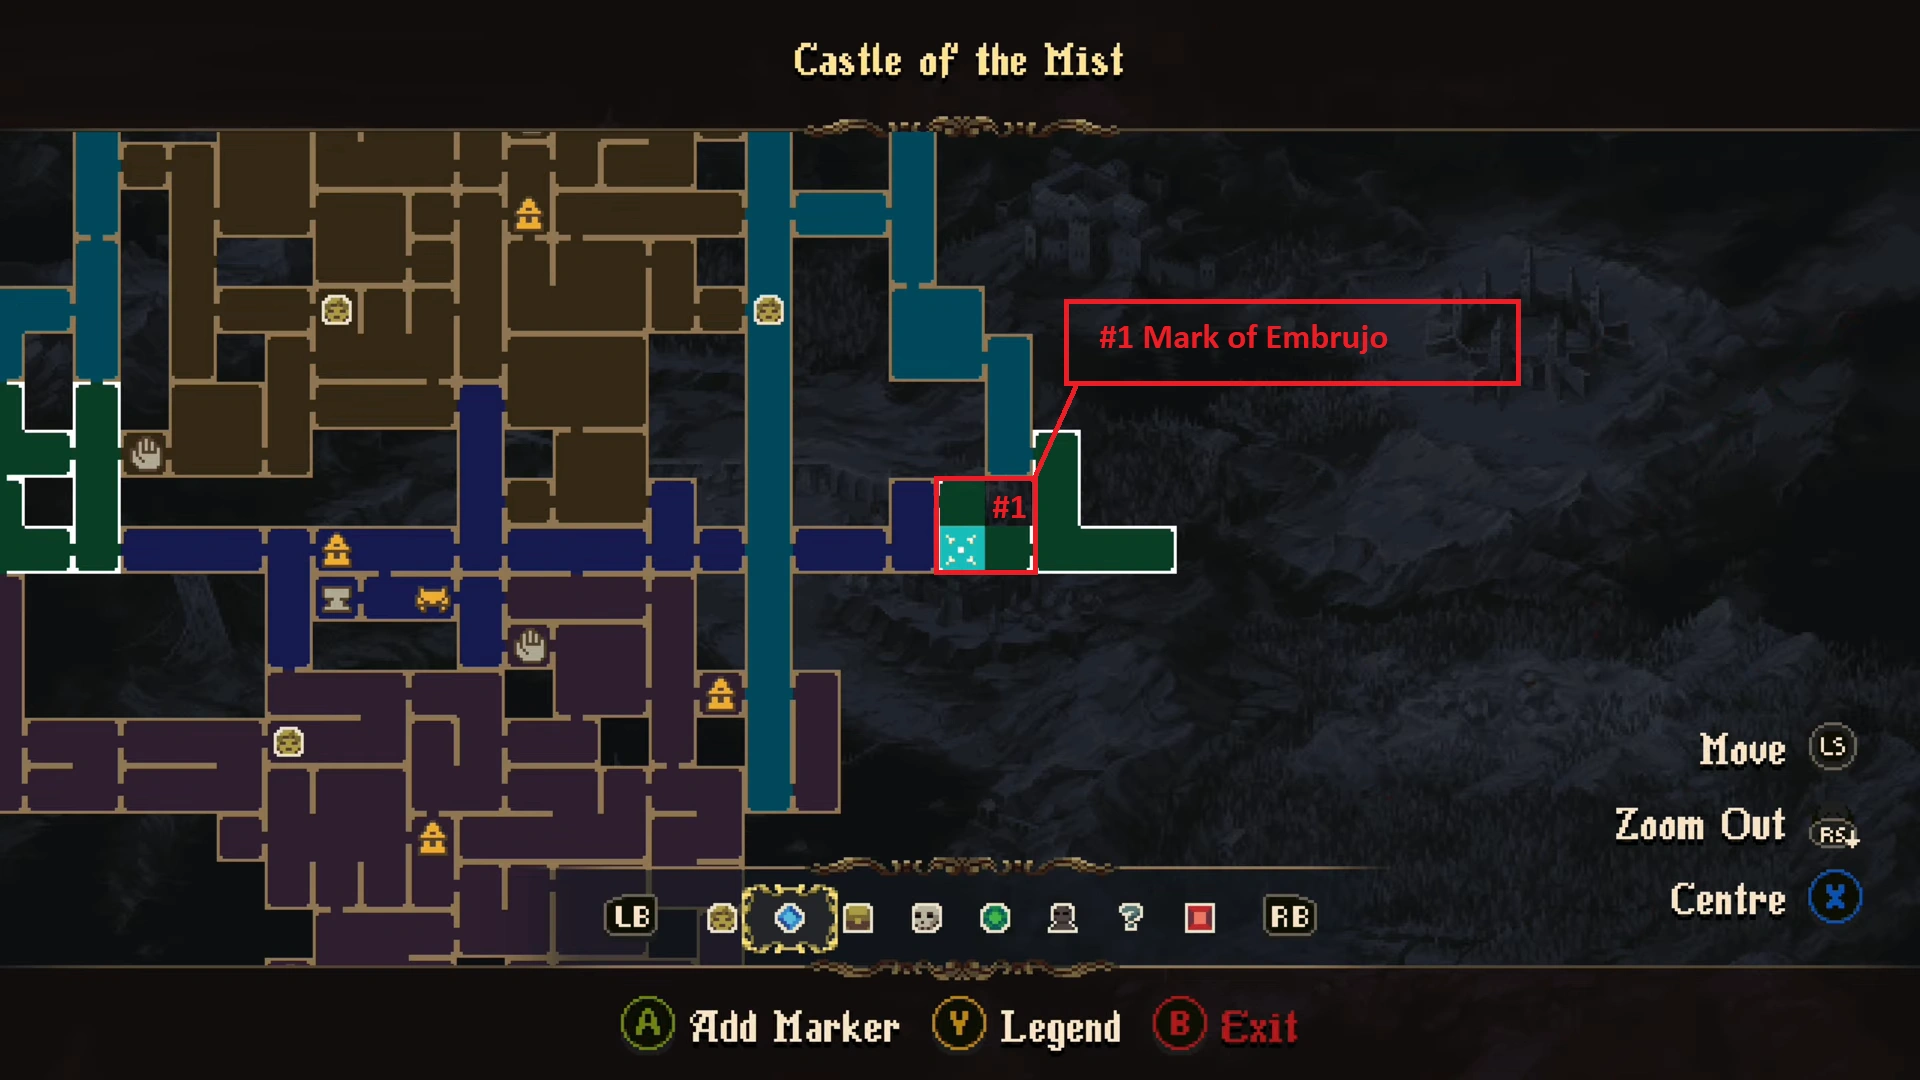
All Mark of Embrujo in the Castle of the Mist (13)
The Game Kitchen
Castle of the Mist has only one Mark of the Embrujo on the left section of the zone. Compared to the rest, it won’t be a difficult miss, but it is located at one of the most lucrative places in the zone.
Mark of the Embrujo #13
This one is located in the western section of the zone. Jump onto the hanging platforms and then make your way to the right by using the grappling hook points. The Mark of the Embrujo will be on a tiny platform hanging off the ceiling, so carefully land on the tiny space to grab the item.
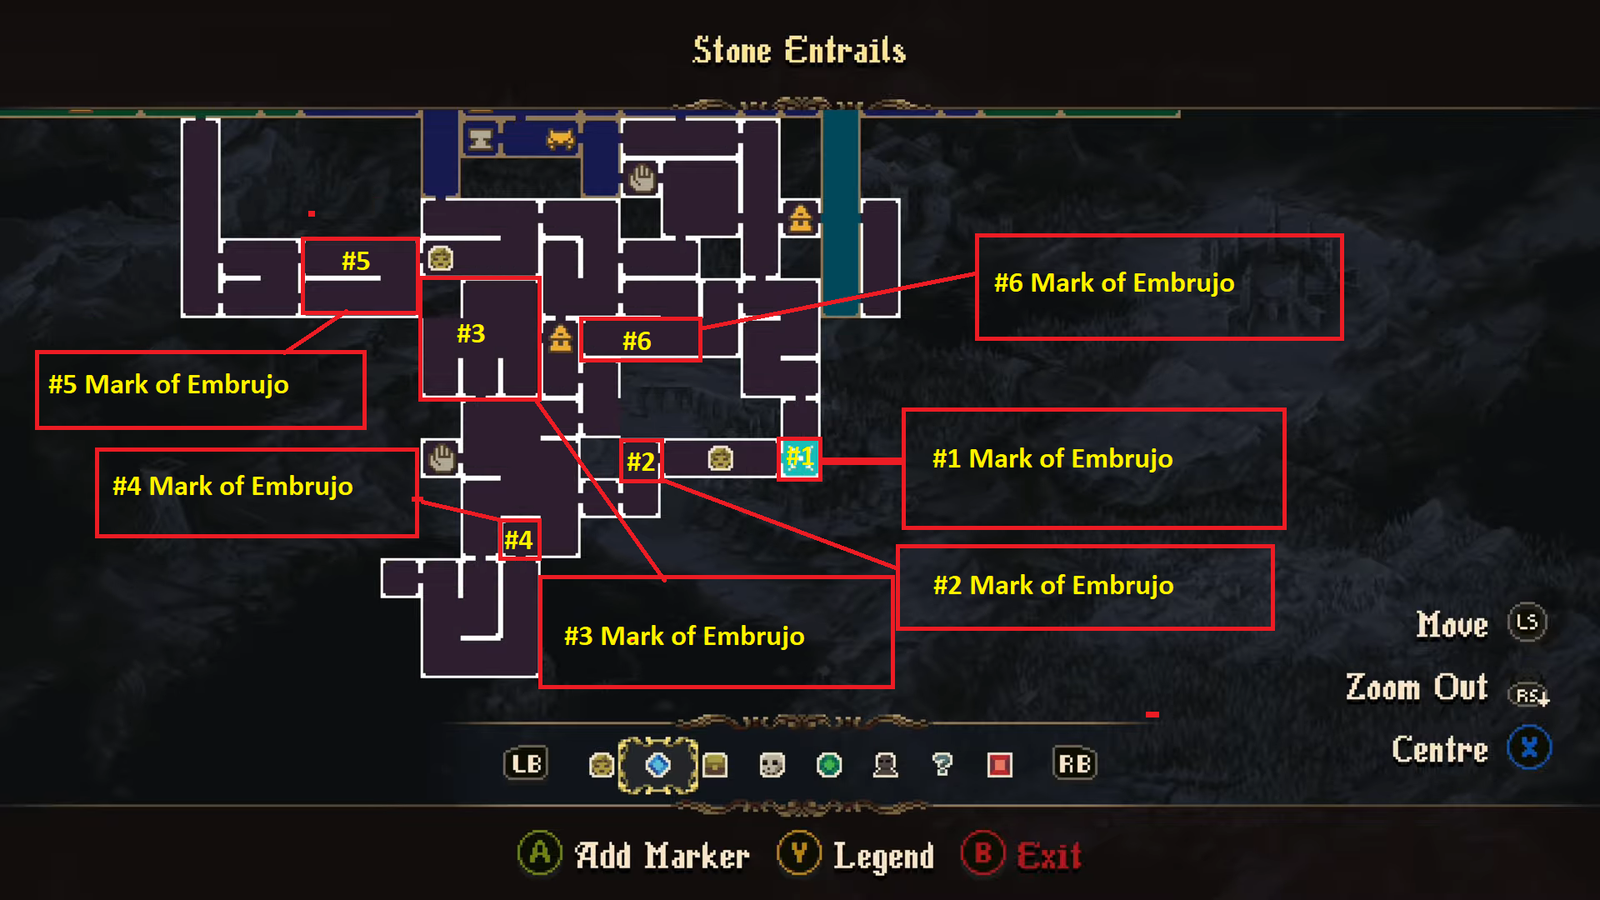
All Mark of the Embrujo in Stone Entrails (14 – 19)
The Game Kitchen
Now we move onto the last area, Stone Entrails, which holds the last six Mark of the Embrujo in Blashemous 2. Some of them are widely out in the open, others require a bit of platforming to get closer to them.
Mark of the Embrujo #14
The Game Kitchen
This one will take you all the way southeast of the map, at the corner marked on the map, jump onto the platform on the right, and slide into the small space on the left, grab the item. This one can be missed easily, as it is behind a small hole on a tiny platform, easily missable.
Mark of the Embrujo #15
This one is shown on the plainsight, next to the ladder south of Stone Entrails. Just left of the first Mark of the Embrujo we grabbed in this zone.
Mark of the Embrujo #16
Now we move onto the west of the zone, next to the fast travel point. This one is hidden at the top. To get there, you need to ring the large bell between platforms and use the grapple hook points to get to the end of the route. You will find the Mark of the Embrujo on the platform on the left.
Mark of the Embrujo #17
The Mark of the Embrujo here is shown on the plain sight, it’s sitting on a single platform with ladders on both sides. This one is located south of the Stone Entrails.
Mark of the Embrujo #18
The fifth Mark (and the penultimate) of the Embrujo is in the western section of the zone. Prepare to do some grappling puzzles and a boss fight to access the room with the reward or Mark of the Embrujo inside.
Mark of the Embrujo #19
The very last Mark of the Embrujo is found in the middle of the map. It’s a straightforward platforming section; use the grappling point above the spiky floor to get to the Mark of the Embrujo item on the left.
Now that you have all 19/19 Marks of Embrujo in your possession, you will unlock the Embrujo of the Flames achievement in Blasphemous 2: The Third Sin.