


Pragmata has plenty of side objectives to gather currencies and new gear. Among them lies the Training Simulations, a series of small challenges offered by Cabin midway into the Mass Production Array.
Each of these Training Simulations grants rewards for completion, with bonus rewards for mastery. Today I’ll be showing you the ropes for each Training Simulation, their rewards, and how to full clear them so you can nab more sweet, sweet loot.
01 – Lightning Speed
Full Clear Conditions
- Reach target area
- Destroy all storage boxes
- Complete within 60 seconds
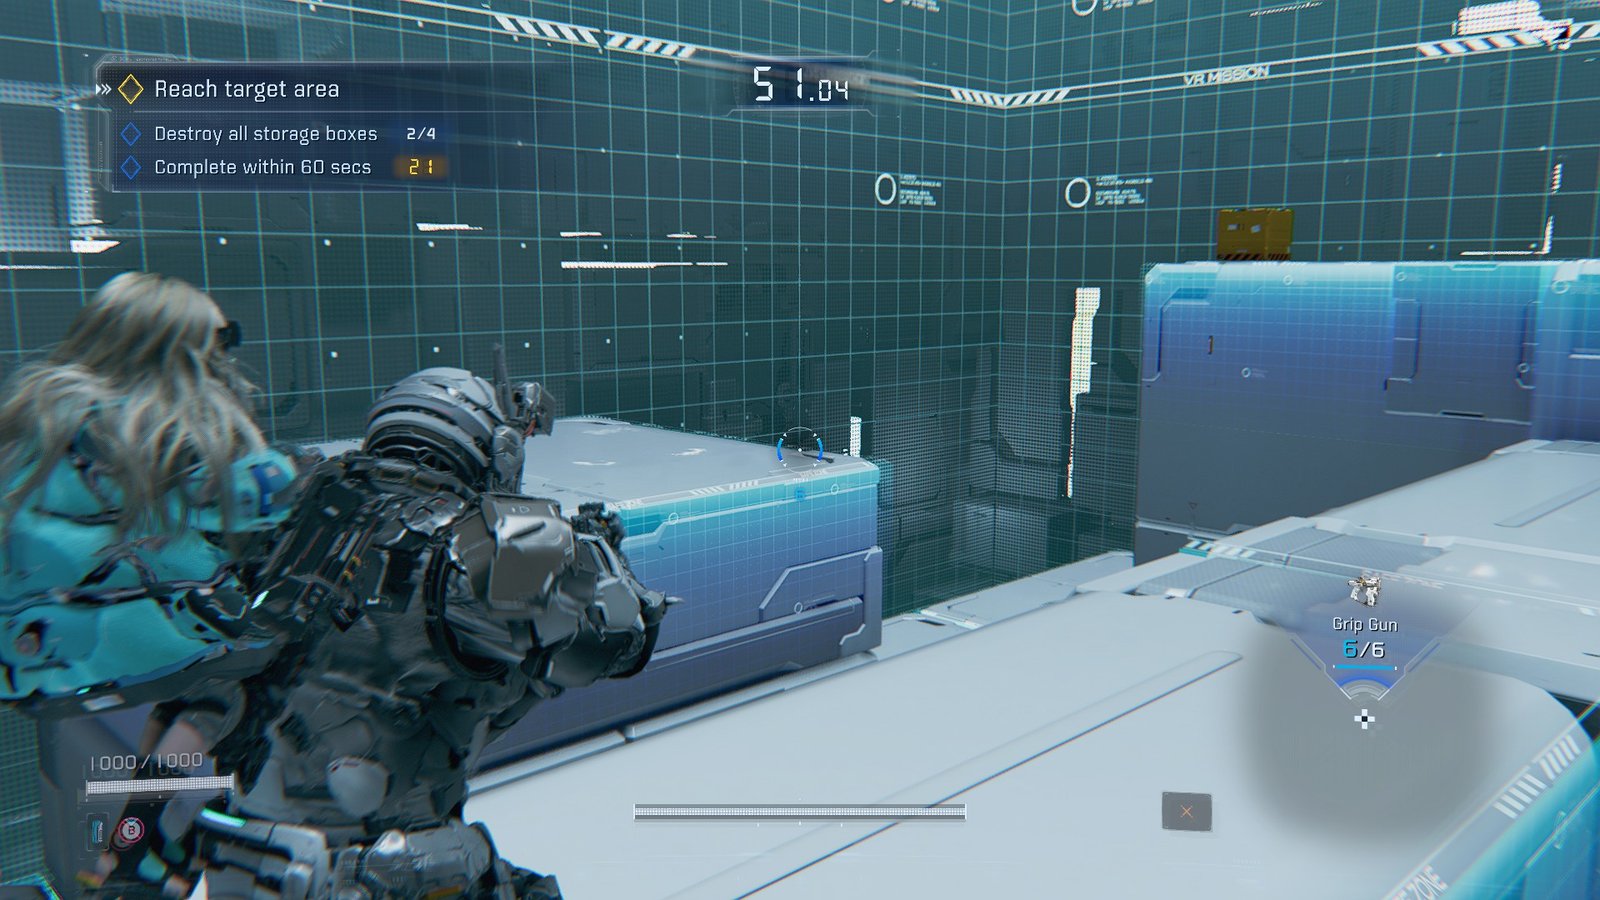
The first of the movement trials, Lightning Speed, tasks you with platforming your way to a target area within a time limit. In order to get every reward, you’ll also need to break the 4 storage boxes littered around the area and complete the trial in 60 seconds.
For a full clear, every bonus objective needs to be cleared in the same run. Luckily, Pragmata starts us off easy. Once the trial starts, hop on the floating platform to your right and ride it forward.
The next platform has the first storage box, which you can destroy either by shooting it or interacting with it in close proximity. Pop it and continue forward to find a series of rising and falling platforms. Make your way across them, shooting the storage crate visible at the end as you do.
To your right is a series another set of moving platforms, these ones moving left to right. Dash your way across and begin climbing towards the target area, where the final two Storage Crates will reveal themselves. Pop them as you make your way to the beacon and interact with it to clear the trial!
The speed time is very easy to hit, as expected from the very first training sim. Just take your time, don’t panic as platforms shift, and you’ll be in the clear.
02 – Shimmering Drift & Discovery
Full Clear Conditions
- Collect 7 Signal Data
- Complete without taking damage
- Complete within 50 seconds
The first Skill Trial, Shimmering Drift & Discovery places 7 Signal Data packages around the level, floating above an abyss. To full clear the challenge, you’ll need to avoid falling and collect all the data in 50 seconds.
For the fastest time, grab the Data immediately in front of you before turning to the right. Make the small jump to grab the second Data. Take a moment to ascend the floating platform to your right before heading forward, grabbing the fourth Data between the northmost platforms.
Ride the second ascending platform up after grabbing the fifth Data. At the top, you’ll find the sixth. Complete the circle and grab the seventh Data to the right of spawn.
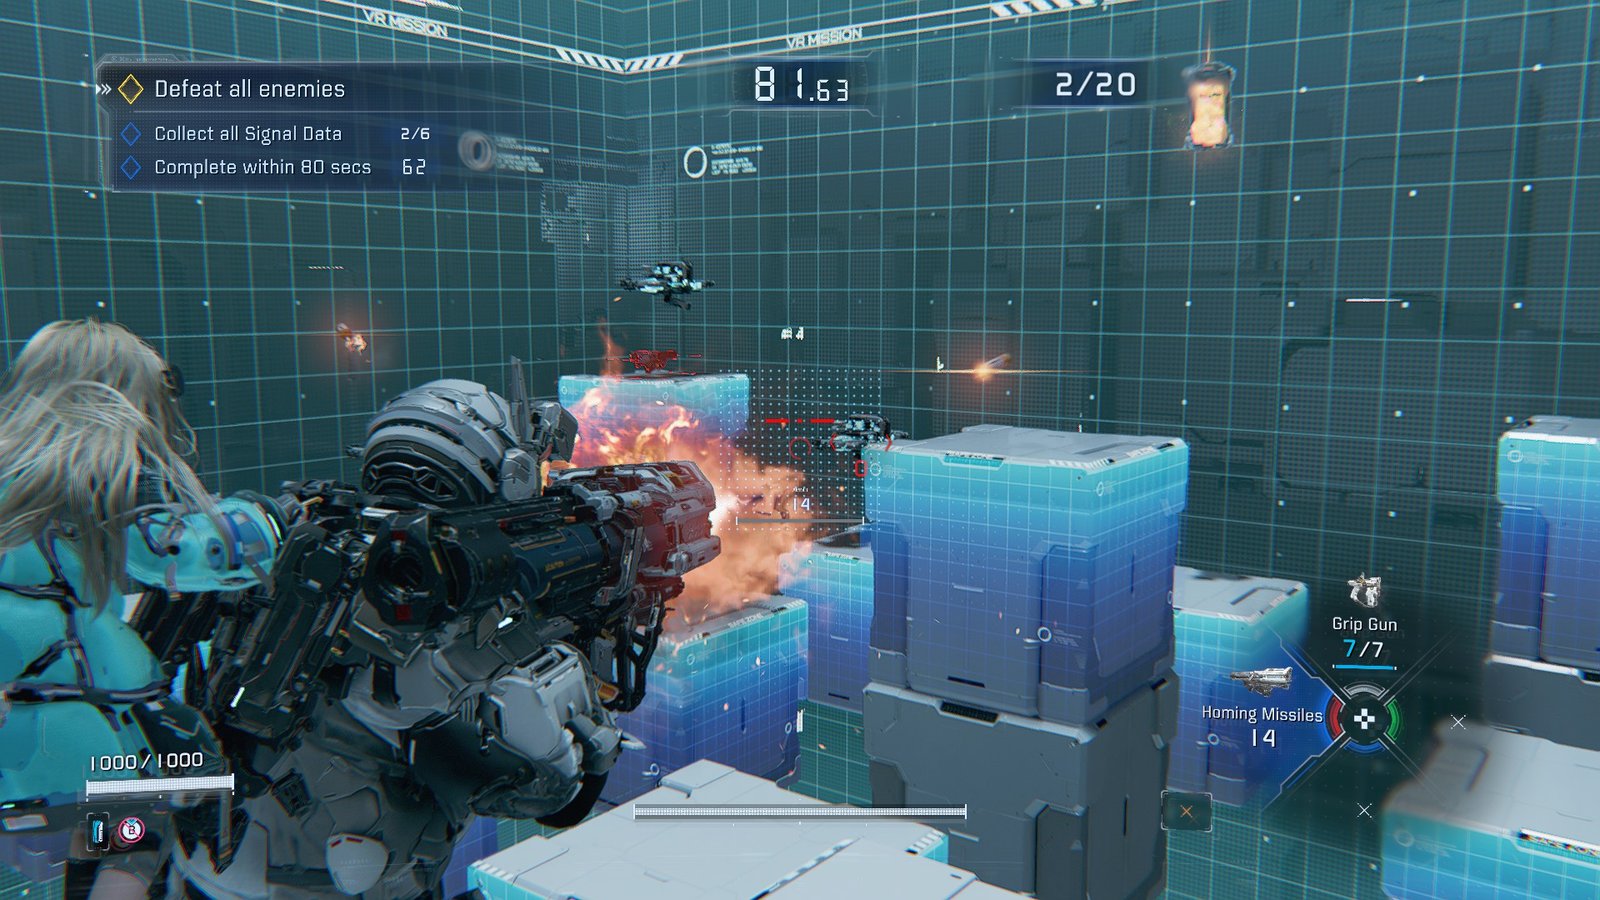
03 – One Shot, One Kill
Full Clear Conditions
- Defeat All Enemies
- Collect All Signal Data
- Complete within 80 Seconds

Now comes our first combat challenge to round out the bunch! One Shot, One Kill is exactly as it sounds, arming you with the Grip Gun and plenty of Shockwave Gun drops to take out a series of flying drones.
For a full clear, you’ve got to grab the 6 Signal Data packages around the map and clear all enemies in 80 seconds. The drones appear in bunches across the map, right beside the Shockwave Gun pickups.
Each group will spawn between the platforms, giving you plenty of time to snag the Signal Data as you blast them. Remember that the Shockwave Gun loses damage with range, so don’t be afraid to swap to your Grip Gun if they’re out of reach.
The final drone is easy to miss, spawning high above the initial spawn platform. Plink it down with the Grip Gun, and you’ll have a third clear under your belt!
04 – Red Flash
Full Clear Conditions
- Survive for 50 seconds
- Complete without dodging
- Complete without taking damage
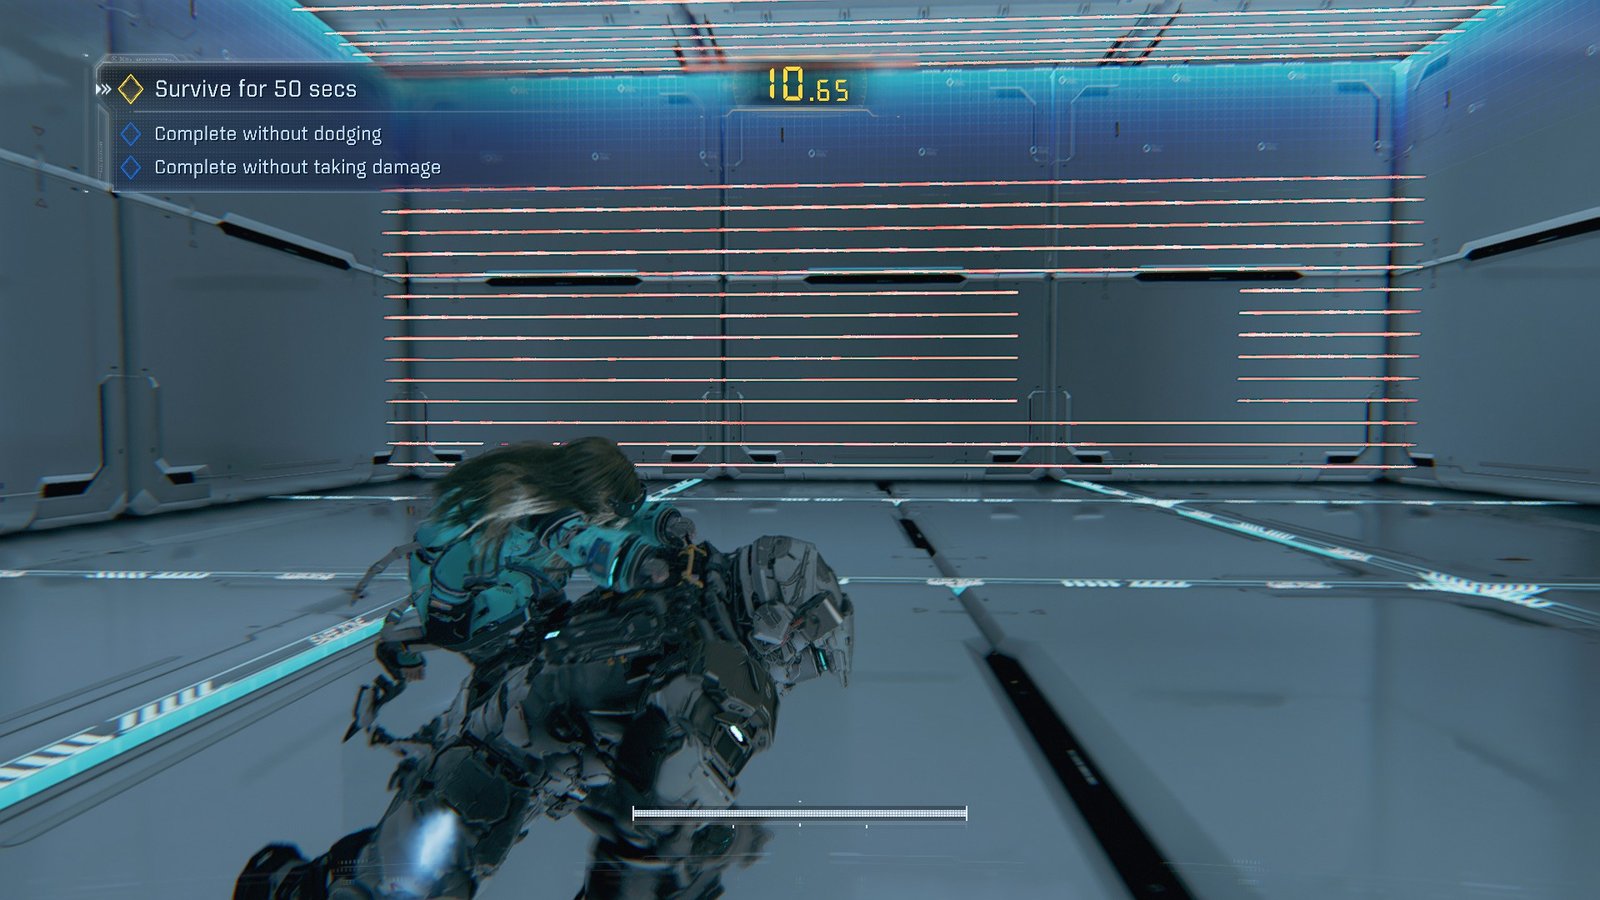
If you’ve ever seen Hole in the Wall, you’ll get Red Flash’s gimmick right away! A series of lasers will appear before traveling towards Hugh and Diana. Full clearing means avoiding every laser without using Hugh’s dash.
Luckily, each laser grid appears before moving, so you’ll have plenty of time to position yourself before they come. You’re still free to sprint and use Hugh’s hover, just remember not to dash.
As the timer ticks down, the safe zones of each grid will shrink. You’ll need to start hovering around halfway through, and at the 9-second mark, the final laser grid will descend from the roof instead. Keep your eyes up and wait it out to clear Red Flash.
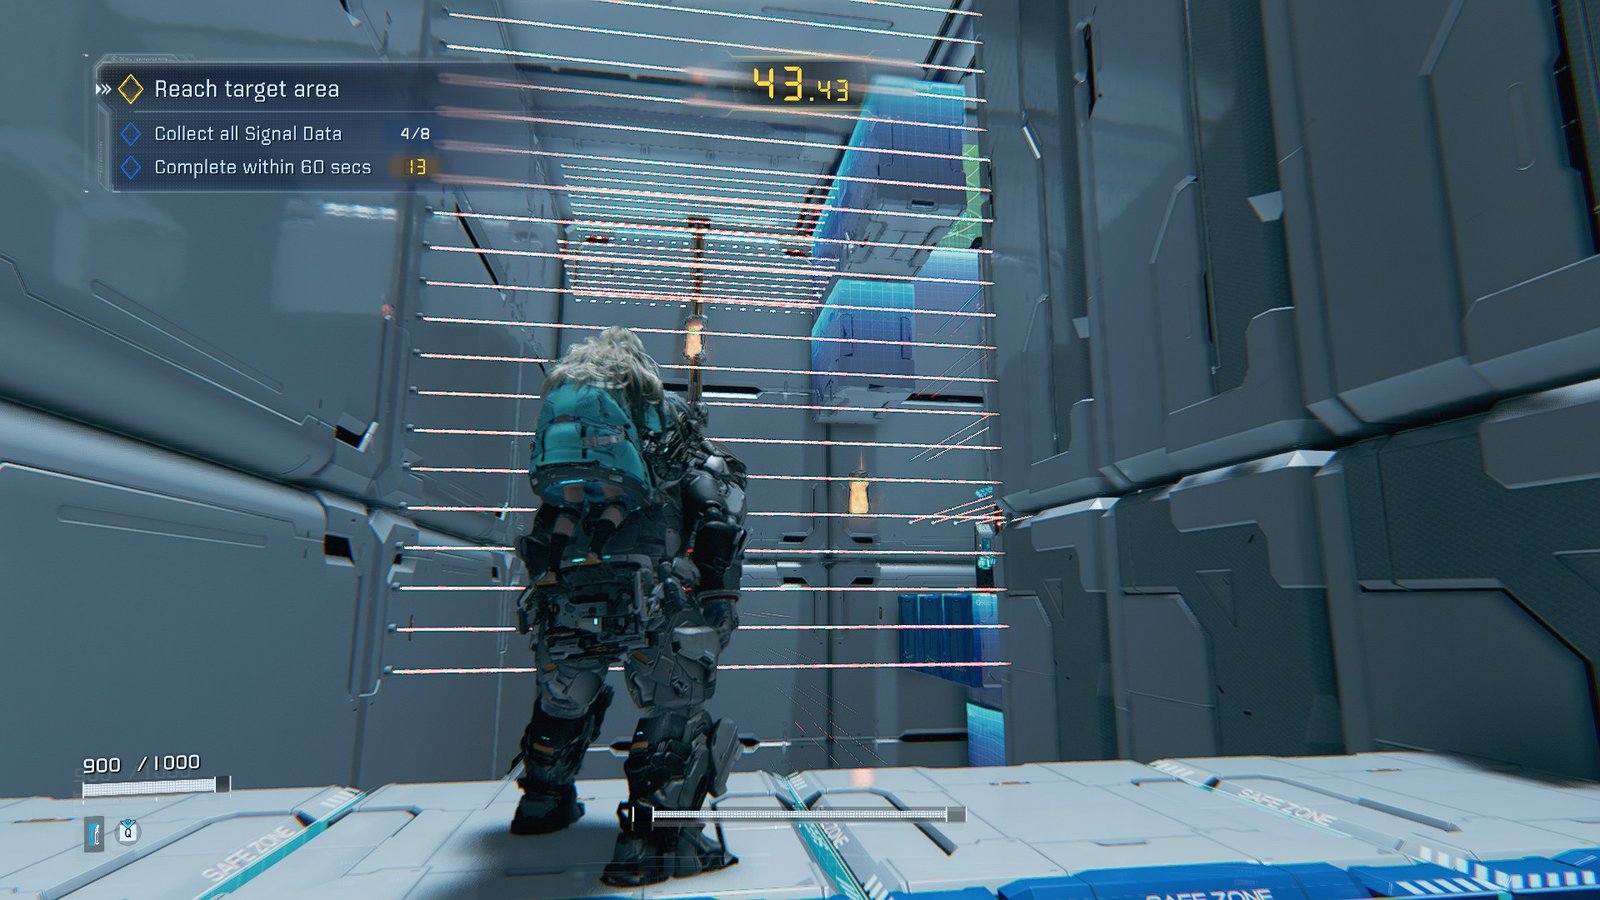
05 – Stop & Go
Full Clear Conditions
- Reach Target Area in 65 Seconds
- Collect all Signal Data
- Complete within 55 Seconds
The best advice for Stop & Go is right in the title. You’ll have to take your opportunities to make progress between the sliding blocks that threaten to push you off. 4 of the 5 Signal Data packages are right on the path, while the fifth is off to the right of the final target area.
Pro Tip: Hugh’s aerial movement is momentum-based, so be careful with accidental long jumps.
If you move fast enough, you can clear multiple blocks in the first run with your dashes, but it’ll be close. Stop & Go is another case of panic being the biggest enemy, so keep calm and take the clearings as they come.
You’ll lose more time rushing and failing than you will waiting for a good pattern.
06 – Medic
Full Clear Conditions
- Defeat all enemies
- Deal damage using enemies
- Complete within 100 seconds
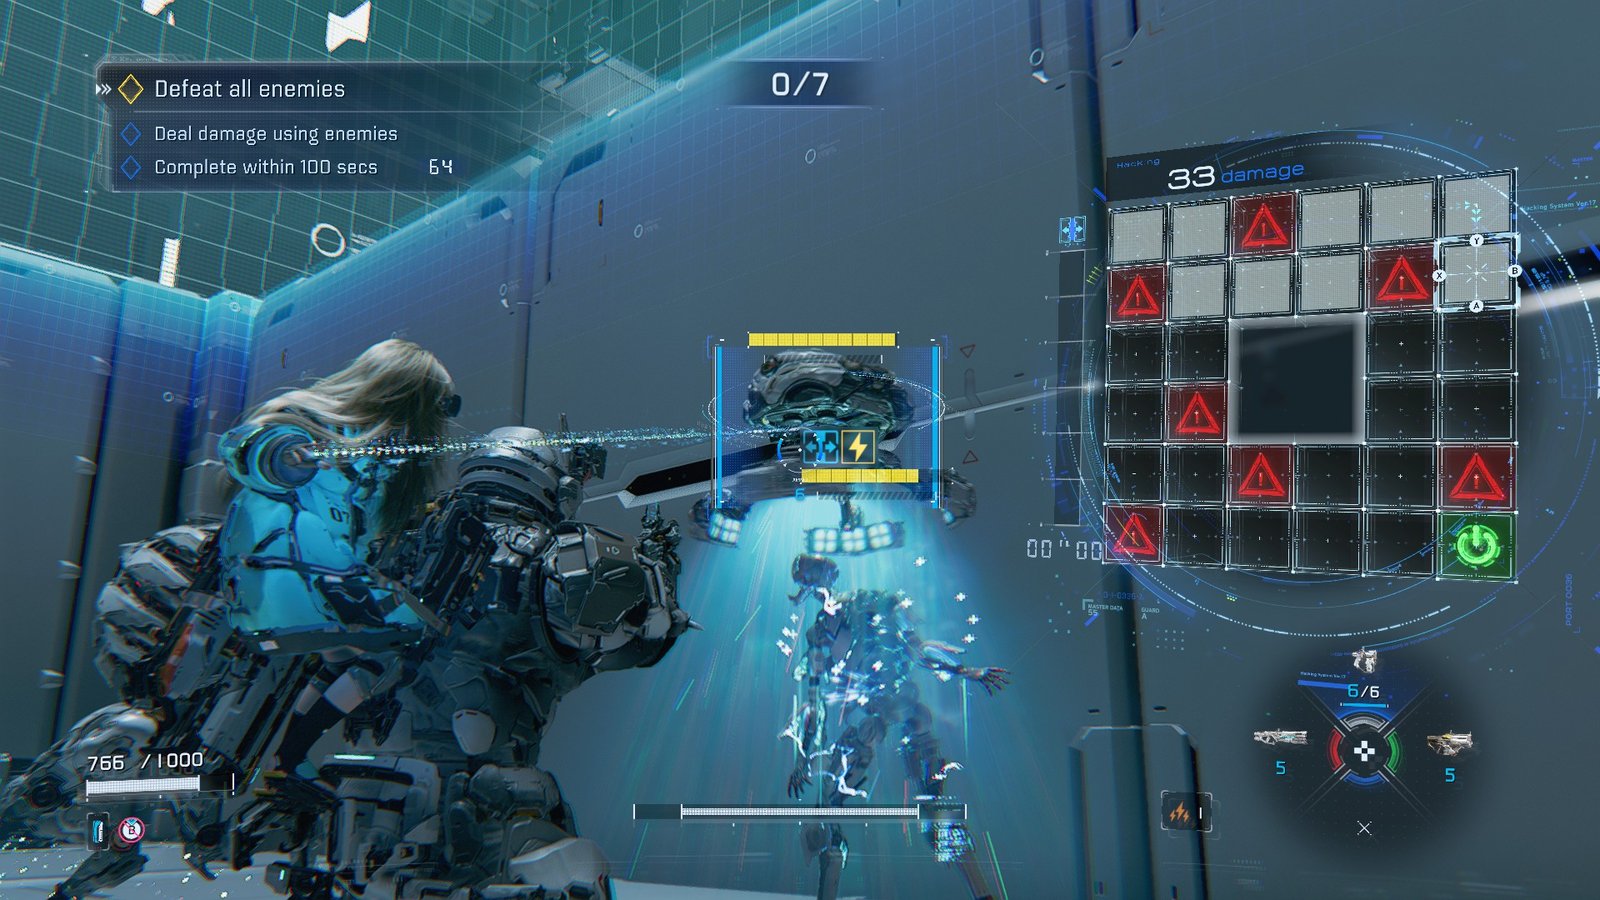
The Medic challenge has a very odd bonus objective, asking you to deal damage using enemies. This challenge is also likely to be your first encounter with Medic drones, which wait until other enemies are hurt before healing them.
In order to complete the bonus objective and speed up the process of clearing the fight, try hacking a medic drone mid-heal. Opening the back menu will reveal a unique pattern for Diana, and clearing it will cause the Medic drone and the bot being healed to take a huge chunk of damage.
Turning the enemy’s aggression back on them is the name of the game, and the provided Shockwave Gun and Stasis Web do wonders at holding them down. Pop the Medic bot early to ensure a quick clear, and you’ll have it in the bag.
07 – Project Pierce
Full Clear Conditions
- Defeat all enemies
- Complete within 60 seconds
- Complete within 45 seconds
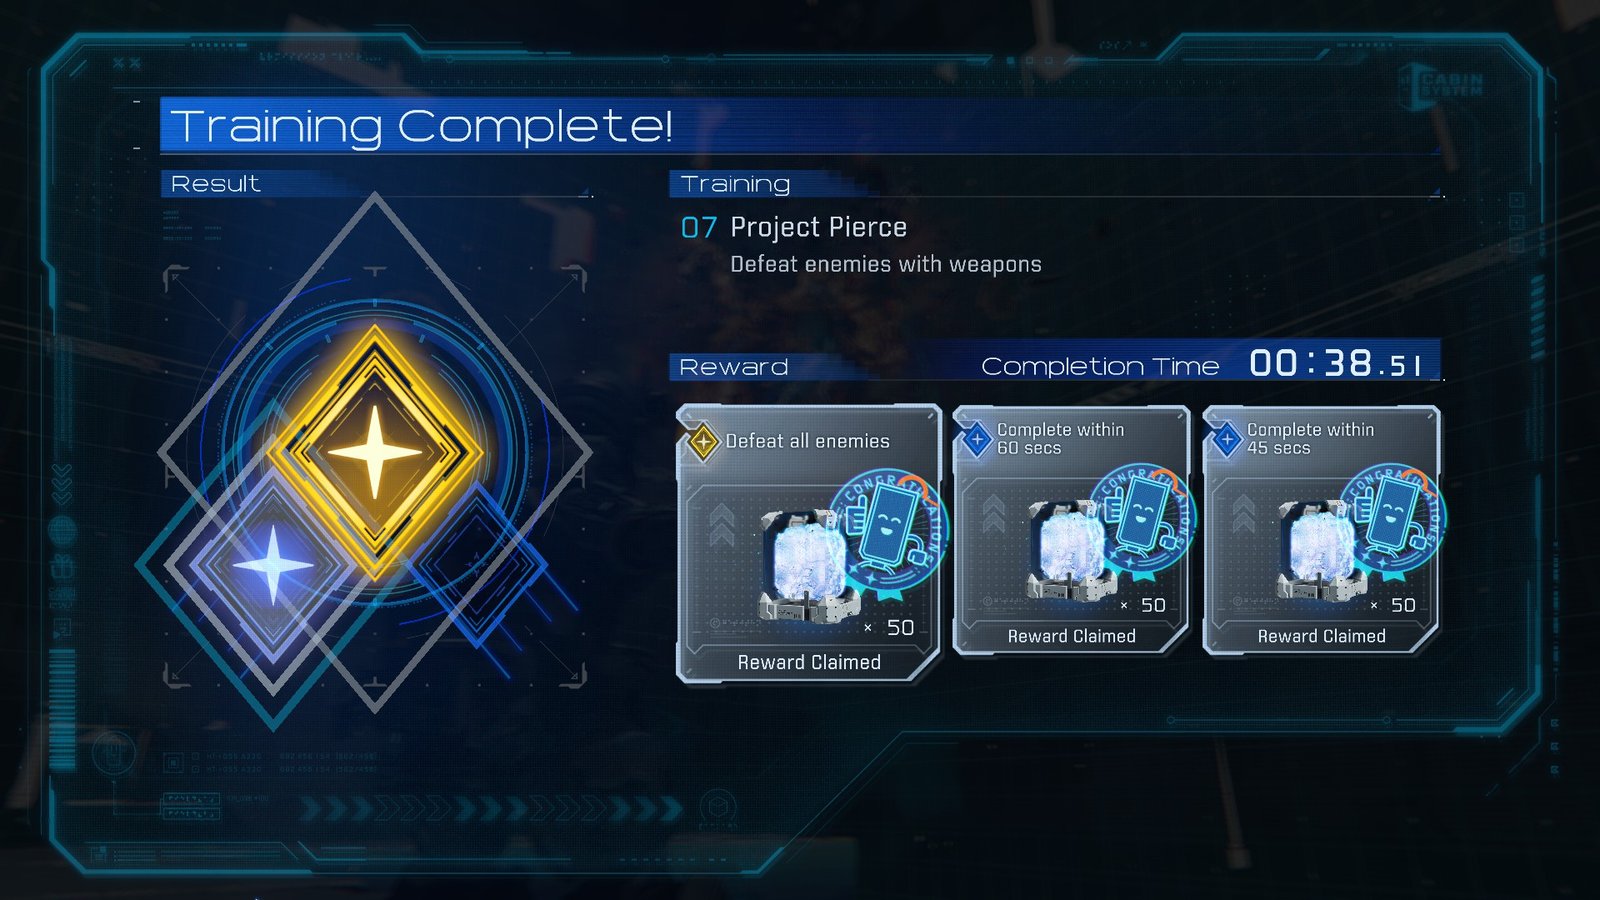
Project Pierce is all about using the Charge Piercer to pop groups of bots at once. They’ll appear in lines that you’ll have to move and position yourself for in order to meet the time requirements.
The first group is straight ahead as you drop down to grab the first Charge Piercer. You only need to make four shots, but other pickups are around the area if you need reloads. The second batch is the back left, and you’ll need to double charge to pop all three in one shot.
The third group appears diagonally, directly to the right of the initial drop. Nail those four, and you’ll have one last diagonal group appear towards the back again. If you fail to pierce them all, switch to your Grip Gun to finish off any stragglers.
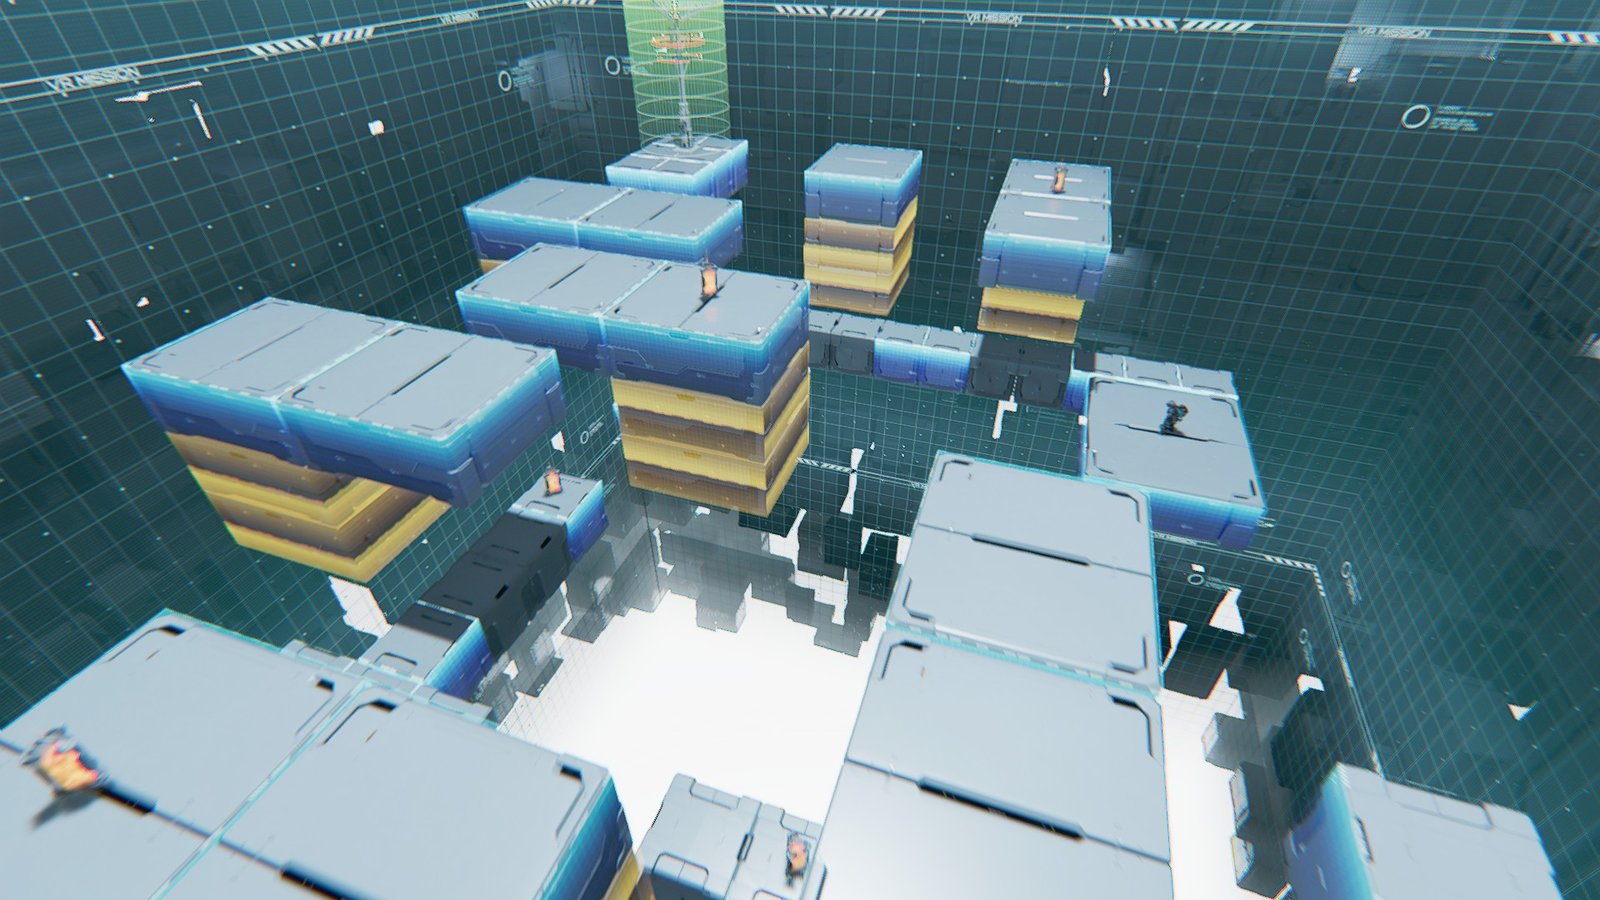
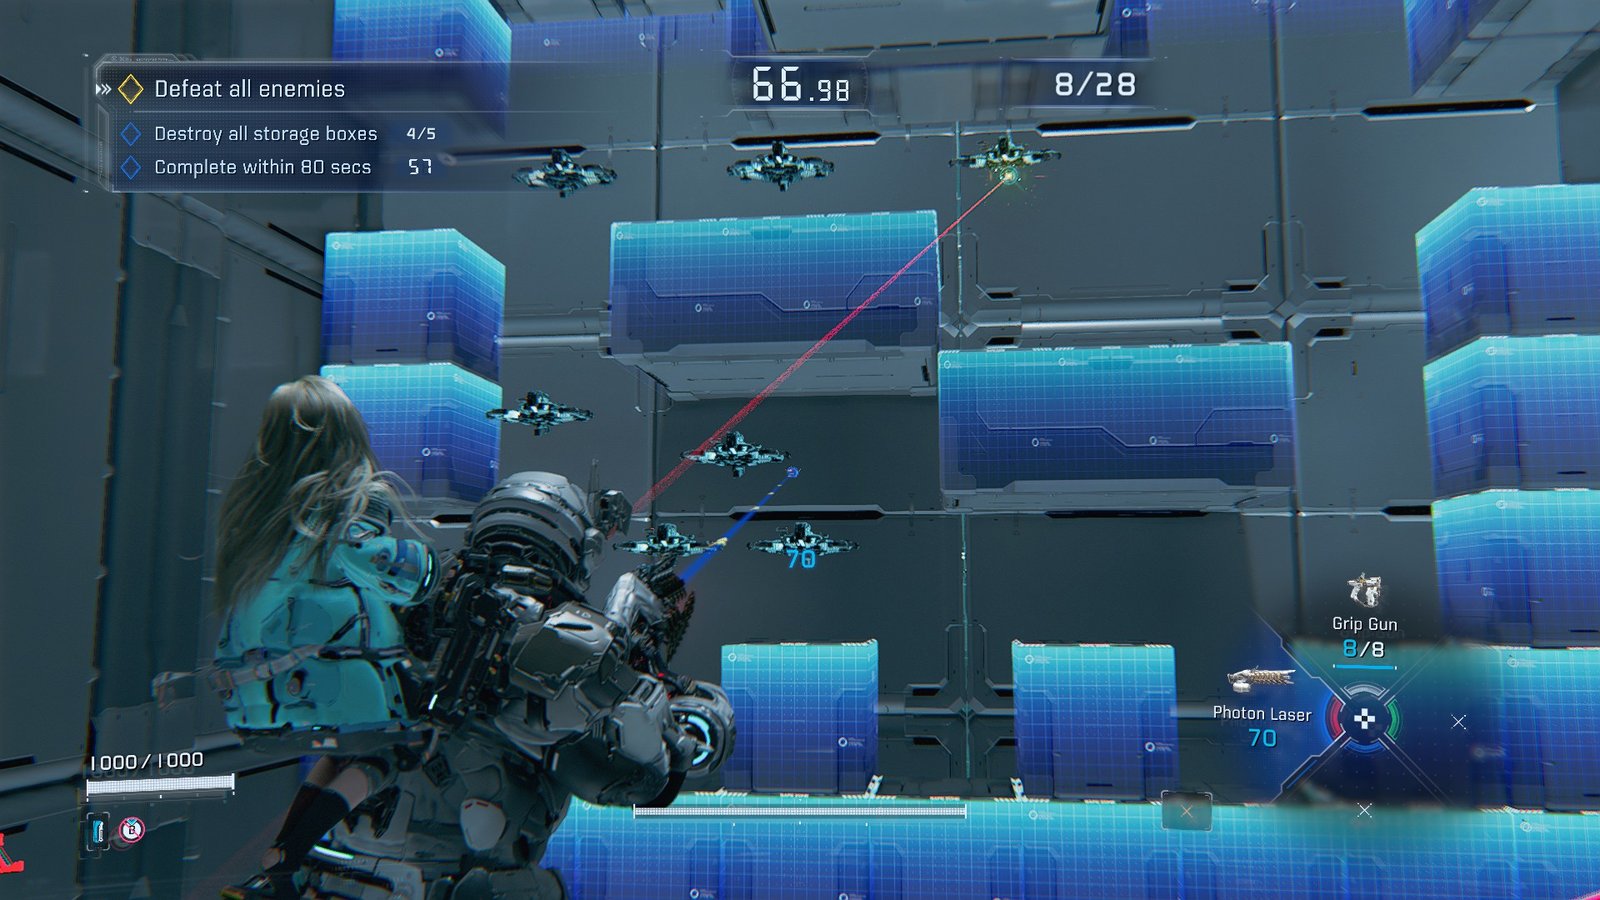
08 – Along the Boxes
Full Clear Conditions
- Reach target area
- Destroy all storage boxes
- Complete within 60 seconds
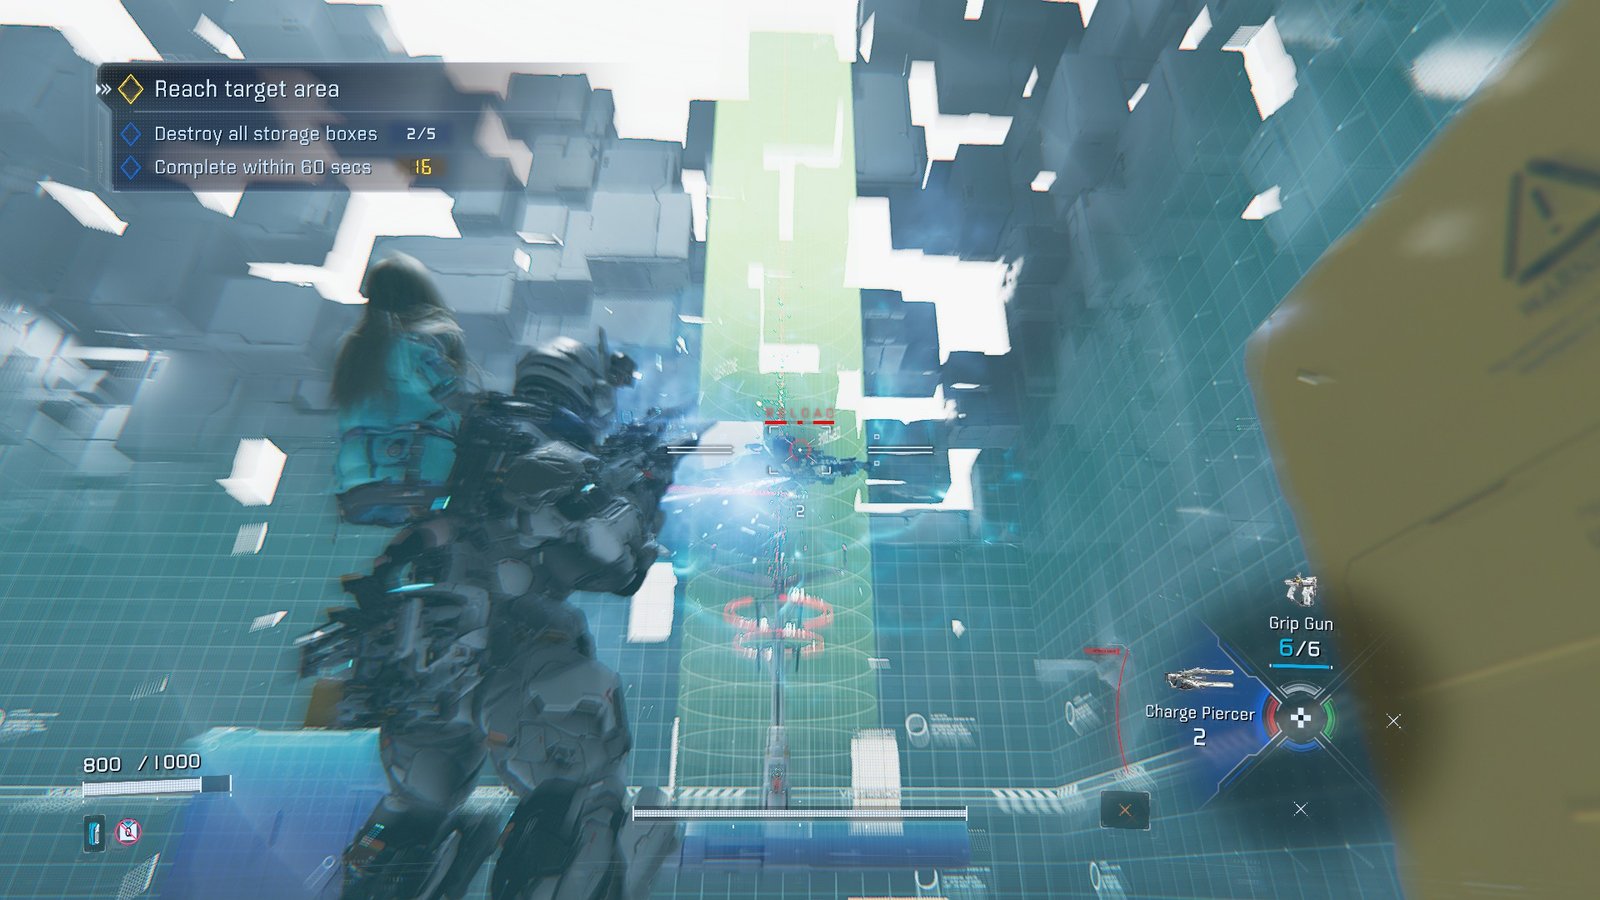
Along the Boxes is a hybrid movement and combat trial, requiring you to kill flying bots before the next platforms appear. You spawn with the Grip Gun and a Shockwave Gun, so blow away the first drone to summon the first set of platforms.
As you progress, pop the storage boxes with your Grip Gun to fulfill the first bonus objective. One is stuck on a quickly moving platform below the target area, and another is behind spawn, but you’ll need to ascend to find an angle on it.
After the first bot is dead, grab the Charge Piercer at the end of the walkway and use it to railgun the two drones floating in the center of the stage. Rush past them and pop the last two as you make it to the target area. Don’t forget to pop the far back box for the full clear.
Pro Tip: The Charge Piercer has deceptive travel time, let it loose about a half second before the lineup if you’re moving.
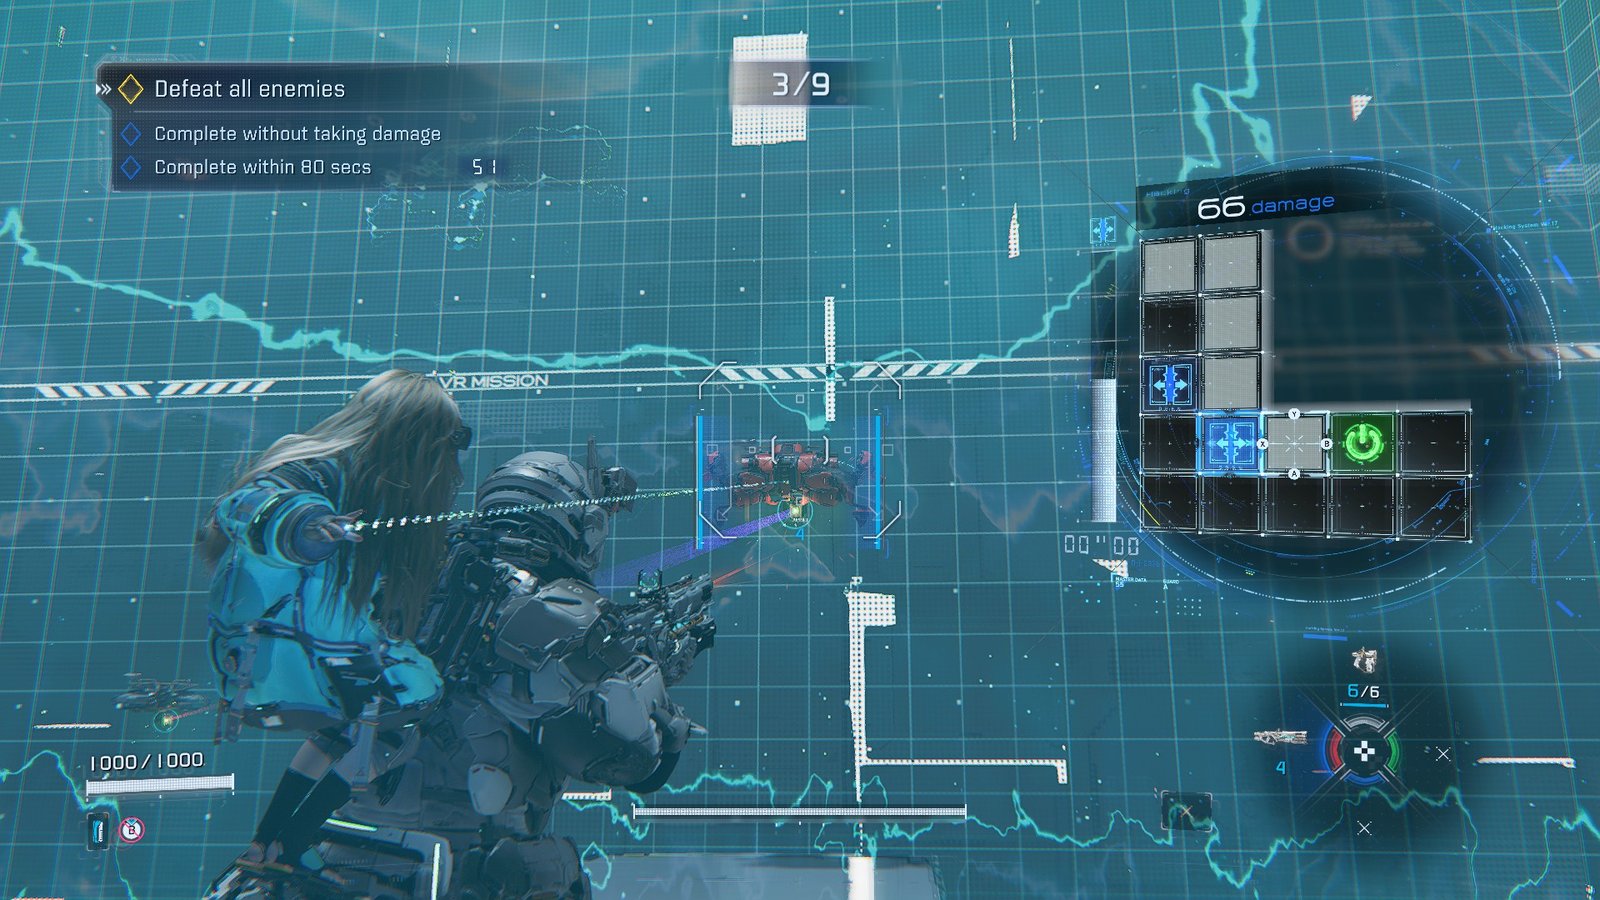
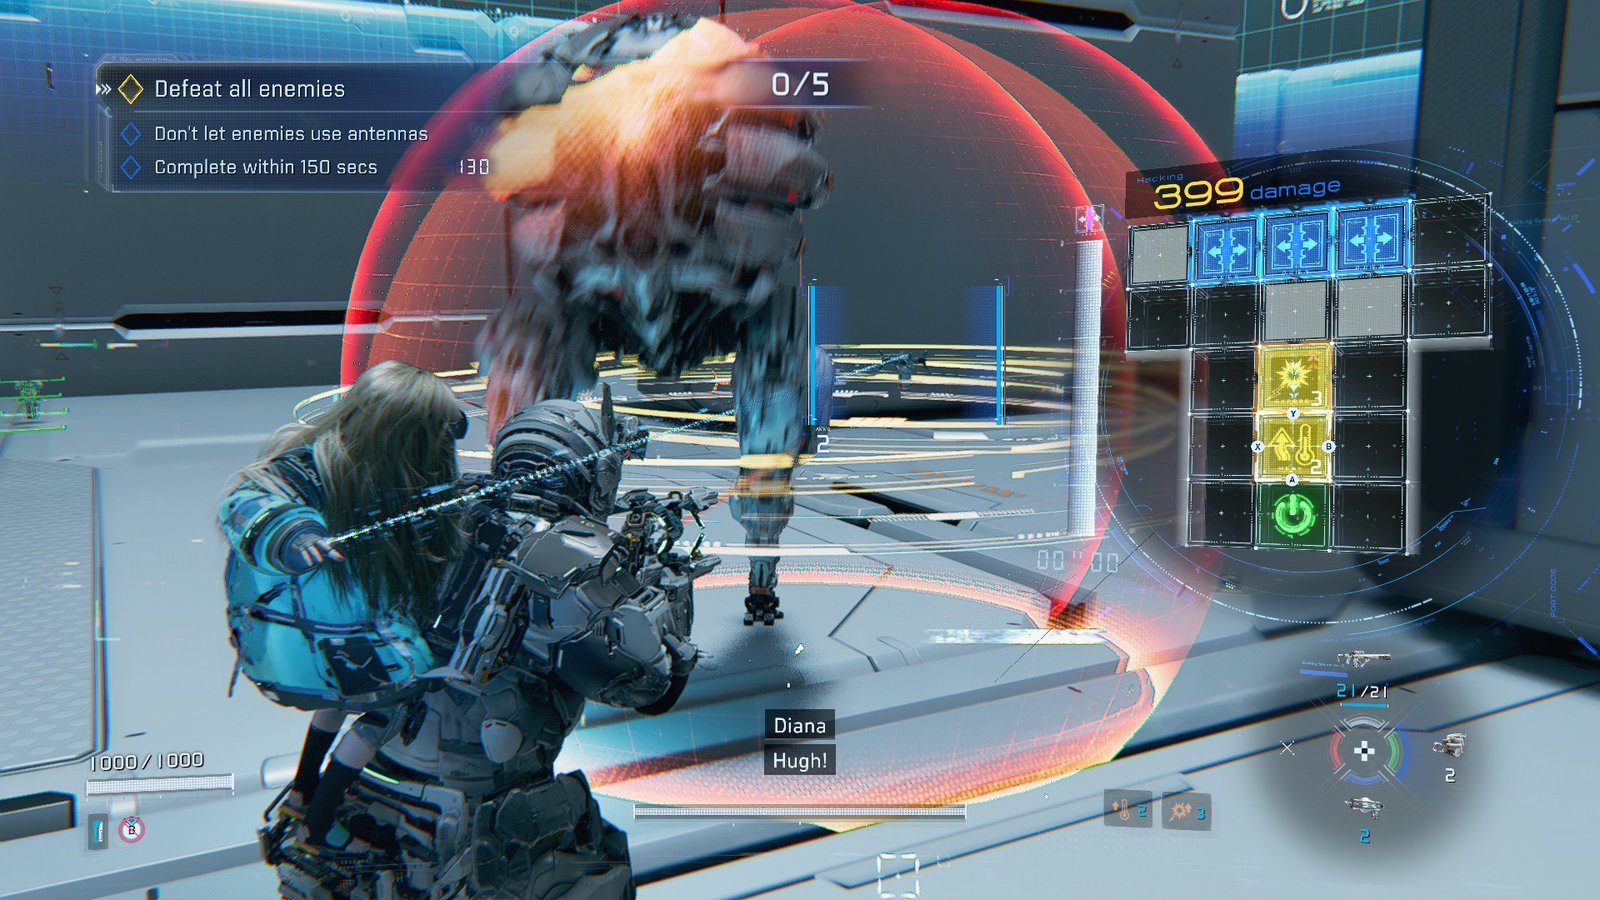
09 – Unshieldable
Full Clear Conditions
- Defeat all enemies
- Don’t let enemies use antennas
- Complete within 30 seconds
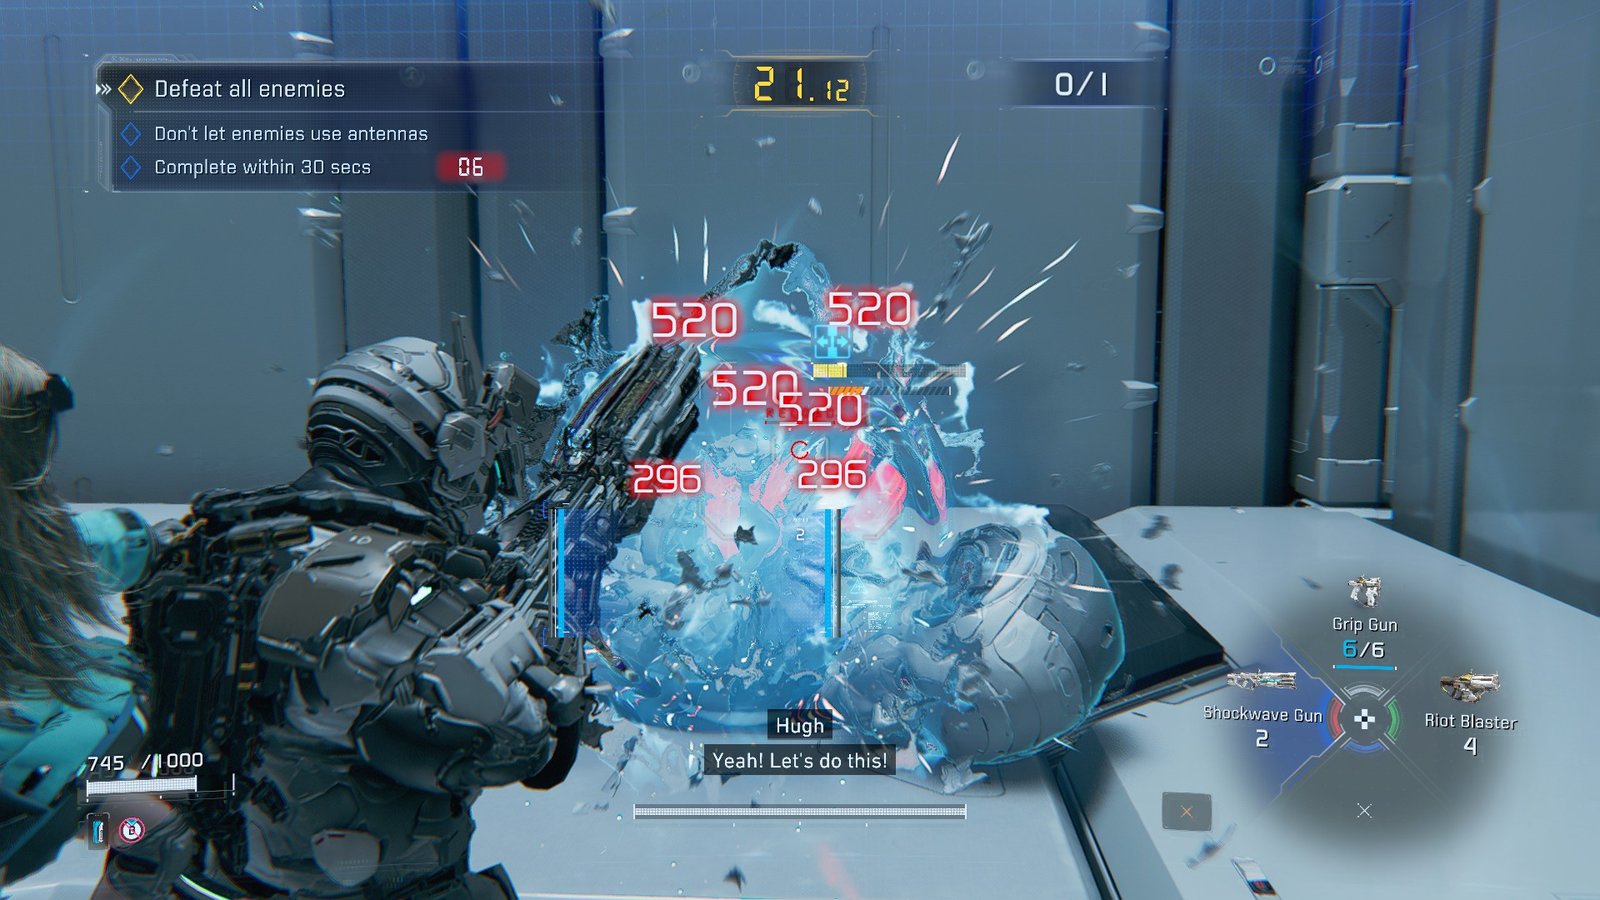
Unshieldable is a 1v1 against a single Executor, and you need to dismantle it in 30 seconds if you want the full clear. You’ll also need to make sure the Executor doesn’t get to deploy its antennas, the red markers that stop Diana from hacking.
Luckily, the Riot Cannon provided right in front of spawn is the perfect way to shut it down if you see its face open up. Once it’s staggered, you can easily tear into it with the Shockwave Gun to pop it nice and quick, with plenty of time to hit that 30-second target.
10 – Mouse Trap
Full Clear Conditions
- Defeat all enemies
- Defeat all enemies with the Recycler
- Complete within 50 seconds
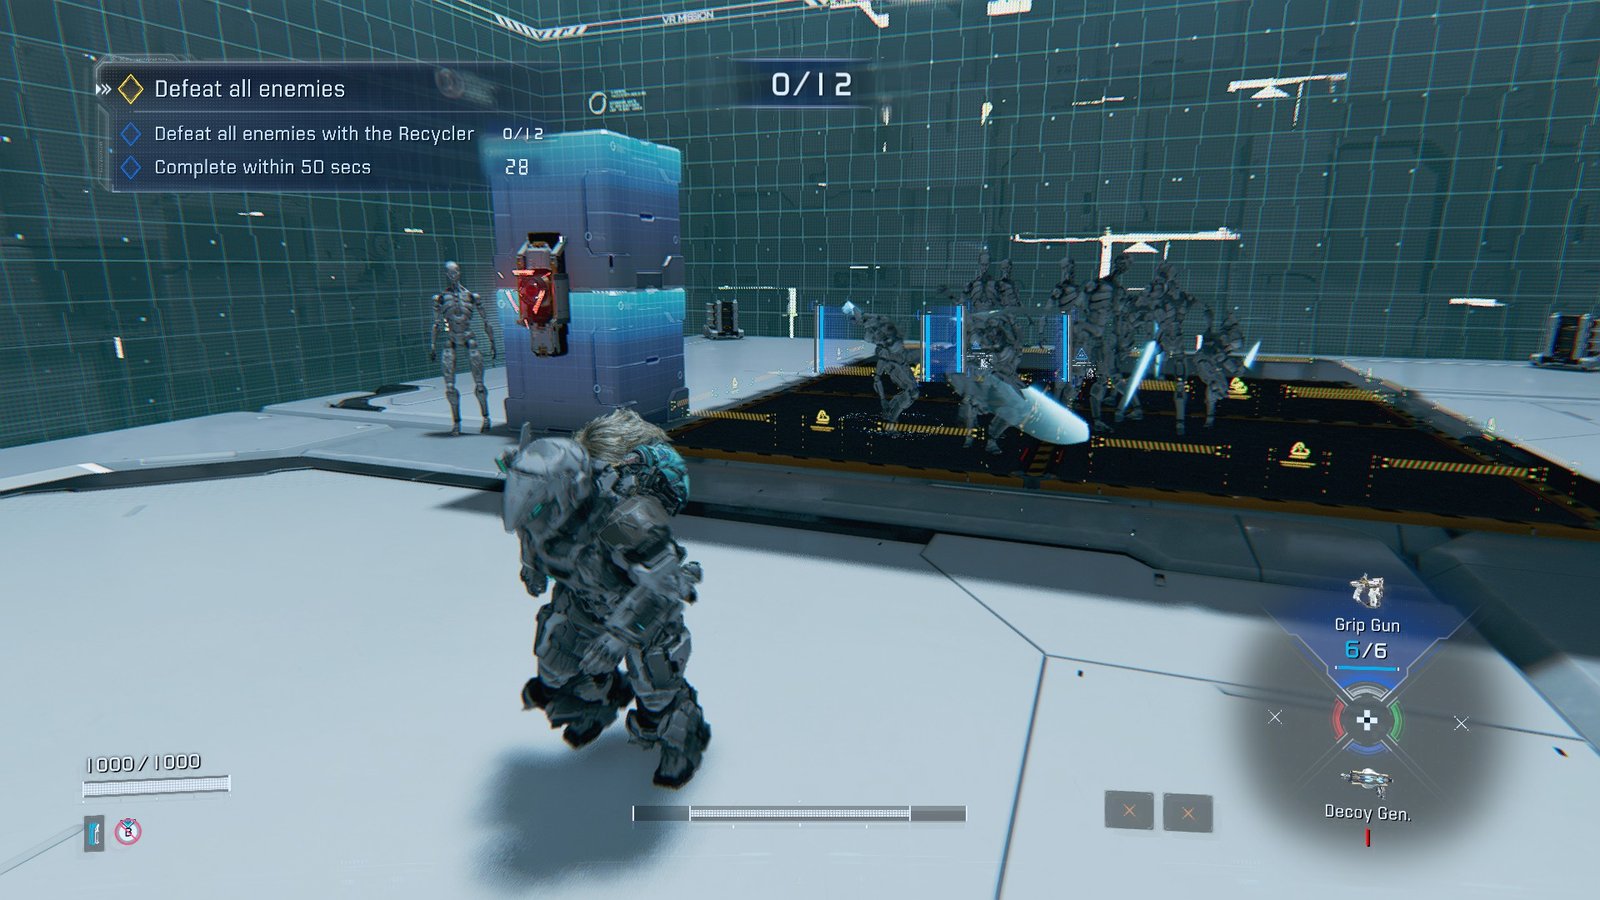
Mouse Trap is a fun challenge, arming you with the Grip Gun and a hackable Recycler positioned in the middle of the room. Walkers will spawn from the four corners of the room, and you’ll need to bait them under the Recycler if you want the full clear marks for killing all of them with the trap.
Luckily, the Walkers are easy enough to dodge, and the Decoy Generator on the ground can help keep them in place when you move to the trigger. You’ll need to pop them all in one shot, so be patient and let them all file in before you fly the final trigger.
Pro Tip: Walkers seem to hang back if enough enemies are around you. Set up a Decoy to keep the main force busy while you pull stragglers into the main force.
11 – Locksmith
Full Clear Conditions
- Reach Target Area
- Complete within 19 seconds
- Complete within 15 seconds
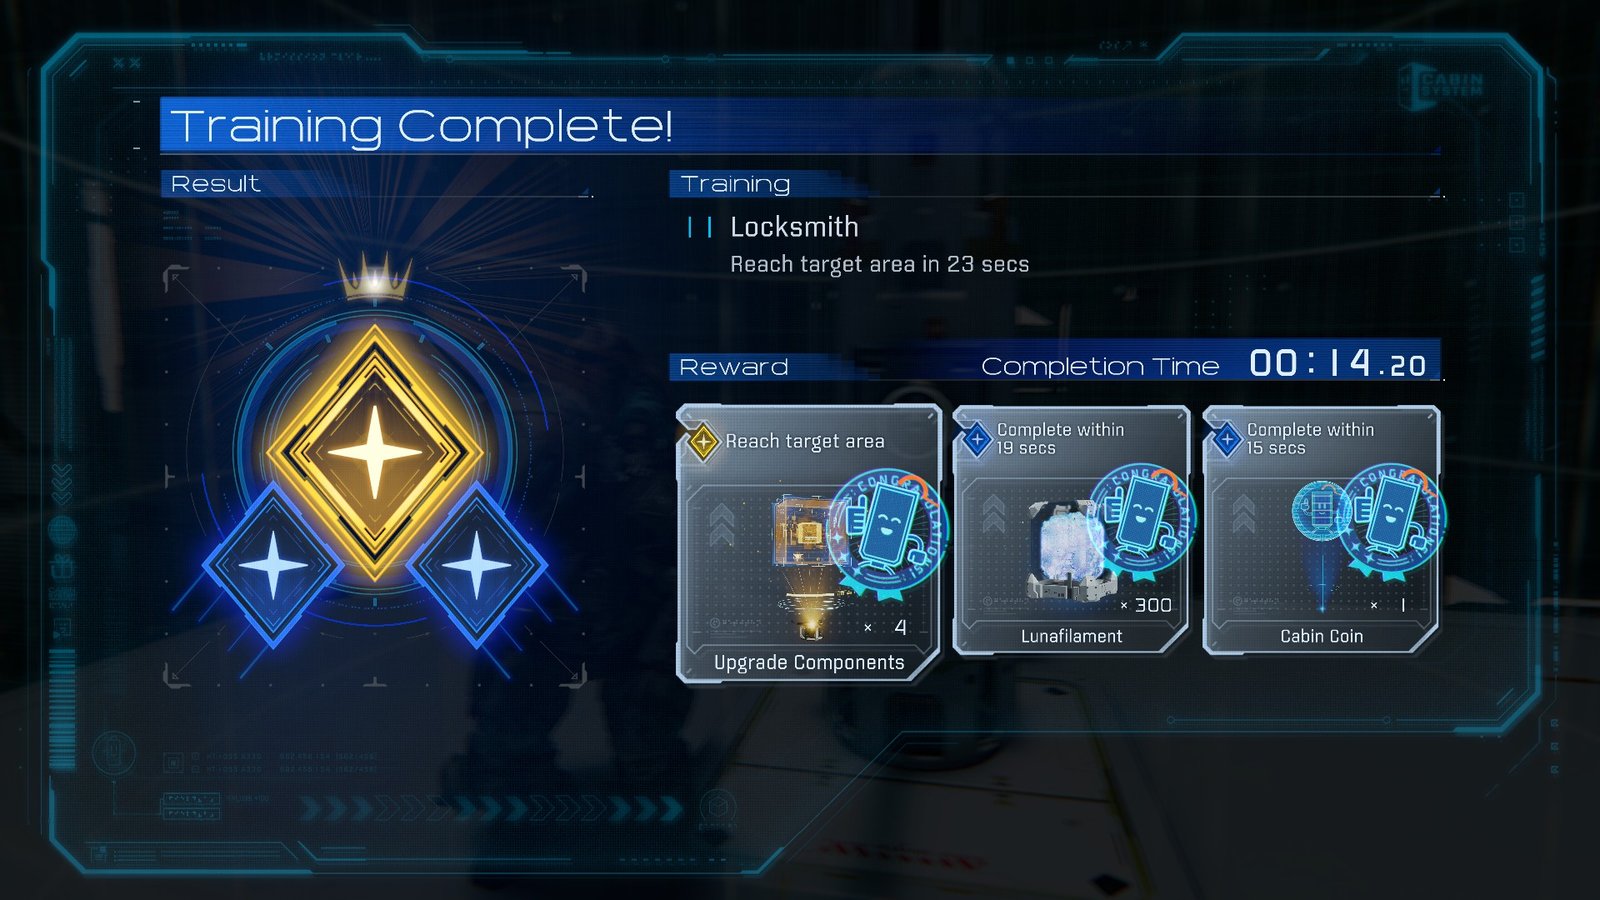
Locksmith’s bonus objectives make it intimidating, but it’s as simple as clearing four hacking terminals as fast as you can. Each is bound to a single laser grid, and you’ll need to hoof it between each to make the timer.
Even at your fastest, it’s going to be close, so don’t be thrown off if it takes a few attempts.
12 – Floor It
Full Clear Conditions
- Reach target area
- Destroy all Storage Boxes
- Complete without taking damage
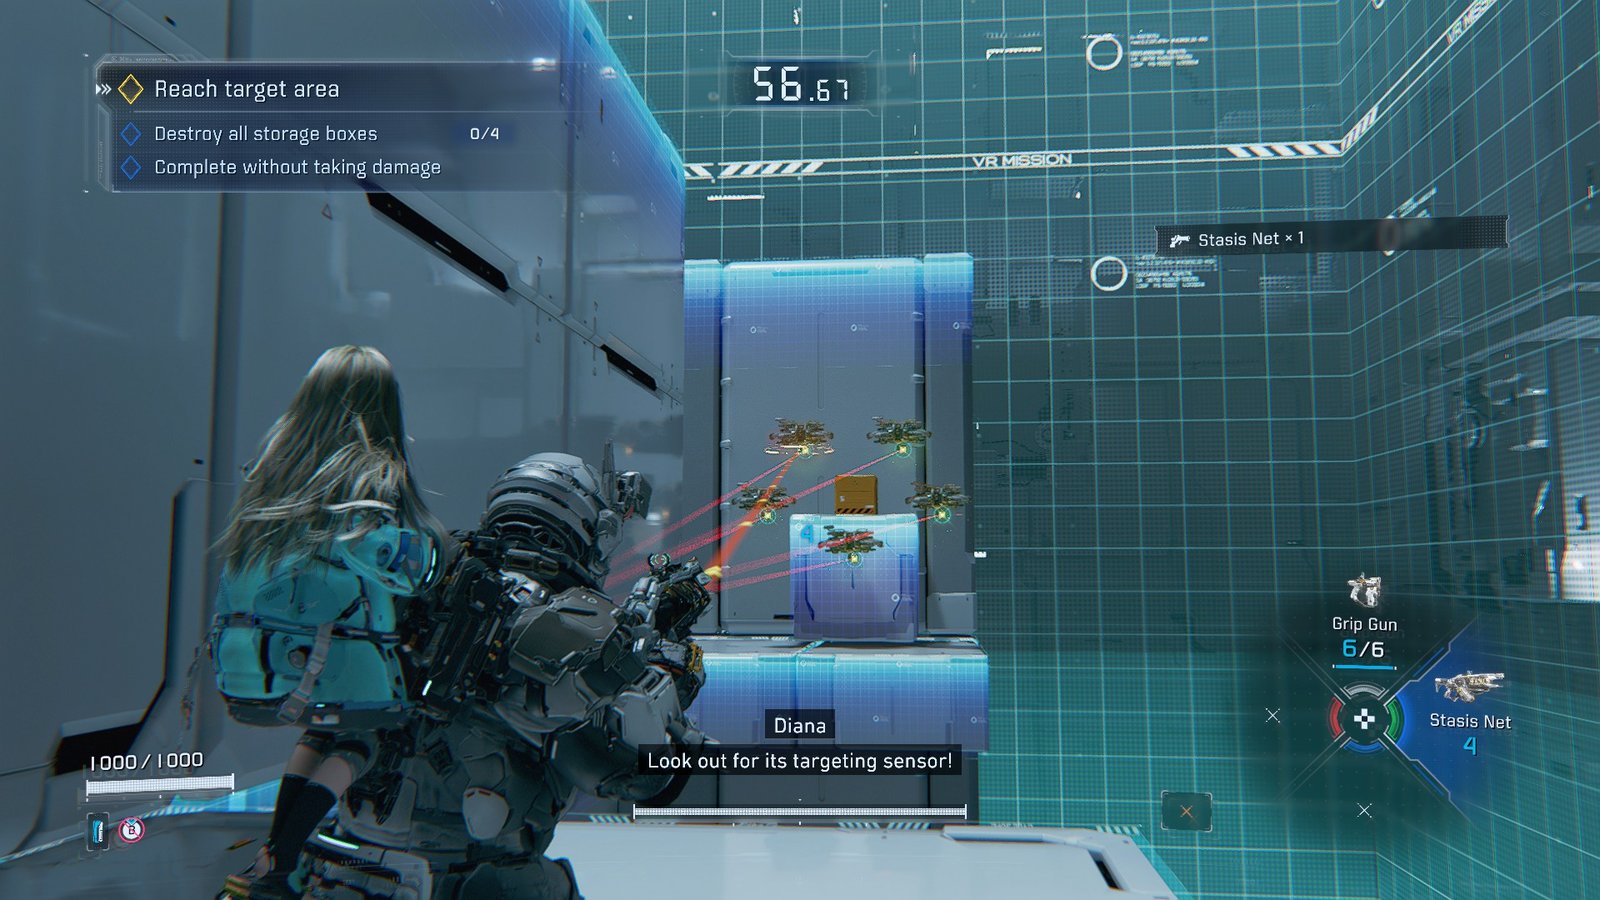
Floor It is another real buzzer beater, where you’re going to need to hoof it past drones, avoiding their shots and nailing the boxes they’re guarding. The best way to do so is the Stasis Net provided on spawn.
The projectile it fires can pop the boxes, and is perfect for keeping the bots from firing at you. With their layouts, there’s no way to destroy them before running out of time, so focus on taking cover around corners and keeping them stunned.
The pocket of 5 at the start will only take one, while the higher-tiered ones up the stairs will each need two, as they recover faster. Plink the boxes with the Grip Gun as you climb, and keep the drones trapped as you approach the final target area.
13 – Bad Blood
Full Clear Conditions
- Defeat all enemies
- Defeat 4 enemies with friendly fire
- Complete within 100 seconds
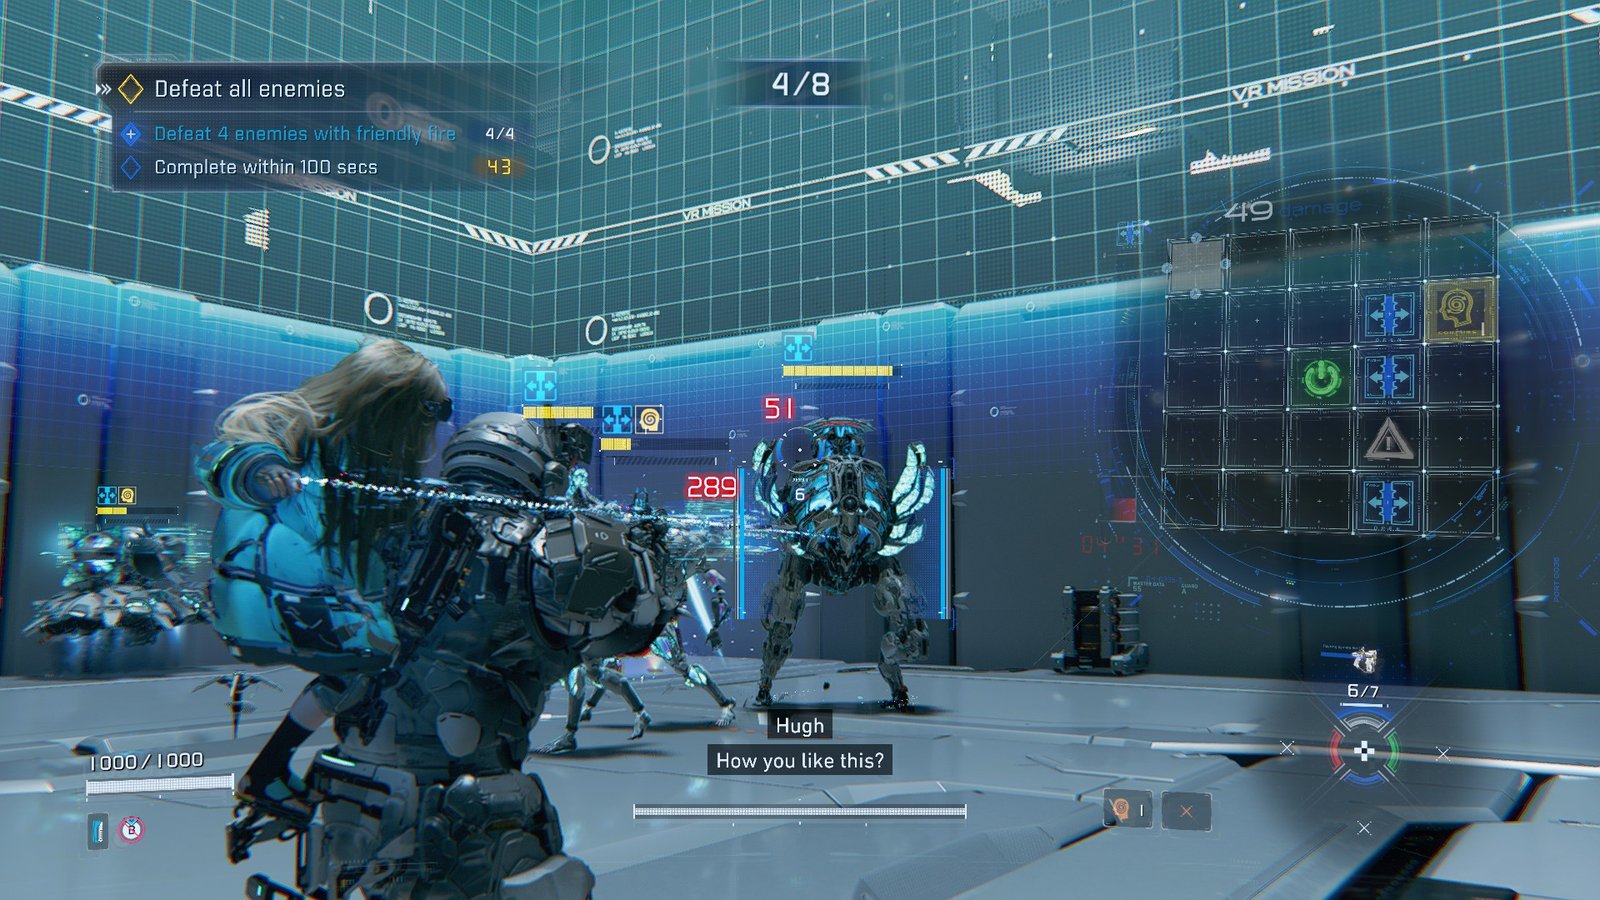
Bad Blood is your trial if you enjoy the friendly fire Hacking Node. Trapped in a small room with plenty of AOE bots, you’re armed with the Grip Gun and plenty of Confuse Nodes. With these nodes, you can force the bots to target each other, doing huge chunks of damage.
You’ll need to ensure that 4 die to friendly fire, and the stomping Crusher is your best bet. Its stomps can almost one-shot the Walkers and stun anyone who’s left alive.
The bots come in two waves, so make sure you’ve killed at least a few with friendly fire before you move onto the second.
14 – Burn, Burn, Burn
Full Clear Conditions
- Defeat all enemies
- Defeat all storage boxes
- Complete within 60 seconds
Burn, Burn, Burn is our Photon Laser showcase, surrounding you on spawn with plenty, just in case you run out of ammo. The Photon Laser only requires a reload when you stop firing, so don’t worry about holding the beam as you move between targets.
Amongst the firing range is a series of boxes you’ll want to pop between the targets, two on each side at different levels of elevation. More are revealed as enemies pile in, with the final box appearing alongside a Crusher descending from the top of the arena.
Pop it and the enemies promptly, and you’ll have another full clear under your belt. Again, don’t worry about ammo; you have plenty of pickups to restock from if you run out.
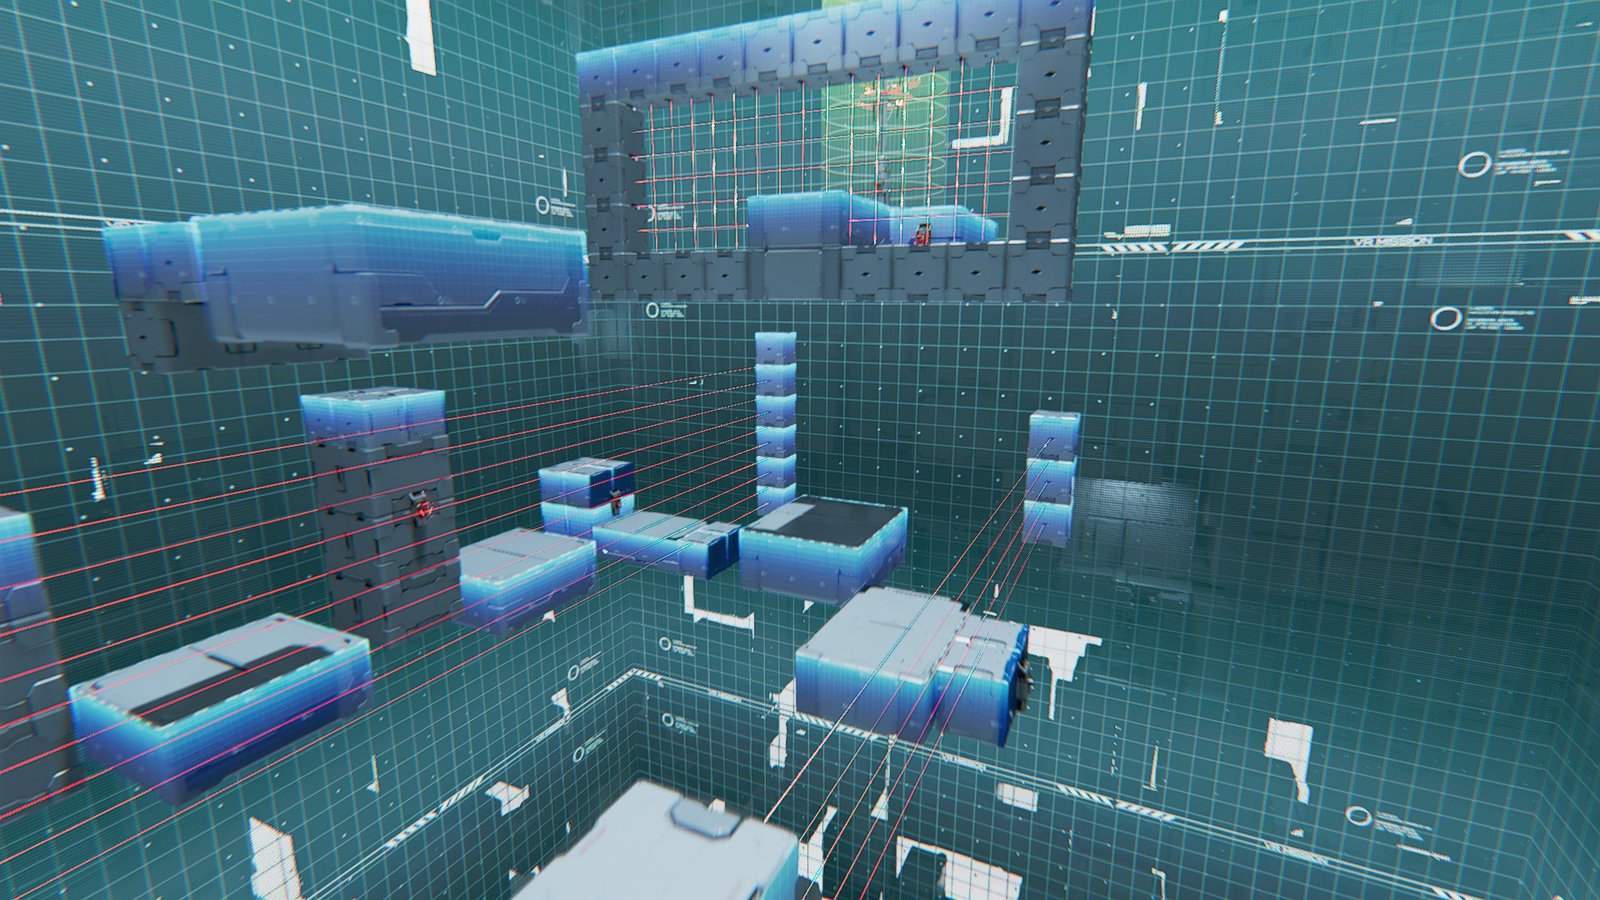
15 – Summit
Full Clear Conditions
- Reach target area
- Collect all Signal Data
- Complete within 60 seconds
Summit is a mountain-climbing simulator more than it is training, and it’s the first that took me a good number of attempts. You’ll need to hoof it to make the time while collecting all the Signal Data, especially with all the lasers.
Two important things to note: pressing your jump button on a zipline instantly drops you off, and taking a laser hit or two can be worth it since taking damage isn’t an issue with the objectives.
The first Signal Node is right around the first corner, while the rest are hidden around bends that try to bait you to move forward or between floating platforms.
Keep your eyes out and your head on a swivel to find each. You’ll probably need to do a scouting run or two just to get a handle on how tight the timing is on some of the Signal Node locations.
16 – Crack & Crash
Full Clear Conditions
- Defeat all enemies
- Complete without taking damage
- Complete within 100 seconds
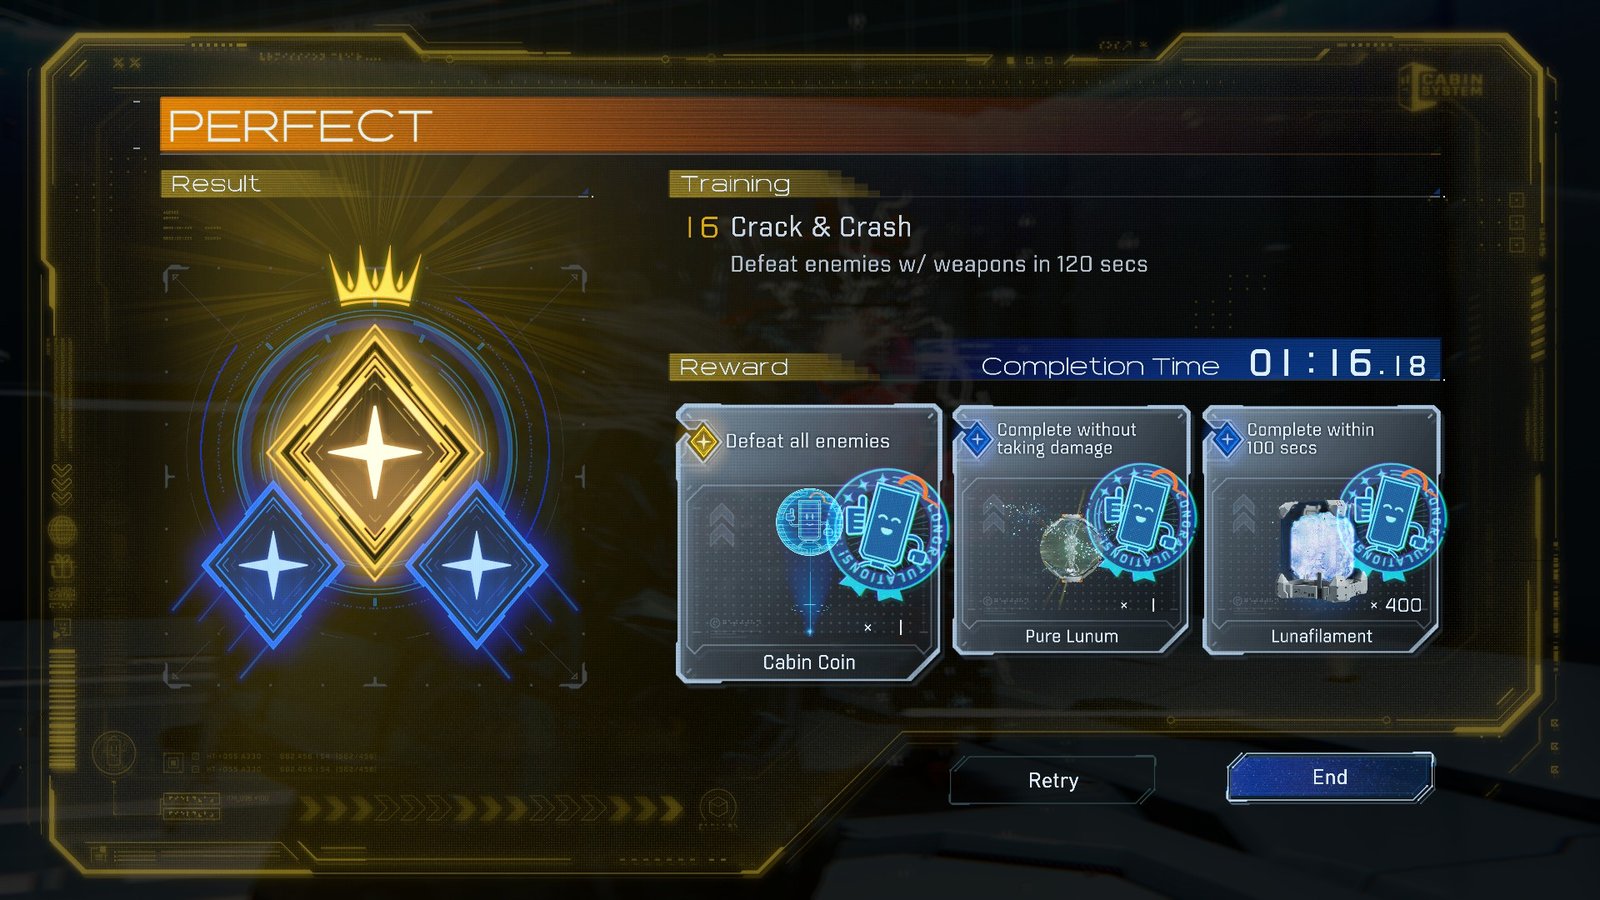
Crack & Crash is a combo of hacking and weapon combat with a spinning laser in the middle. Position behind it as it slowly turns so you can focus on the bots as they come, abusing the combo of the Sticky Bombs with the Expose Hacking Node for serious damage.
You’ll face a lancer before a standard Crusher, then an enhanced variant. Their highly telegraphed attacks make them easy to dodge, just keep an eye on the laser, and you’ll be golden.
17 – Lock and Roll
Full Clear Conditions
- Defeat all enemies
- Collect all Signal Data
- Complete within 80 seconds
Lock and Roll is all about the Homing Rocket Launcher. With 20 bots to burn, you’ll need to let it sing as often as you can. Signal Data is floating between the small platforms you need to jump between, with notable standouts to the right of spawn, and higher up to the northeast.
Try to time your motions to grab them between shots, and towards pickups when you need to reload. The Homing Rocket Launcher is a slow weapon, so be quick on your shots to maximize your uptime.
Pro Tip: The Rocket Launcher can only lock on to one enemy at a time, so let it fly as soon as you hear the lock.
18 – Panic Scramble
Full Clear Conditions
- Reach target area
- Hack all terminals
- Complete within 50 seconds
Panic Scramble’s challenge is largely in the first Bonus Objective, as some of the moving platforms will interrupt your terminal hacks. The big issues are the three surrounding the final exit.
You’ll need to come at them from below to get the camera angles right, so prioritize them before you make your ascent. Platforming between the sliding panels is the second hurdle, but you can’t fall into the challenge’s name.
Don’t panic, don’t scramble, and Panic Scramble is all yours.
19 – Catch Me If You Can
Full Clear Conditions
- Defeat all enemies
- Complete within 115 seconds
- Complete within 100 seconds
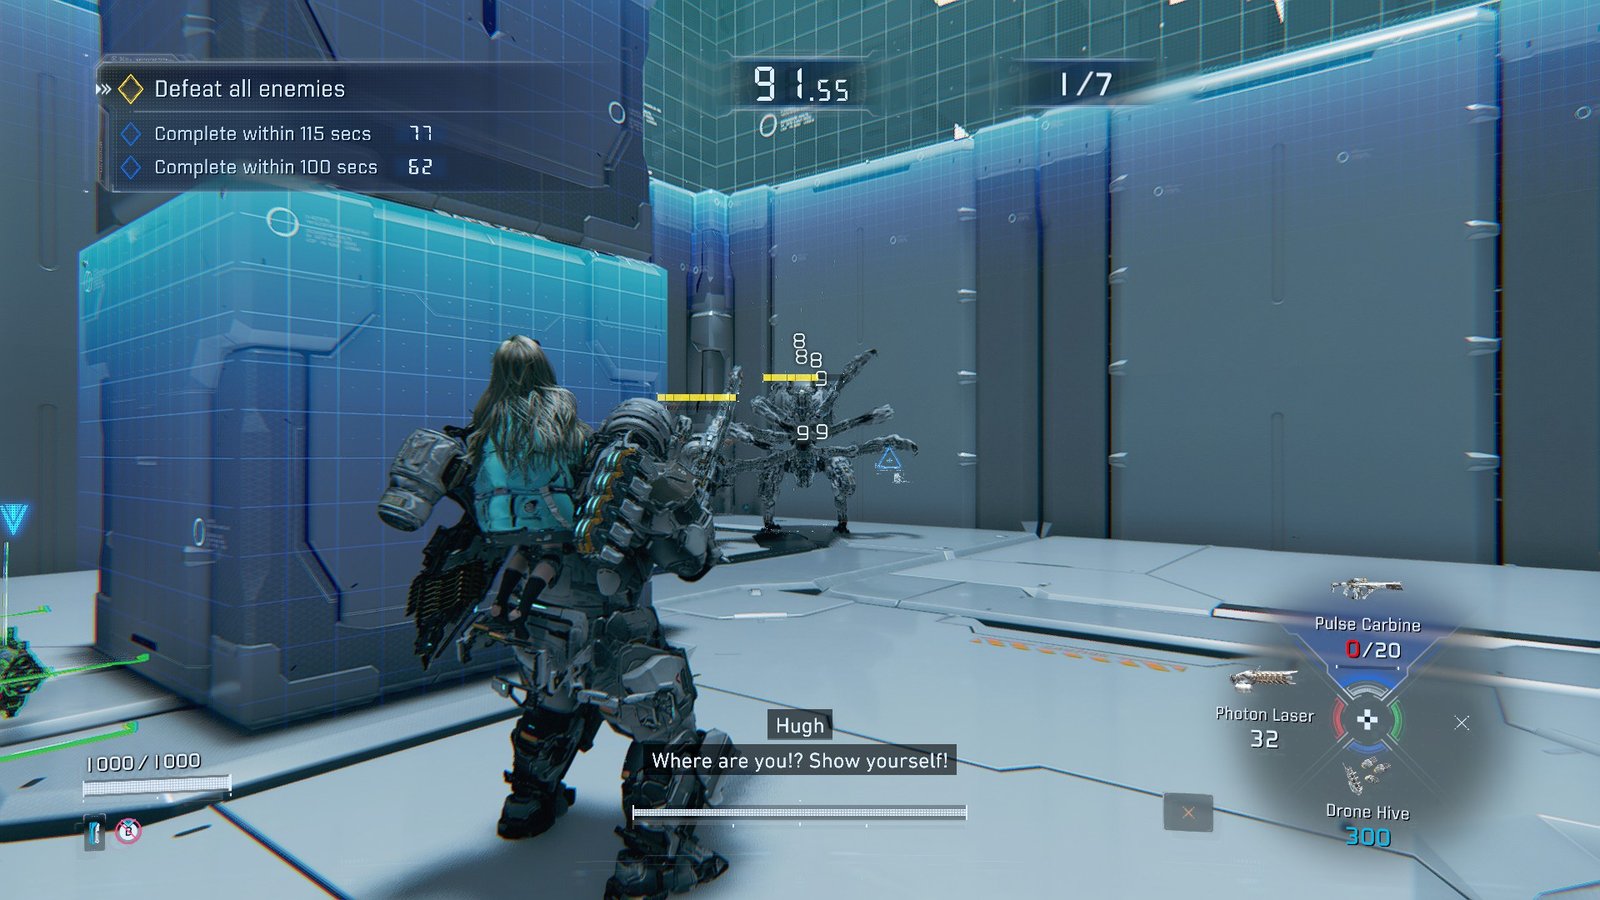
In this Training Simulation, you’re the one being hunted, as a Creeper is released as early as enemy two. Luckily, you’re given the perfect setup to keep an eye on it. Between the Pulse Carbine, Photon Laser, and Drone Hive, you can fire wide to force it out of it’s invisibility.
You’ll fail if you’re caught at all, so keep mobile as you tear through the crowd. The Creepers should be your priority targets whenever they spawn. Just keep an eye out whenever one of the printers seems to drop nobody off.
Pro Tip: Creepers can be forced out of their invisibilty early with prolonged fire. Hip fire the Pulse Carbine if you think you see one to pull it into the open.
The Drone Hive is great at chipping the Creepers down, as their weak points are hard to keep sustained fire on with either other weapon on offer.
20 – Expert Project Pierce
Full Clear Conditions
- Defeat all enemies
- Complete within 70 seconds
- Complete within 55 seconds
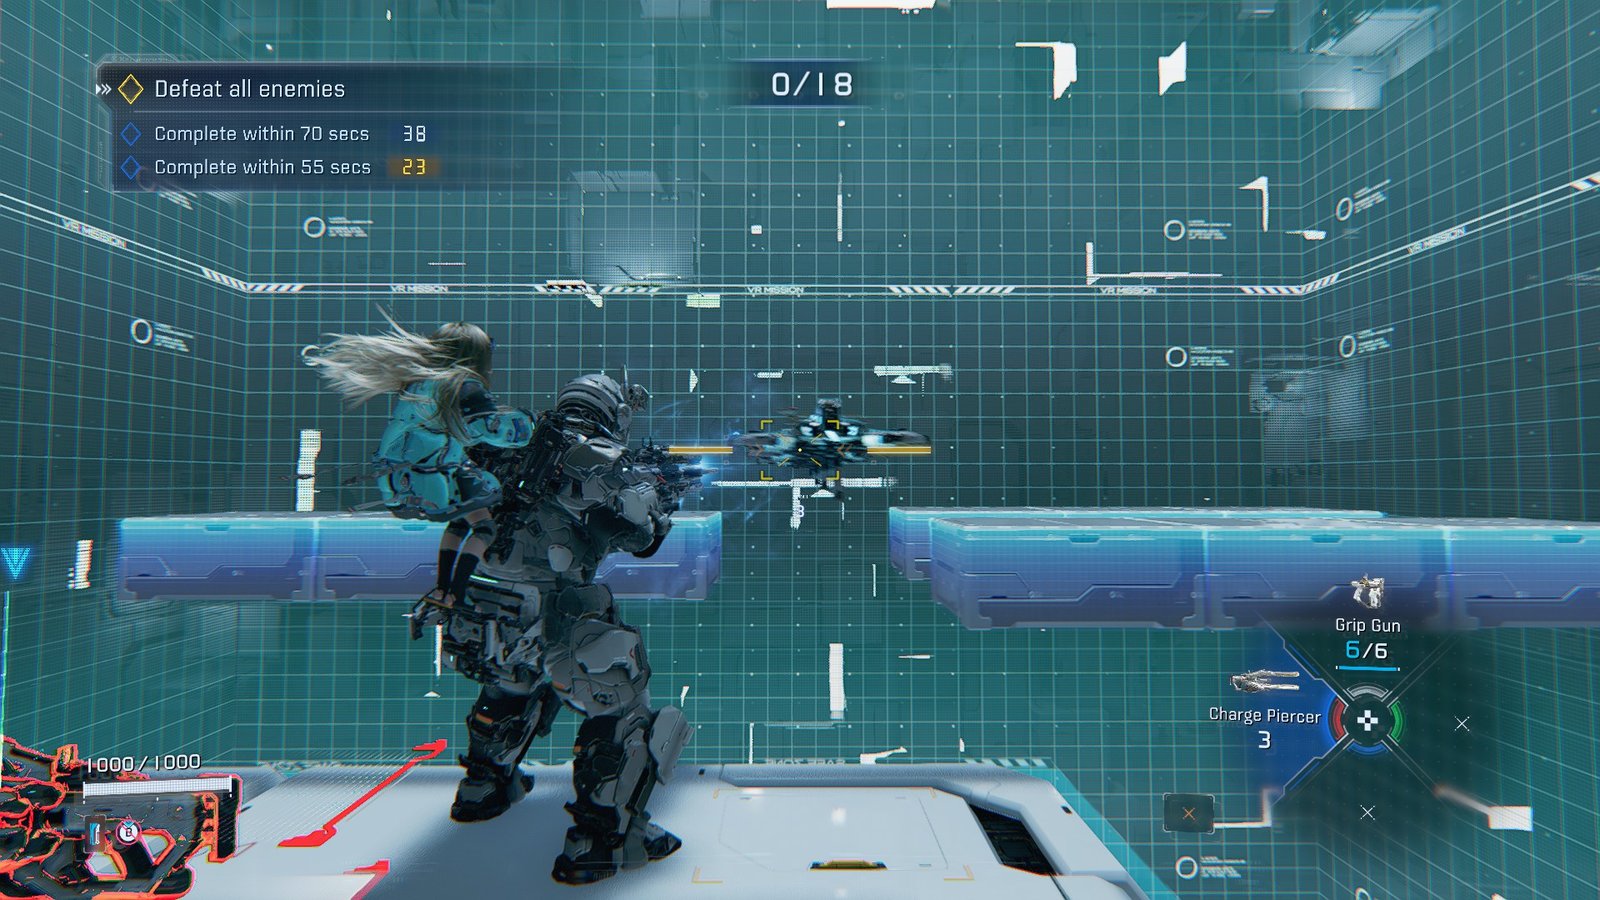
Just as it sounds, Expert Project Pierce is a harder variant of the earlier Project Pierce Training Sim. You’re placed on a moving platform as rows of Drones spawn. You’ve got 55 seconds to pop each, so try to line up each shot before they come.
The first row appears directly ahead in the center of the map. Once you pop that one, two will spawn, one on the left and right at diagonal angles. The third is another diagonal line to the upper left, a tougher shot to hit.
When all the drones are done, another platform descends with three fresh Charge Piercers. Ahead of you, three Walkers appear on three separate moving platforms. They’ll begin to walk towards each other as the platforms line up, and that’s your moment.
21 – Bullet Hell Arena
Full Clear Conditions
- Defeat all enemies
- Complete without taking damage
- Complete within 80 seconds
This fight is where Impact Barrier got most of its use in my playthrough, and it’s a requirement for the Bonus Objective of not getting hit. Enemies appear in the form of ascending levels of Drones, from basics to the scary enhanced rocket and machine gun drones.
The Impact Shield is exactly what you need to take shots at the higher-tiered drones, but the tiered cover of the arena is perfect for breaking the enemy’s sightlines in the meantime.
Use the Shockwave Gun to pop the real problematic ones as they come, minimizing the chance you get hit and speeding up the fight as much as possible.
22 – Dash and Dodge
Full Clear Conditions
- Reach target area
- Destroy all storage boxes
- Complete within 40 seconds
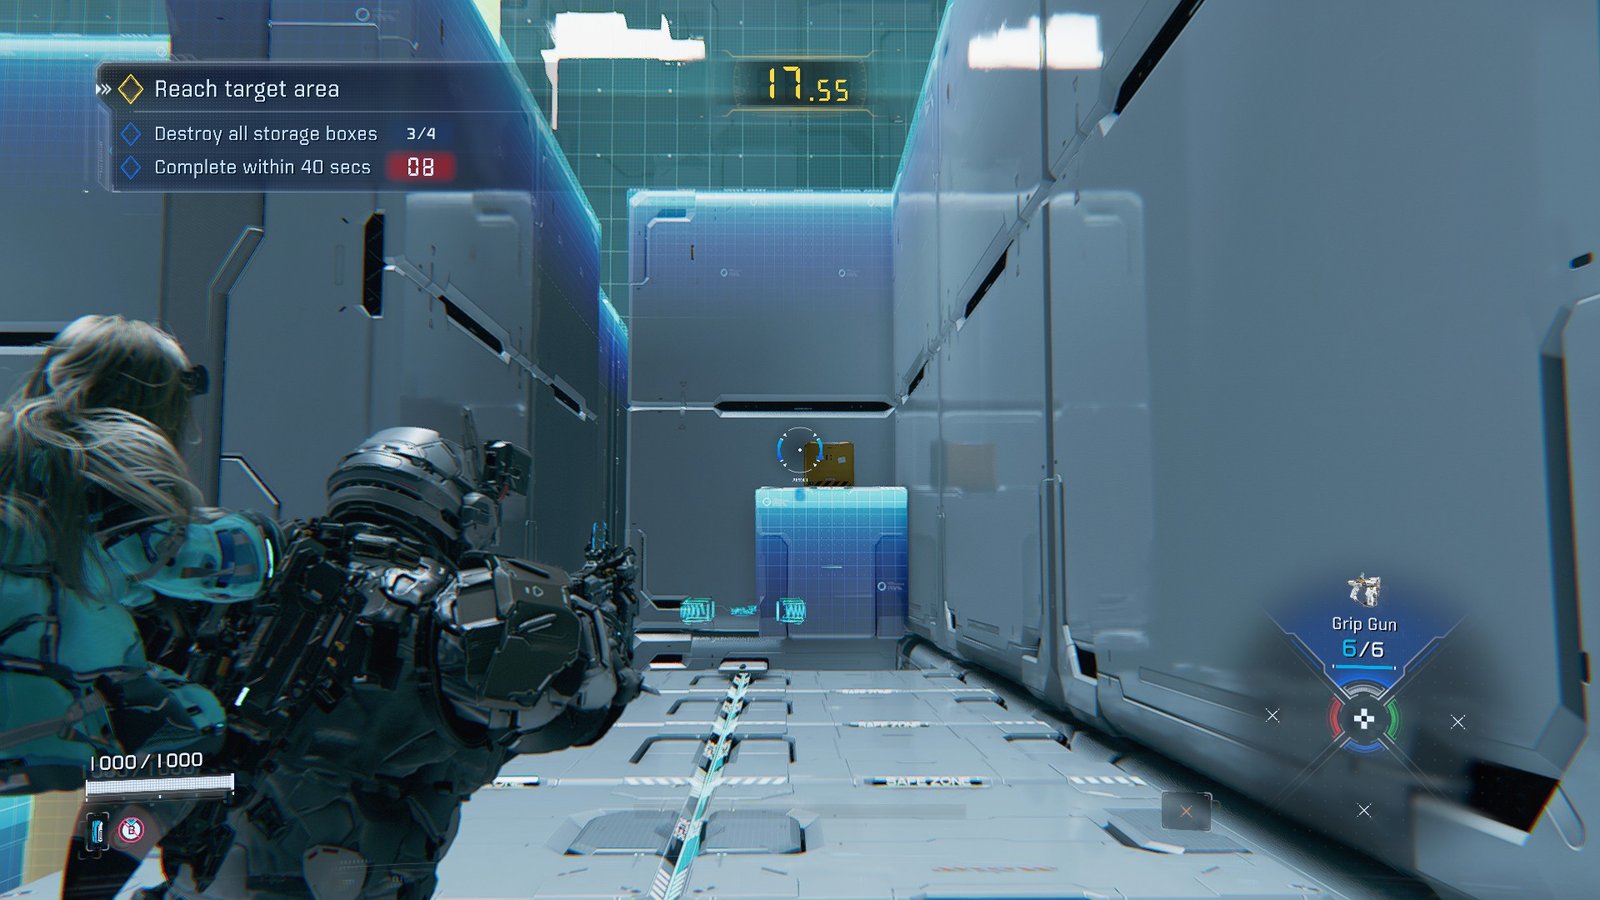
Another ‘hit the ground running’ style Training Sim, Dash and Dodge looks a lot more complex than it really is. The hardest part is finding the four boxes, three of which can be found after the first jump.
One box is beneath you, another is straight ahead atop a floating box, while the third is to your right on top of another floating box. The final box is a bit further ahead, right before the grid of single floating boxes.
Keep calm and hop between them as you make your final march to the zipline to the final target area. You can dash over a few if you have the energy, just make sure to maintain your charge.
23 – Walker Family
Full Clear Conditions
- Defeat all enemies
- Deal damage using enemies
- Complete within 150 seconds
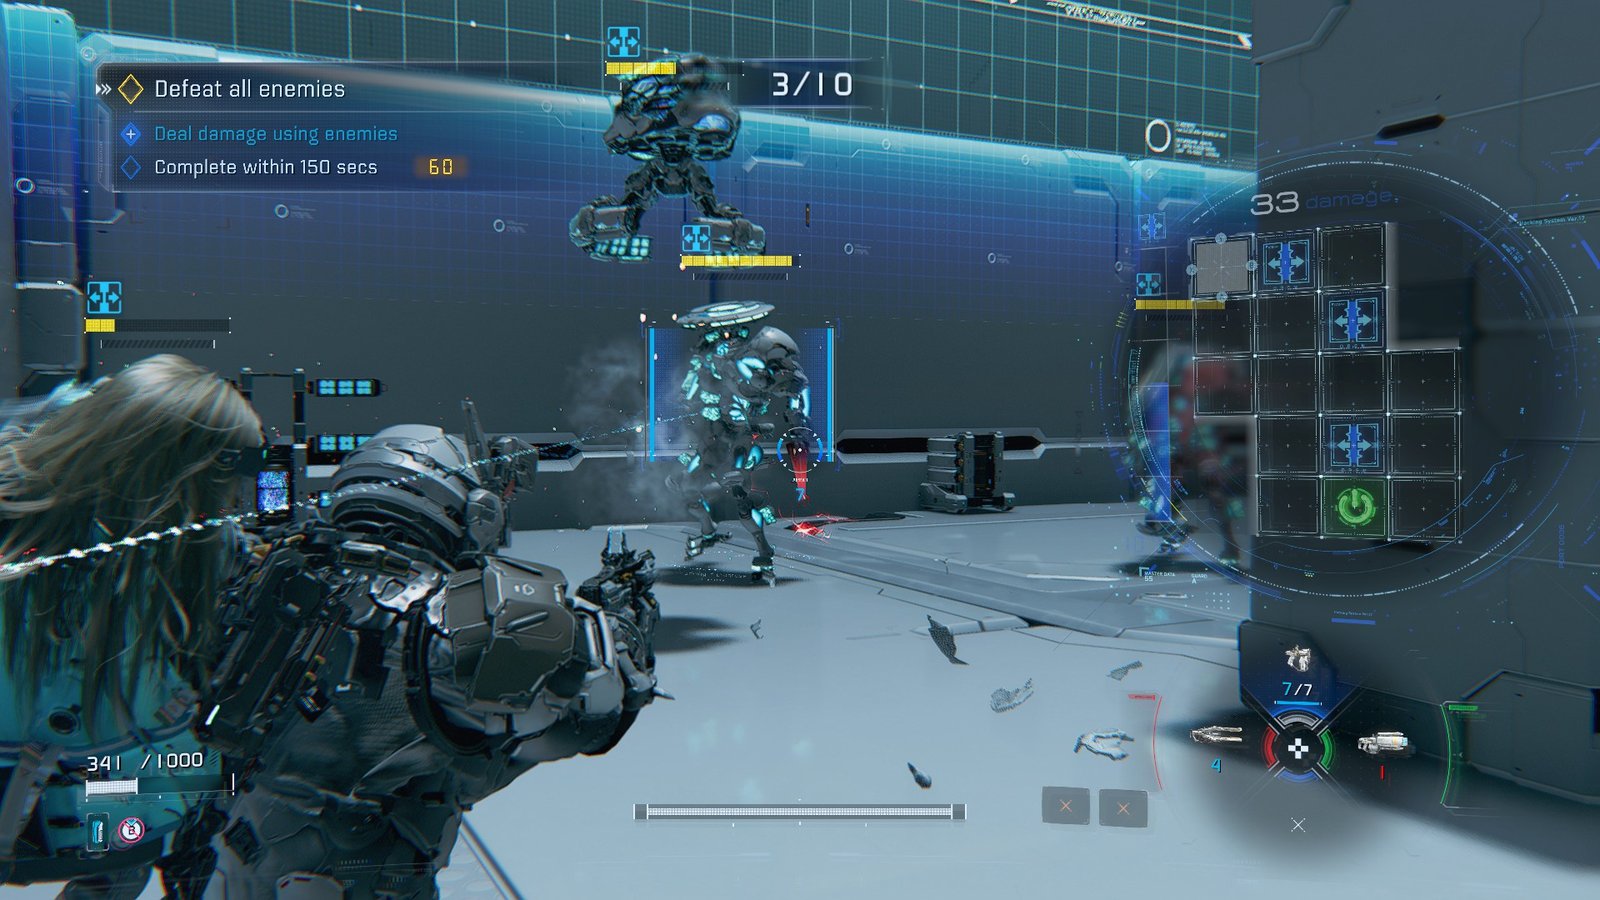
The Walker Family is a major trial against an eclectic bunch of different bots. They come in three waves, each with a medic drone to top them off if need be.
Those Medic drones are where we complete the bonus objective to deal damage using an enemy, just like the Medic challenge from earlier. The bots you face are increasingly threatening, from Lancers to eventually an Executor.
You have free choice of several Hacking Nodes and Weapon Kits right out the gate, but don’t waste too much time. The 150-second counter is ticking down right as you spawn, so pick fast and get to it.
24 – Expert Locksmith
Full Clear Conditions
- Reach target area
- Complete with no failed hacks
- Complete within 45 seconds
The Expert variant of the Locksmith challenge requires a whole lot more platforming, and swaps out the node connecting hacks with the sequence of button presses.
You’ll need to do every one without fail; luckily, being pulled out of range by the moving platforms doesn’t count as failing. You’ve got three to hit as you approach the climb, and two when you make it to the top.
The platform in the center will rapidly move between both needed to open the final gate, so be quick, but it’s better to reset than fail if need be.
25 – Expert Red Flash
Full Clear Conditions
- Survive for 40 seconds
- Collect all Signal Data
- Complete without taking damage
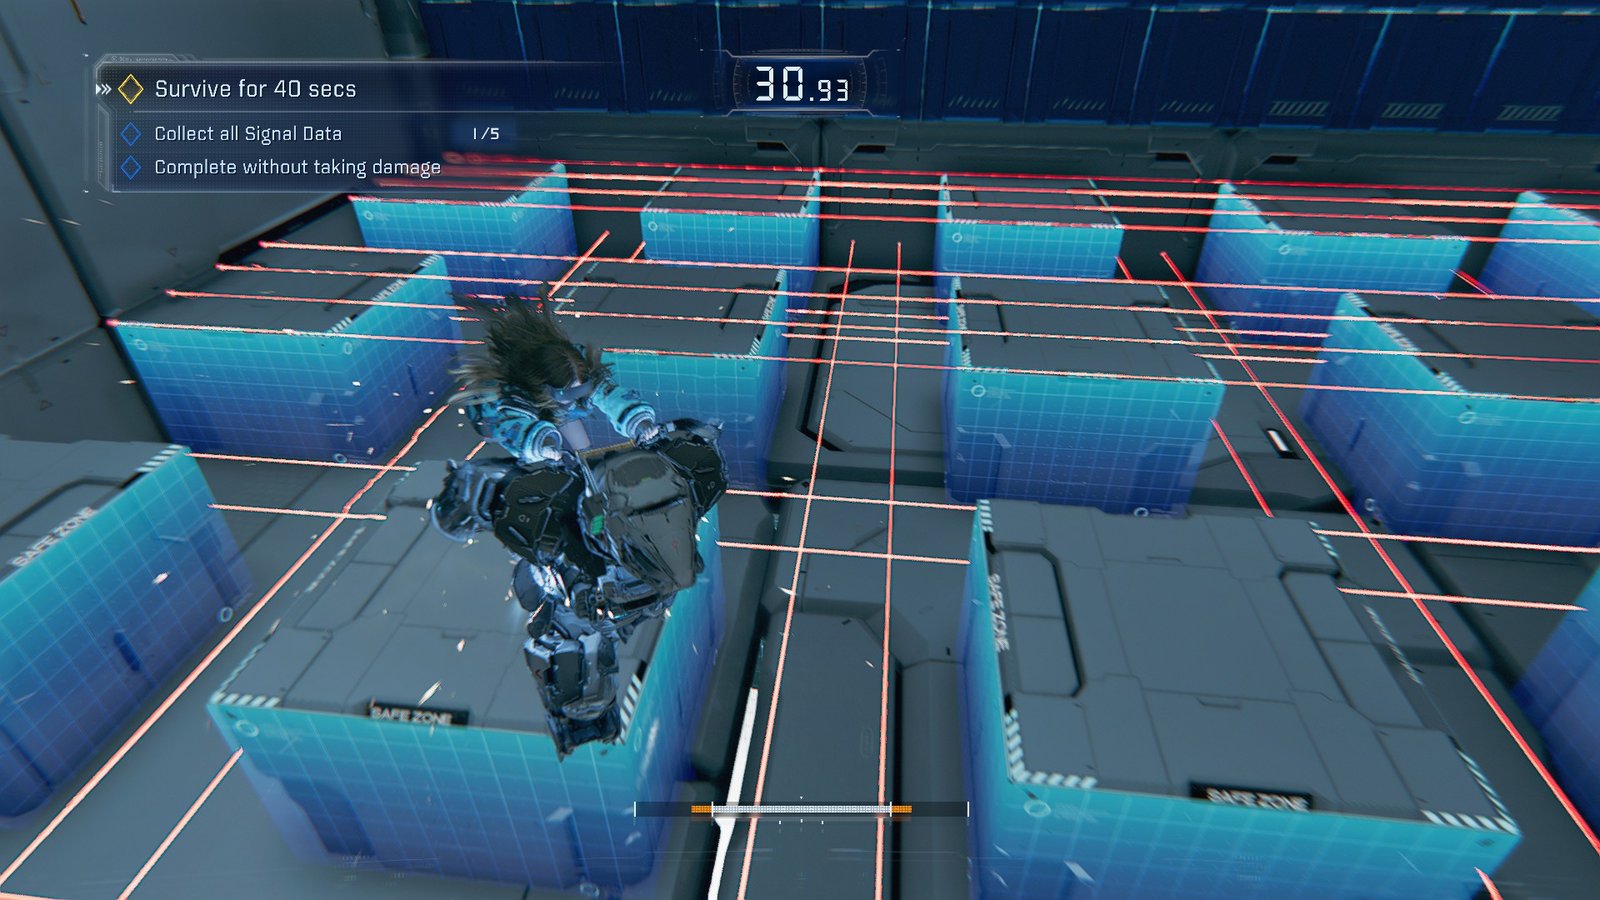
Another entry in laser grid dodgeball, Expert Red Flash places you above a laser grid that repeatedly rises and lowers. To beat it out, you’ll need to see the lasers coming, AND be able to snag all the Signal Data in the area.
The first piece of it is right ahead of spawn, with two on the left and another two on the right. Playing towards the center of the map is the safest bet, as the encroaching lasers always start on one end and approach.
Pro Tip: Though dangerous, careful floating can actually land you between the lasers on top of a platform. A potential lifesaver if you’re running low on fuel.
Make liberal use of your float to stay above them as you maneuver, and don’t rush to snag the Signal Data right away. Focus on staying out of reach, and make your way to the Data whenever it comes up.
26 – Heat Up, Cool Down
Full Clear Conditions
- Defeat all enemies
- Land a Critical Shot
- Complete within 90 seconds
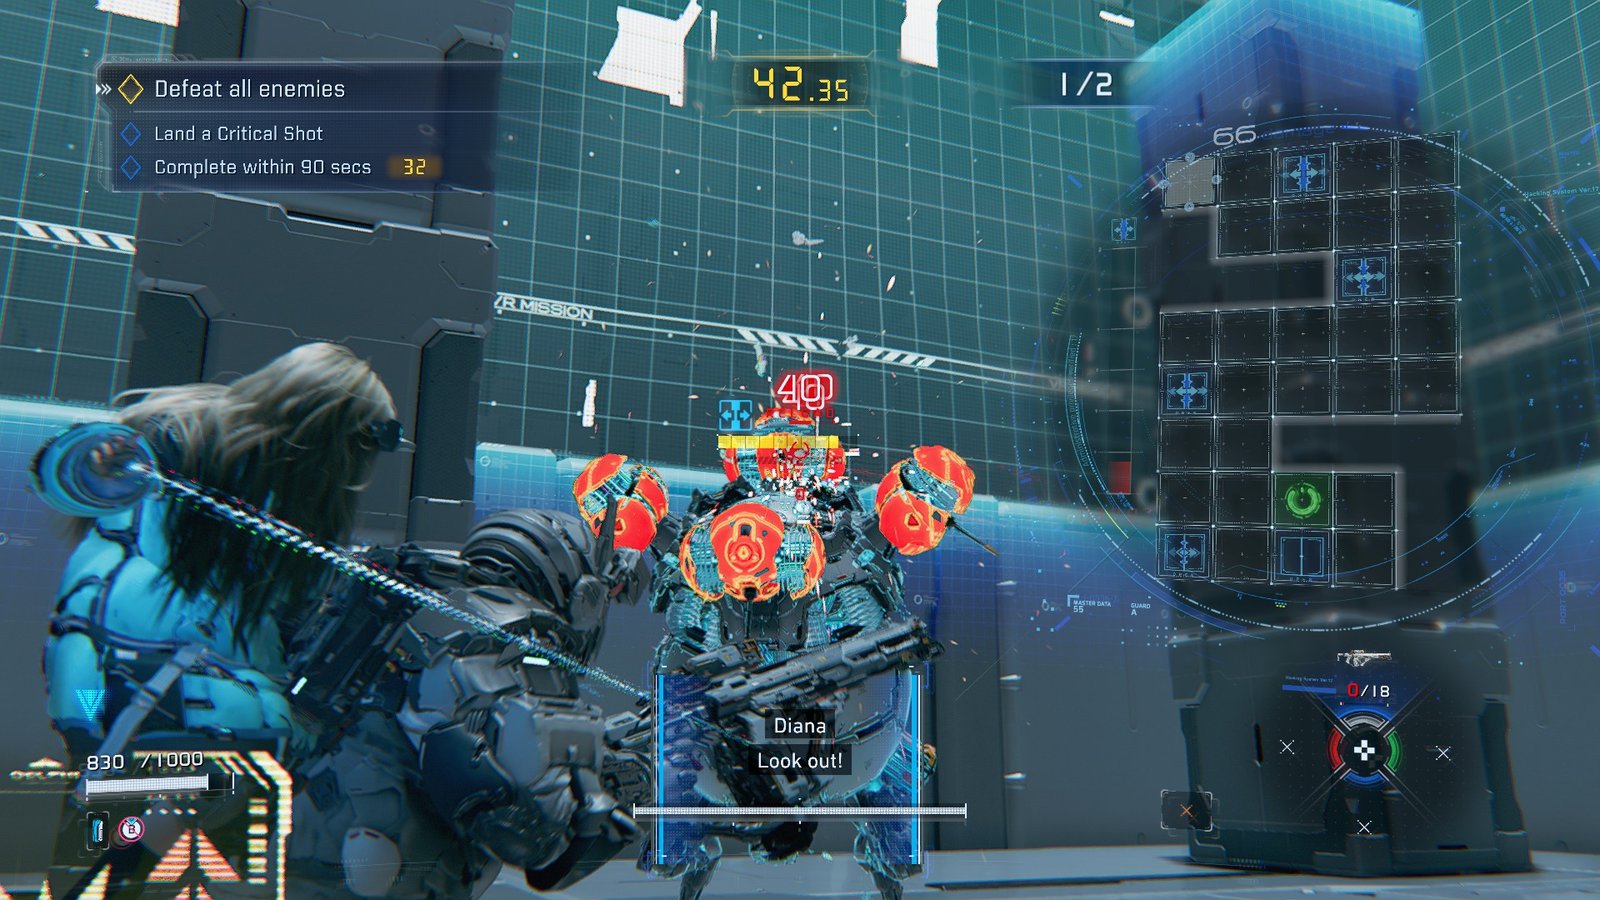
Heat Up, Cool Down is a 2v1 against a bot boasting defensive drones to counter hacking and an EMP bot. Priority number one is on the drone bot, luckily the liberally provided Code Generators can eliminate their hacking shields in a single blast.
Spend the start of the fight focusing on hacking damage on the bot drone, using as many expose nodes as you can to pop it asap.
Once it’s just the EMP bot left, down it with the Code Generator/Expose combo and use the Pulse Carbine on its crit points to build up its heat. Once it’s overheated, you can land a Critical Shot to finish up the bonus conditions.
27 – Round and Round
Full Clear Conditions
- Reach target area
- Complete without taking damage
- Destroy all storage boxes

Round and Round is a spiral climb with a limited overall time limit and plenty of lasers to dodge. For a full clear, jump onto the moving platform to the left of spawn and turn around. You’ll be able to see one box around a corner towards the inner structure, and another above spawn peeking out.
Continue forward until you see a floating platform with two diagonal lasers. Across from it is a box on a lone platform, making your third. Continue to the right to another moving platform, jumping between the lasers and taking another right, where the last box is sitting in a small alcove.
The rest is all up to avoiding the lasers, which are easy enough to do with proper positioning as you climb. Just pas the sliding lasers and onto the final vertical platform.
28 – Chain Attack
Full Clear Conditions
- Defeat all enemies
- Don’t let enemies use antennas
- Complete within 150 seconds
Chain Attack’s hint is in the name, tasking you with comboing Hacking Mines to keep bots hurt and stunned. This is paramount for the bonus objective to stop enemies from using antenna.
Grab some Hacking Nodes from the corner and prep two for Executor in the final wave. Then it’ll be easy enough to pop it and stack Heat with the Pulse Carbine, you can get a Critical Shot for not too much effort.
29 – Cave-In
Full Clear Conditions
- Defeat all enemies
- Complete without taking damage
- Complete within 130 seconds
Cave-In is one of the final big combat trials, opening with two enhanced Walkers and an Enhanced Crusher. Use the Shockwave Gun you spawn with to tear through them, but keep on the backfoot so you don’t get tagged.
Make sure you grab the Impact Shield to the left and the Charge Piercer once you’re out of Shockwave Gun ammo. Wave two consists of three floating drones, easy enough to take out once they’re hacked.
Third comes two rocket drones, one after another. Flip their rockets with a hack to deny pressure and keep them tagged, and eventually you’ll make it to the final wave.
With very little room to work with, you’re up against two turret bots. Now is the time to pop that Impact Shield, giving you a bubble of safety to hack and fire from. They don’t have too much HP, so take them down, and you’re one off!
30 – Stand or Die
Full Clear Conditions
- Reach target area
- Complete without taking damage
- Complete within 190 seconds
Your final Training Sim is here, a real triathlon of everything you’ve learned. We’ll go step by step on each area, starting with the opening gate. You’re given a Hacking Mine kit, a Decoy Generator, and two Hacking Nodes.
Plant a Hacking Mine loaded with Heat and Freeze to easily pop the four Walkers that pile into the room. When they’re gone, head through the door and up past the shifting platforms. Take a left to find Another room this time filled with an Enhanced Walker, a Crusher, and a Medic.
Use another Hacking Mine charged with both Nodes to take them out, keeping an eye on the Medic in case you get the chance to backfire it. If they all step in, use the Recycler bound to the Terminal on the wall to fry them. Head through the next door, and you’ll have a Charge Piercer and Homing Rocket Launcher in front of you.
Snag them both, and Drones will appear in different patterns straight ahead. The first is a perfect line for the Charge Piercer, the next are Rocket fodder, and the third requires you to swap between both.
Head into the door to the left to see a zipline covered in moving lasers. Time your ascent and enter the final area, with a Photon Laser, Code Generator, and a fresh set of Hacking Nodes.
First you’ll fight off three Enhanced Walkers, feel free to use a Code Generator Blast and both Multihack and Confuse to cause some infighting. The next wave is a Shield bot, an EMP bot, another Enhanced Walker, and a Medic.
Try and burst down the Shield bot first, turning it’s shields to your side with the Confuse node for the Can I Borrow This achievement. Abuse the Medic drone trick to nail another, using your leftover ammo liberally.
The door opens and you’re lead down a hallway with a hackable terminal to move some lasers. Head to the Target Area and four terminals appear as a grid of lasers descends from the roof. These four terminals are each of the hacking minigames you’ve done throughout the game, so stay on your toes and don’t panic. Finish these, and you’re in the clear!