


Finding legendary weapons is always going to be the best thing about any Borderlands game. Borderlands 4 also has many legendaries tied to boss fights; one such boss fight takes place in Auger Mines in the game. Here, we will help you locate the Auger Mine and complete Timid Kyle’s Neglected Opening Mine mission to get your hands on the legendaries in Borderlands 4.
Timid Kyle’s Neglected Opening Mine Walkthrough
Requirements: Make progress in the main storyline and complete the main mission, Shadow of the Mountain.
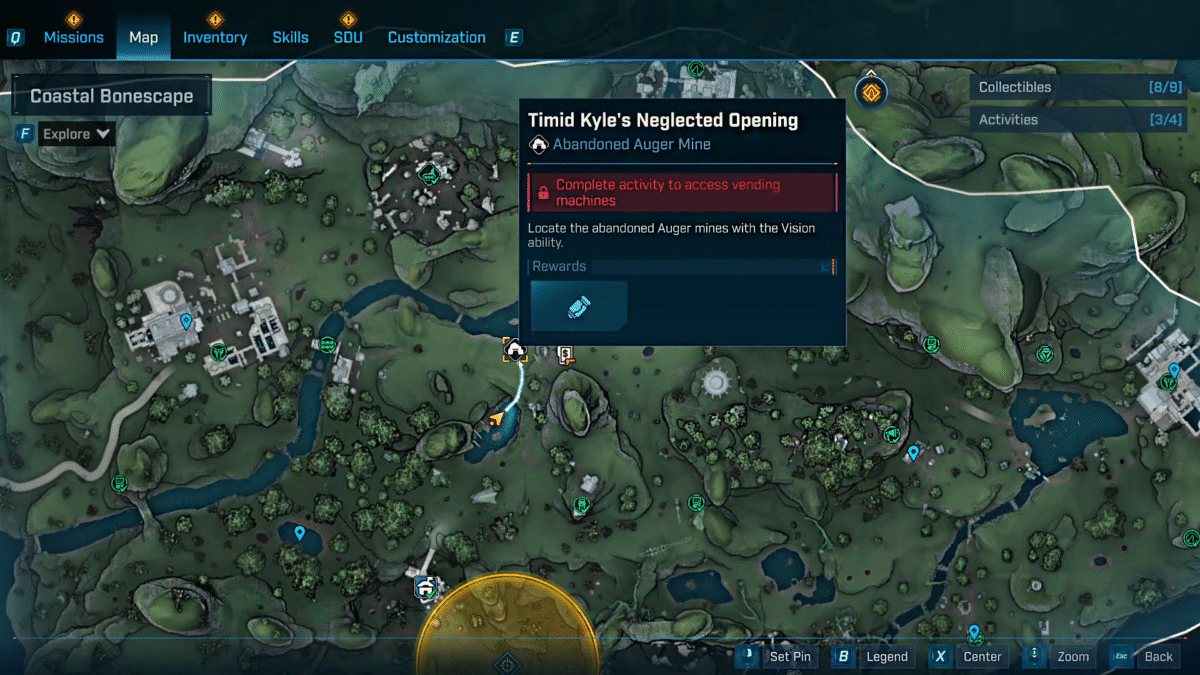
Once you clear the Shadow of the Mountain main mission, you will immediately unlock Auger Mines. The mine is located in the Coastal Bonescape, FadeFields, part of the map. The mission related to the mine will be titled “Timid Kyle’s Neglected Opening”. You will find the location south of the lake in the region; it’s impossible to miss. The giant cave opening with the bones at the entrance will be an easy indicator of the location.
- Once you jump down, move forward and then turn right, here you must use the Vision ability to get through the barrier. Don’t try to jump down the red hole at the entrance; the actual route to the mine is located on the right. That’s it, now you are inside the Auger Mines, it’s time to explore.
- Once you have taken a step inside the mines, just follow the rail tracks and they will lead you to an open area. After taking a few steps, you will get ambushed by the enemies, kill them, and head to the other side of the area with wooden barricades blocking the route.
- The route is linear. Use the ECHO-4 button Z (Keyboard), or Up on the D-Pad (Console) to scan the location and a yellow line that will direct you to the objective in the mines. On your way, you will encounter enemies, but you can easily get past them to get to the main boss. However, if you are interested in leveling up, then you can always turn around and learn the area before moving on.
Eventually, you will arrive in the area before the boss room. You will find a save point and a couple of vending machines to your left. Best time to refill all of your ammo, because you will be needing them for the fight that is about to happen next. Now head down the slope on the right of the vending machine to get to the boss floor.
How To Defeat Voraxis?
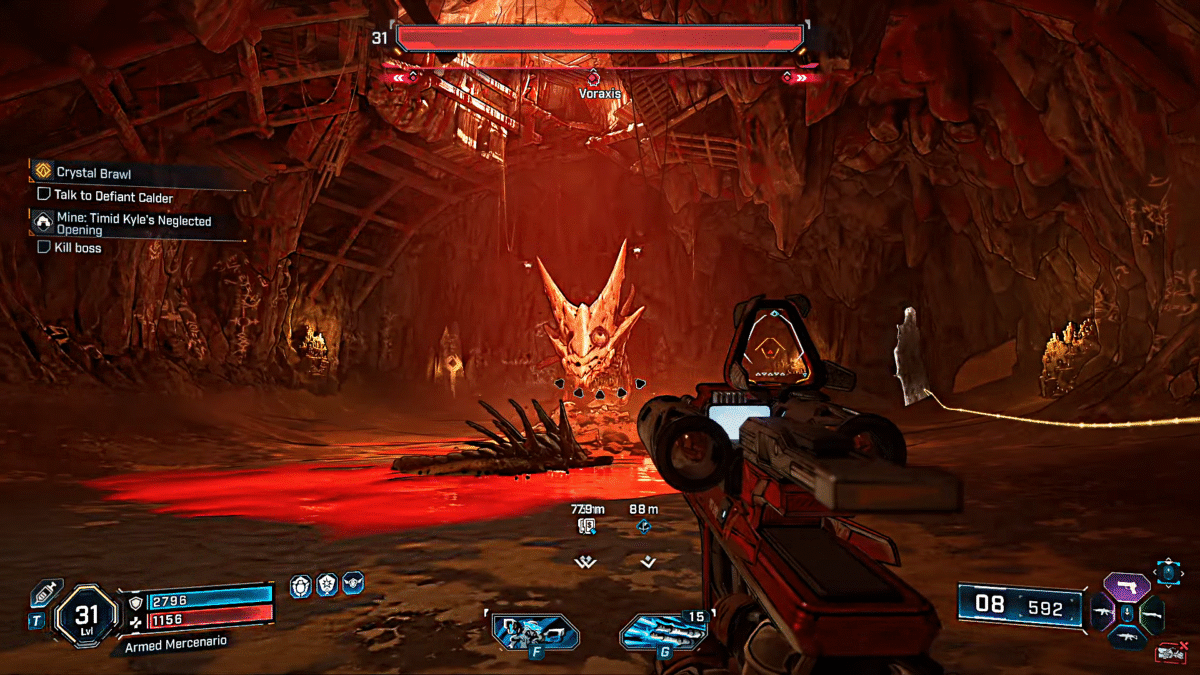
Now is the time to take on Voraxis boss; it won’t be alone in the room, you will also see a Wyrm Thresher and many small-time mobs.
Elemental Weapon Recommendation:
The boss comes with no armor or shield; it has only a single flesh bar. If you want to end the fight quickly without any hassle, then switch to any Incendiary Elemental Damage weapon. With proper Enhancement Mods to make the fight even quicker.
Fire Balls: Voraxis will release fireballs instantly out of its mouth. It won’t be directly aimed at you; instead, they will fall like crumbling rocks from the ceiling. But the dangerous part of the fireballs is that when they touch the ground, they cause an especially high damage explosion.
When you see the fireball attack coming, just move out of the way; don’t jump, or you will make things worse for yourself. Simply backtrack or move to the side to avoid the attack, and then you can continue shooting.
Charge Move #1: The next worst move is when the Voraxis will go into the ground and start chasing you from far away. Think of it as a shark attack in the water; again, the only option you have here is to dodge out of the way. You can easily spot the attack, as the boss will rush at your location with its mouth wide open, ready to devour you. Here, stop shooting and doge. If the boss gets too close, then his open mouth will not give you any way to get out of the hit spot.
Charge Move #2: This move follows the same pattern of rushing at you, but instead of opening its mouth, Voraxis will start spinning towards your location. This attack is a bit faster than the last one, but the tactic of dodging stays the same.
Tips for the Voraxis
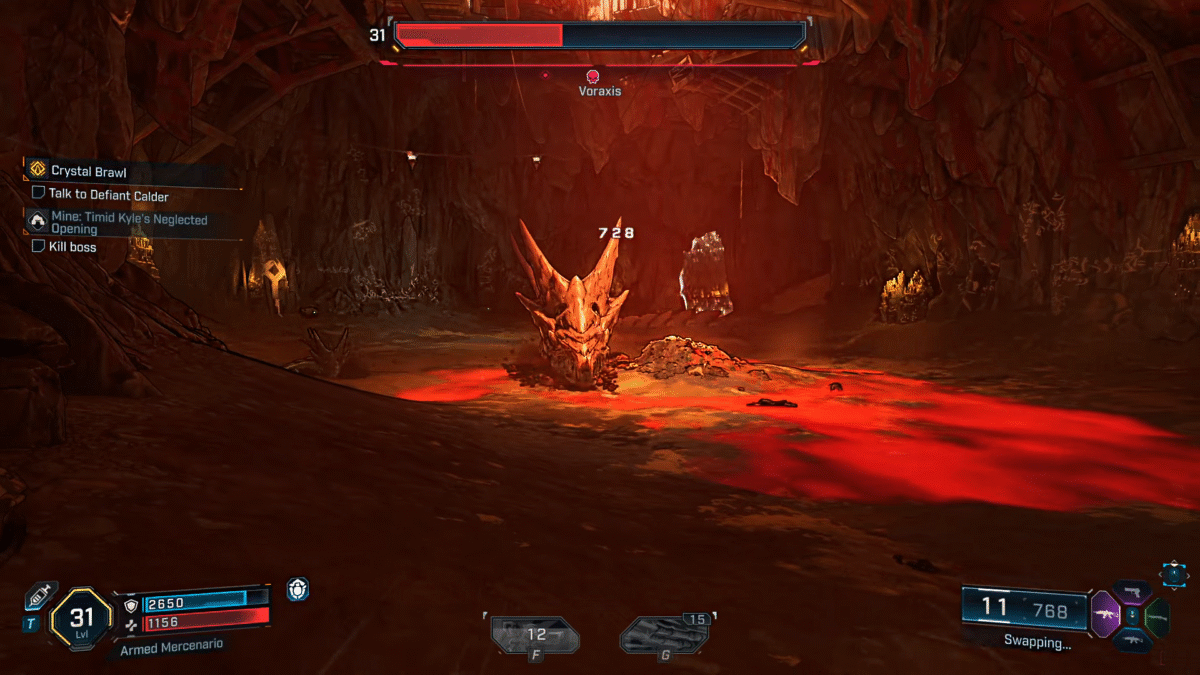
- Keep Shooting: Never stop shooting at the boss; in his rush or charge attacks, you can always land a critical by shooting at his head. Since it is a giant creature, you don’t have to pull out an accurate, focused gun to deal damage, unload all the bullets, and you will be fine.
- Emergency Revivers: Don’t kill the small enemies in the area; take out at least 60 to 70% of their health, let them roam around, and focus on the boss. If you manage to die in the area, you can kill the minions to get your life back. Focus on the boss, leave the minions for emergencies.
- Cheap Tactic: You can use a cheap tactic here by standing on the spot in the middle of the room. It’s the spawn spot for the boss; the ground is a bit higher than the rest. The best thing about the spot is that the boss can’t move through it. You can use the spot to circle around and keep shooting at the boss. Don’t feel too safe by staying in one spot; the fireball attacks can easily end your life.
Rewards: Here, the legendary items can include the Darkbeast/ Potato Thower IV/ and Buoy.
If you want to know more about weapon manufacturers and how they can help you set up the perfect, do check our guide on all details on weapon manufacturers and the key takeaways that will help you with your gameplay in Borderlands 4.