Close Menu

    Subscribe to Updates

    Get the latest creative news from FooBar about art, design and business.

    What's Hot
    Kingdom Come Deliverance 2: Source of Inspiration Quest Walkthrough
    May 17, 2025
    Kingdom Come Deliverance 2: Madman’s Longsword Location
    May 17, 2025
    Kingdom Come Deliverance 2: How To Let Burkhard Live (Portrait in Red Quest)
    May 17, 2025
    Facebook X (Twitter) Instagram
    TheGameSlayerTheGameSlayer
    • Home
    • News
    • Guides
    TheGameSlayerTheGameSlayer
    Home»Guides»God of War Ragnarok: How To Solve Giant Geyser Puzzle In Bay of Bounty
    Guides

    God of War Ragnarok: How To Solve Giant Geyser Puzzle In Bay of Bounty

    By Santosh KumarSeptember 19, 2024
    God of War Ragnarok - Bay of Bounty - Giant Geyser puzzle
    image via TheGameSlayer
    Share
    Facebook Twitter Reddit WhatsApp Pinterest LinkedIn

    When you reach the Bay of Bounty region, it’s hard to neglect the huge geyser in the middle of the lake. Even Atreus will point out the large geyser, which means there is something to it. There is a small island named Giant Geyser in the middle of the Bay of Bounty. The tiny island doesn’t give off the vibes of holding something special, but it holds the Key to a new area. To recover the key we must solve a puzzle and defeat a monster, all of that unfolds on that tiny island. Here is a guide to solving the Giant Geyser puzzle in Bay of Bounty.

    Guide To Solving Giant Geyser Puzzle In Bay of Bounty

    Here are the steps you need to follow to solve the Giant Geyeser Puzzle in Bay of Bounty:

    • There is a small island in the middle of the Bay of Bounty in Svartalfheim, our quest revolves around that location. Take your boat to the Boat Dock “Giant Geyser” on the small island. After a bit of exploration, you will receive a quest titled “The Weight of Chains“.
    • Get off the boat, and throw your Leviathan Axe at the Red Vessel blocking the debris on your path to get to the higher level.
    God of War Ragnarok - Bay of Bounty - Giant Geyser puzzle
    image via TheGameSlayer
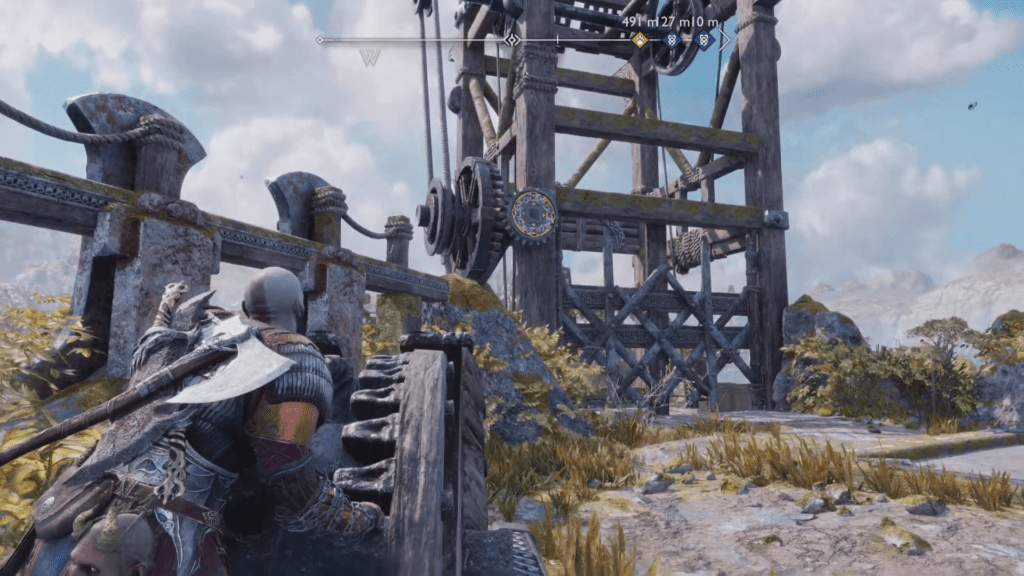
    • When you arrive at the higher ground, a giant elevator will be in front of you and right next to a small lake. On your left you can see a Crank, we need to control the wheel to mess with the elevator in front of us. There is also a yellow-colored Gear attached to the elevator.
    • Interact with the Crank to lower the floor inside the elevator, now use the Leviathan Axe with one hand and throw it at the Gear to freeze it.

    Note: Don’t let go of the wheel to throw the Leviathan Axe at the Gear. You can throw the axe at the Gear to freeze it while holding the Crank. If you let go of the Crank, the floor will come back on again in the elevator.

    • Once the Gear is frozen solid, take the path left of the elevator, climb down, and then shimmy along to the right. Eventually, you will be on the elevator floor. Now call your Leviathan Axe to move the floor.
    God of War Ragnarok - Bay of Bounty - Giant Geyser puzzle
    image via TheGameSlayer
    • When you are on the top, you can see a breakable spot on the ground, the game will pop up an Interact button to help you smash through the spot on the ground. But get ready for an enemy encounter.

    Once the monster is long gone, loot the chest, and you will get the “Key to the Watchtower“. That’s it, the puzzle in Giant Geyser Island is resolved, now with the key in your possession, you can now sail to the Watchtower.

    Looking for help on how to open the gate near Cliffside Ruins in Vanaheim? We have a detailed guide for you exactly on this. Also, make sure that you unlock the trials of Muspelheim at the earliest to get various loot and upgrade items in the Crucibles!

    God of War Ragnarök
    Santosh Kumar
    • LinkedIn

    Santosh Panda creates gaming guides at The Game Slayer. With 5 years of writing experience under his belt, his journey to game writing has helped many fight the big monsters, solve intricate puzzles, disarm the hidden traps, and finally open the treasure box.

    Related Posts

    Kingdom Come Deliverance 2: Source of Inspiration Quest Walkthrough

    May 17, 2025

    Kingdom Come Deliverance 2: Madman’s Longsword Location

    May 17, 2025

    Kingdom Come Deliverance 2: How To Let Burkhard Live (Portrait in Red Quest)

    May 17, 2025
    Don't Miss
    Guides
    Kingdom Come Deliverance 2: Source of Inspiration Quest Walkthrough
    May 17, 2025

    Source of Inspiration is a major questline for Kingdom Come: Deliverance 2’s DLC, Brushes with…

    Kingdom Come Deliverance 2: Madman’s Longsword Location

    May 17, 2025

    Kingdom Come Deliverance 2: How To Let Burkhard Live (Portrait in Red Quest)

    May 17, 2025

    How To Start A Pirate’s Fortune DLC in Star Wars Outlaws

    May 17, 2025

    The Precinct: All 20 Artifacts & Safebox Codes

    May 16, 2025

    Cash Cleaner Simulator: All 7 Hoaxy Art Bill Locations

    May 16, 2025

    Star Wars Outlaws DLC: Qorvino’s Map Location (A Pirate’s Plight Quest)

    May 16, 2025
    • Home
    • Privacy Policy
    • About Us
    • Contact Us
    © 2025 TheGameSlayer

    Type above and press Enter to search. Press Esc to cancel.

    We use cookies to ensure that we give you the best experience on our website. If you continue to use this site we will assume that you are happy with it.OkPrivacy policy