

")
Dragon Age: The Veilguard can keep you busy with the list of quests provided in the game. Not only do you have the main story quest to complete, but you also have several side quests and regional quests as well. Once you start unlocking companions, you can complete a couple of their questlines too. After unlocking Bellara, there are four companion quests you can pick up for her.
One of them is the Through the Shadows quest, which is a short side quest to complete. Within this quest, you have to solve the Barrier puzzle and energize the console. In this guide we will take you step by step through the Barrier Puzzle solution for Through the Shadows quest in Dragon Age: The Veilguard.
Energize the Console & Get Past The Barrier Puzzle Solution Dragon Age: The Veilguard
The Barrier Puzzle solution involves getting a Powercrystal and then pointing the five Beam Generators correctly to the right Energy nodes.
Once you reach the Lower Chamber section during the Through the Shadows quest, you will notice that most of the Beam Generators are pointing in different directions, and it is up to you to move them around and make sure that the beams they emit hit the nodes on the other side. But before that, we need to find the Powercrystal to get the first Beam Generator going.
Power Up the Beam Generator

Head west, take the stairs and turn right to find the Power Crystal beside a treasure chest. Head back down the stairs and place it on the pedestal. With that, the Beam Generator is active, and we can now get on to the task of aligning them towards the right Energy Nodes. You can begin with this one and turn it so that it is facing the energy node on the western section of the room, in between and above all the statues.
Find The Other Beam Generators
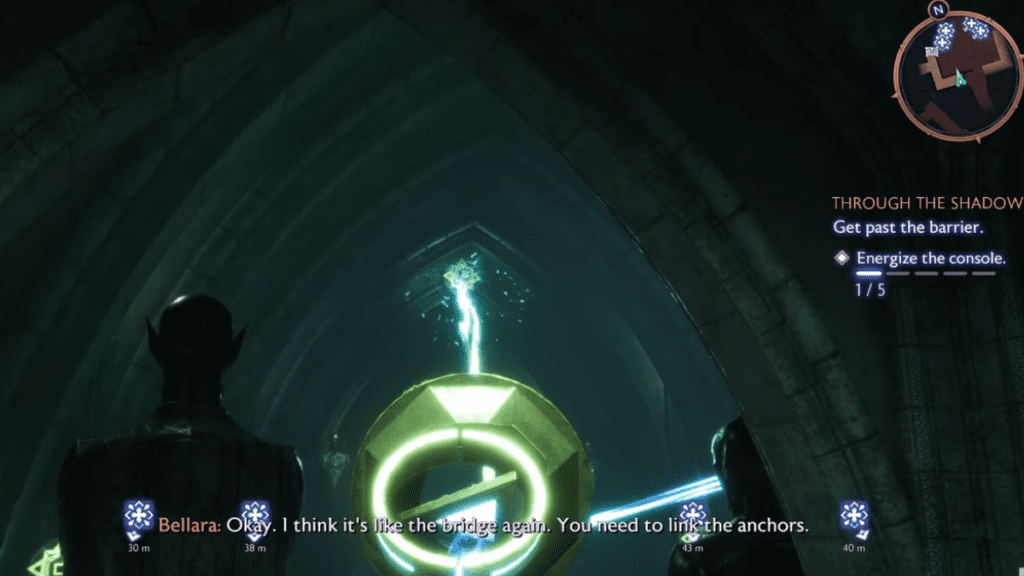
Second Beam Generator: From the first Beam Generator, take the stairs on your right, and then left to arrive at the Second Beam Generator. The beam generator here doesn’t require a Powercrystal, as the beam is already active. Interact with it and align the beam to the device straight ahead, near the barrier. The quest marker will read this Energy Node at (45m).
Third Beam Generator: The third beam generator can be found on the rafters above. From where you interacted with the second beam generator, take a left to the corner of the room and you will spot a ladder. Go up the ladder to find the third beam generator. Move the beam to link it to the node. This one will be second from left, and the quest marker will have the distance for this Energy Node at (38 m).
Fourth Beam Generator: Take a right from the Third Beam Generator, and jump across the broken platform on the right to get to the fourth generator. The matching Energy Node will be second from right, at a distance of (40 m).
Fifth Beam Generator: Repeat the steps above, then make your way down the stairs on the right. You will find the fifth beam generator that you need to align. This one aligns with the Energy Node at a distance of (30m).
With this done, return to the First Beam Generator, and make it point to the last Energy Node on its right, and your Barrier Puzzle is solved!
You can now progress through the rest of the quest with ease, but you might encounter some tougher enemies to beat along the way. If you are looking for a powerful build to help you take care of that, you can check out our guide on the best Ice Mage build to help you out.